Model Car Indicates Door Is Ajar

The amount of technology in modern cars is truly staggering. Heated seats, keyless entry, and arrays of helpful cameras are all becoming increasingly common in all but the cheapest of models. [mathisox] drives a slightly older Volkswagen van, which has been converted into a camper. Unfortunately, it lacks a proper door ajar display. Nevermind that, though – there’s a charming solution to this problem.

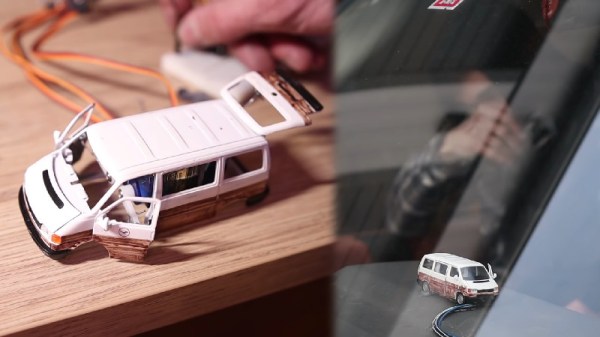
Rather than stick to the automotive standard of boring indicator lights and low-resolution LCD displays, [mathisox] took a more analogous approach. A small model car matching his van was sourced and quickly gutted for the project. It was then fitted with servos to open and close the doors and rear hatch. The servos are controlled by an Arduino Nano, which reads the door switches in the vehicle and actuates the appropriate parts on the model.

With the model car stuck prominently on the dashboard, it serves as a clear visual indicator of the current status of the vehicle’s doors. It’s far less intrusive than those old Chryslers which repeatedly insisted that a door is a jar.

[Thanks to Raffael for the tip!]

Continue reading “Model Car Indicates Door Is Ajar”

Door Springs And Neopixels Demonstrate Quantum Computing Principles

They may be out of style now, and something of a choking hazard for toddlers, but there’s no denying that spring doorstops make a great sound when they’re “plucked” by a foot as you walk by. Sure, maybe not on a 2:00 AM bathroom break when the rest of the house is sleeping, but certainly when used as sensors in this interactive light show.

The idea behind [Robin Baumgarten]’s “Quantum Garden” is clear from the first video below: engaging people through touch, sound, and light. Each of the 228 springs, surrounded by a Neopixel ring, is connected to one of the 12 inputs on an MPR121 capacitive touch sensor. The touch sensors and an accelerometer in the base detect which spring is sproinging and send that information to a pair of Teensies. A PC then runs the simulations that determine how the lights will react. The display is actually capable of some pretty complex responses, including full-on games. But the most interesting modes demonstrate principles of quantum computing, specifically stimulated Raman adiabatic passage (STIRAP), which describes transfers between quantum states. While the kids in the first video were a great stress test, the second video shows the display under less stimulation and gives a better idea of how it works.

We like this because it uses a simple mechanism of springs to demonstrate difficult quantum concepts in an engaging way. If you need more background on quantum computing, [Al Williams] has been covering the field for a while. Need the basics? Check out [Will Sweatman]’s primer.

Continue reading “Door Springs And Neopixels Demonstrate Quantum Computing Principles”

Hack My House: Garage Door Cryptography Meets Raspberry Pi

Today’s story is one of victory and defeat, of mystery and adventure… It’s time to automate the garage door. Connecting the garage door to the internet was a must on my list of smart home features. Our opener has internet connection capabilities built-in. As you might guess, I’m very skeptical of connecting a device to the internet when I have no control over the software running on it.

The garage door is controlled by a button hung on the garage wall. There is only a pair of wires, so a simple relay should be all that is needed to simulate the button press from a Raspberry Pi. I wired a relay module to a GPIO on the Pi mounted in the garage ceiling, and wrote a quick and dirty test program in Python. Sure enough, the little relay was clicking happily– but the garage door wasn’t budging. Time to troubleshoot. Does the push button still work? *raises the garage door* yep. How about the relay now? *click…click* nope.

You may have figured out by now, but this garage door opener isn’t just a simple momentary contact push button. Yes, that’s a microcontroller, in a garage door button. This sort of scenario calls for forensic equipment more capable than a simple multimeter, and so I turned to Amazon for a USB oscilloscope that could do some limited signal analysis. A device with Linux support was a must, and Pico Technology fit the bill nicely.

Searching for a Secret We Don’t Actually Need

My 2 channel Picotech oscilloscope, the 2204A, finally arrived, and it was time to see what sort of alien technology was in this garage door opener. There are two leads to the button, a ground and a five volt line. When the button is pressed, the microcontroller sends data back over that line by pulling the 5 V line to ground. If this isn’t an implementation of Dallas 1-wire, it’s a very similar concept.

Continue reading “Hack My House: Garage Door Cryptography Meets Raspberry Pi”

A Malicious WiFi Backdoor In A Keyboard’s Clothing

The USB Rubber Ducky burst onto the scene a few years ago, and invented a new attack vector – keystroke injection. The malicious USB device presents itself as a keyboard to the target system, blurting out keystrokes at up to 1000 words per minute. The device is typically used to open a phishing site or otherwise enter commands to exfiltrate data from the victim. Now things have stepped up a notch, with ESPloitV2 – a WiFi-enabled take on the same concept.

Running on the Cactus WHID platform, the device is so named for the ESP12 WiFi microcontroller it employs, along with an Atmega 32u4 for USB HID device emulation. By virtue of its wireless connection, no longer does the aspiring hacker have to rely on pre-cooked routines. Various exploits can be stored in the ESP12’s spacious 4 megabytes of flash, and there’s even the potential to live type your attack if you’re feeling bold.

It goes to show that the trust we implicitly place in foreign USB devices is potentially our future downfall. BadUSB is another great example, and the USB Wrapper is a great way to get a charge if you’re stuck using an untrusted port.


Front Door Camera Sends Automatic Alerts By Text

In these turbulent times, journalists fearmonger and honest citizens fear for the safety of their homes and themselves. Adding some security features can allay these fears, and with the advent of cheap technology, front door cameras have become popular. There’s a wide array of options on the market, but short of watching hours of logged video, they’re not always super useful. Adding some smarts can really help – as [Peter Quinn] has done.

For this project, [Peter] decided on a JeVois smart camera. More than just a USB webcam, it also packs a quad-core processor running machine vision algorithms. This allows object recognition and other tasks to be run on the camera itself. In this setup, [Peter] configured the JeVois camera to detect people. When a human is detected upon the doorstep, the camera sends a message to the connected Raspberry Pi over serial. The Raspberry Pi then captures a JPEG still from the camera over the USB connection, and, using Twilio, sends a notification to [Peter]’s phone.

It’s a well-integrated system that automatically photographs visitors to [Peter]’s home, requiring little to no interaction from the user. We’ve seen other integrated machine vision platforms, too – such as the OpenMV, which got its start as a Hackaday Prize entry, way back in 2017.

DIY Guided Telescope Mount Tracks Like A Barn Door

Astrophotography is an expensive hobby. When assembling even a basic setup consisting of a telescope, camera, guiding equipment and mount, you can easily end up with several thousand dollars worth of gear. To reduce the monetary sting a little, [td0g] has come up with an innovative homebrew mount and guiding solution that could be assembled by almost any dedicated amateur, with the parts cost estimated around $100. The accuracy required to obtain high-quality astrophotographs is quite demanding, so we’re impressed with what he’s been able to achieve on a limited budget.

The inspiration for this design comes from an incredibly simple star tracking device known as a barn-door tracker, or Haig mount. Invented by George Haig in the 1970’s, this mount is essentially nothing more than a hinge aligned with the Earth’s axis of rotation. A threaded rod or screw, turned at a constant rate, is used to slowly open the hinge so that a mounted camera tracks the apparent motion of the heavens. As a result, long exposures can show pinpoint images of stars and sharp details of deep-sky objects, instead of curved star trails. [td0g] adapted this technique to drive a more traditional telescope mount, using barn-door-like drive screws on both the right ascension and declination axes. A pair of NEMA 17 stepper motors drive 4-mm pitch Acme threaded rods through toothed pulleys 3D printed from PETG.

Speaking of 3D-printed parts, this build is a good example of judicious use of the technology: where metal parts are warranted, metal parts are used, and printed plastic is relegated to those places where it can adequately do the job. [td0g] has placed the STL files for the printed parts on Thingiverse in case you want to replicate the drive.

The non-linear relationship between the threaded rod rotation and right ascension drive rate usually limits the length of exposure you can reasonably achieve with a barn-door tracker. To adjust for this, [td0g] created a lookup table in firmware to compensate the drive and allow longer exposures. He mentions that the drive will operate for three hours before it hits the end of the screw’s travel and needs to be reset, but if he can manage three hour exposures, his skies must be much darker than ours!

Continue reading “DIY Guided Telescope Mount Tracks Like A Barn Door”

State Machine Controls Garage Door Over The Internet

Home automation has been a hot-button topic time and again since the dawn of the personal computer age. These days, thanks to modern communications technology, it’s possible to do some pretty cool stuff. [Brad Harbert] decided to automate his garage door, controlling it over the Internet.

The build relies on a Particle Photon to do the heavy lifting of connecting the door to the Internet. Particle offer a cloud service that makes setting up such a project easy for the first timer, and [Brad] was able to get things working quickly. A relay is used to activate the garage door remote button, as it was desired to leave the main control board of the garage door opener untouched. Reed switches are used to sense the position of the door, and [Brad] coded a state machine to ensure the door’s current state is always known.

It’s a simple project, but [Brad]’s use of state machine techniques and position sensing mean it’s less likely he’ll get home to find his garage open and his possessions missing. If you’re new to programming simple physical devices, you could take a page out of his logbook. Of course we’ve seen similar builds before, like this one from parts from the scrapbin.