THP Hacker Bio: Radu.motisan

thp-contestant-bio-radu-motisan

Here’s a great example of thinking big while keeping it simple. [Radu Motisan‘s] putting together a global radiation monitoring network as his entry in The Hackaday Prize.

The simplicity comes in the silver box pictured above. This houses the Geiger tube which measures radiation levels. The box does three things: hangs on a wall somewhere, plugs into Ethernet and power, and reports measurements so that the data can be combined with info from all other functioning units.

After seeing the idea we wanted to know more about [Radu]. His answers to our slate of queries are found below.

Continue reading “THP Hacker Bio: Radu.motisan”

Thumbnail that say The Hacklet

Hacklet #4 — PCB Tools And Wristwatches

4

The Hackaday Prize is heating up! When we set up the prize, we expected to see some incredible entries, and you guys haven’t let us down. Projects like SatNOGS, which aims to create a global network of satellite ground stations, or OpenMV, a low-cost Python powered vision module, are seriously blowing us away.

We’re starting to give away some prizes through community voting and there’s still plenty of time for you to enter. Check out The Hackaday Prize page for the full details.

Low Cost Printed Circuit Board Tools

Pick and Place

We’ve seen mills, lathes, CNC machines and 3D printers, but if there is any device that gets a hardware hacker’s attention, it’s a pick and place machine. In the PCB industry these machines pick up thousands of parts every hour, perfectly placing them on printed circuit boards. The downside is they’re incredibly expensive. The cheapest Chinese machines without vision start in the $4000 USD price range.

[Neil] aims to break down those price barriers with a $300 Pick and Place Machine that doubles as a 3D printer. He’s using delta 3D printer hardware to do it, and he’s throwing in everything! OpenCV based vision, multiple tool heads, reel and tray pick up, [Neil] has covered all the major points. He can’t do it alone though, so he’s looking for help. Check it out, and give him a hand (or a skull)!
pcbMill

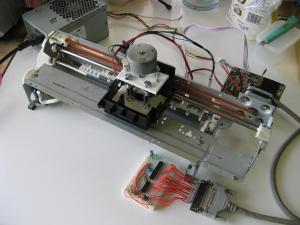
A low-cost pick and place machine will need printed circuit boards to work on. Not to worry, [shlonkin] has you covered with his PCB mill for under $10. Built from recycled printers, an Arduino, and host software written in processing, [shlonkin] has already posted impressive photos of boards his machine has milled. The main problem [shlonkin] has run into is longevity with plastic parts. In his most recent update, he’s looking for ideas. Can you help him?

Digital Watches

Anyone will tell you that digital watches are a pretty neat idea. With the era of smartwatches upon us, more than one hacker has delved into building their own timepiece. We’re happy to report that most of them even tell time.
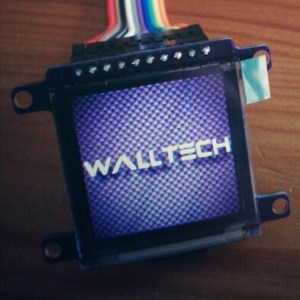
walltech[Walltech] has gone all out to create the ultimate watch. His OLED Smart Watch 6.0 is the culmination of years of work. The watch features a 1.5” OLED display, an SD card slot, and a vibrator motor. It has Bluetooth 4.0 to connect to the world, and an Atmel ATmega32u4 as its brain. A 500mAh battery will power the watch for 18-24 hours per charge.

[Walltech] plans to make it do everything from SMS and email notifications to music streaming. Don’t see a feature you want? Add it! Smart Watch 6.0 Is completely open source, so you can hop into the code and hack away!
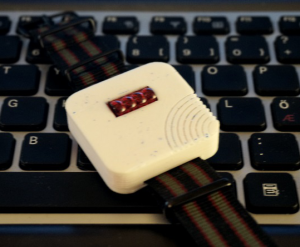
tilttouchtime2On the other side of the spectrum is [askoog89’s] Tilt Touch Time, which utilizes  those awesome bubble LED displays some of us remember from the 70’s. The retro look is only 3D printed skin deep though, as [askoog89] is using an ATtiny2313 processor. Atmel’s Qtouch is providing the capacitive touch sensing, while a tilt sensor helps Tilt Touch Time live up to its name. [Askoog89] has submitted his watch to The Hackaday Prize, so he’s trying to figure out a way to use the touch sensor to sync time with a PC. If that doesn’t work out, we bet those bubble LEDs would make great light sensors for some monitor-blink-sync action.

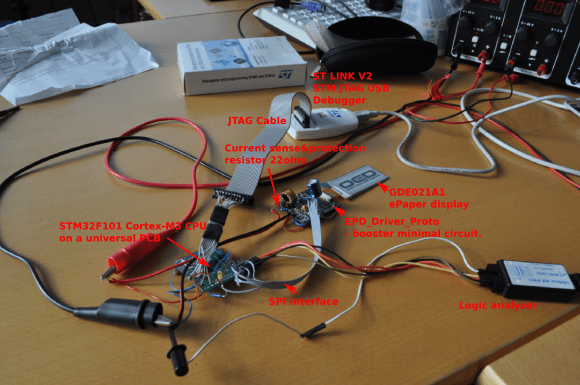
Fallout fans have seen plenty of PIP boys here on Hackaday, but have you seen [jara’s] PIP Watch? This Personal Information Panel is going big on size but low on power with a 3 inch e-ink display. [Jara] is using an STM32F101 ARM Cortex-M3 CPU, so he’s got plenty of processing power at his disposal. He’s connecting to the world through a Bluetooth serial link. All he needs is a Geiger counter, and he’s good to go!
pipWatch

That’s it for this week’s Hacklet, stay tuned for next week when we bring you more of what’s happening at Hackaday.io!

THP Entry: The Improved Open Source Tricorder

Since [Gene Roddenberry] traveled back in time from the 23rd century, the idea of a small, portable device has wound its way through the social consciousness, eventually turning into things like smartphones, PDAs, and all the other technological gadgetry of modern life. A few years ago, [Peter Jansen] started The Tricorder Project, the start of the ultimate expression of [Mr. Roddneberry]’s electronic swiss army knife. Now [Peter] is building a better, smaller version for The Hackaday Prize.

[Peter]’s first tricorders borrowed their design heavily from The Next Generation props with a fold-out section, two displays, and a bulky front packed to the gills with sensors and detectors. Accurate if you’re cosplaying, but not the most practical in terms of interface and human factors consideration. These constraints led [Peter] to completely redesign his tricorder, disregarding the painted wooden blocks found on Enterprise and putting all the electronics in a more usable form factor.

A muse of sorts was found in the Radiation Watch, a tiny, handheld Geiger counter meant as an add-on to smartphones. [Peter] envisions a small ~1.5″ OLED display on top, a capacitive sensing wheel in the middle, and a swipe bar at the bottom. Basically, it looks like a 1st gen iPod nano, but much, much more useful.

Plans for what to put in this improved tricorder include temperature, humidity, pressure, and gas sensors, a 3-axis magnetometer, x-ray and gamma ray detectors, a polarimeter, colorimeter, spectrometer, 9-axis IMU, a microphone, a lightning sensor, and WiFi courtesy of TI’s CC3000 module. Also included is something akin to a nuclear event detector; if it still exists, there has been no nuclear event.

It’s an astonishing array of technology packed into an extremely small enclosure – impressive for something that is essentially a homebrew device.Even if it doesn’t win the Hackaday Prize, it’s still an ambitious attempt at putting data collection and science in everyone’s pocket – just like in Star Trek.


SpaceWrencherThe project featured in this post is an entry in The Hackaday Prize. Build something awesome and win a trip to space or hundreds of other prizes.

The Two Component Random Number Generator

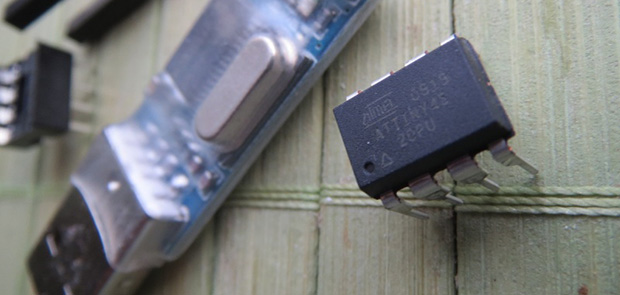
attiny10

[Karl] was in need of a hardware random number generator, but is needs had a few caveats: it needed to be cheap, and sufficiently random. Random number generation can get quite crazy with Geiger tubes, lava lamps, and radioactive decay, but a much smaller solution was found in an 8 pin AVR microcontroller.

The solution uses AVRentropy, a library that uses the watchdog timer’s jitter in AVR microcontrollers to provide cryptographically secure random numbers. Setting up the circuit was easy – an ATtiny45 microcontroller was connected to a cheap chinese USB to serial converter. Three wires, and the circuit is complete. The code was simple as well; it’s just a call to initialize the entropy and write the bits to the serial port.

There are a few drawbacks to this build. Because the entropy library must wait until enough entropy is gathered, it can only produce about two 32-bit numbers per second. That’s all [Karl] needed for his application, though, and with an enclosure made from a wine cork and marble, he has the prettiest and smallest random number generator around.

Get Tangled Up In EL Wire With Freaklabs

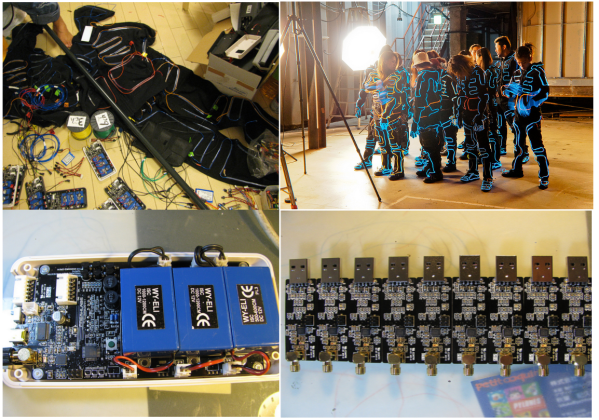
[Akiba] over at Freaklabs has been working with electroluminescent (EL) wire.  An entire dance company worth! We know [Akiba] from his post tsunami radiation monitoring work with the Tokyo Hackerspace. Today he’s one of the engineers for Wrecking Crew Orchestra, the dance company that put on the viral “Tron Dance” last year. Wrecking Crew Orchestra just recently put on a new production called Cosmic Beat. Cosmic Beat takes Wrecking Crew’s performances to a whole new level by adding stage projection mapping and powerful lasers, along with Iron Man repulsor style hand mounted LEDs.

As one might expect, the EL wire costumes are controlled by a computer, which keeps all the performers lighting effects in perfect time. That’s where [Akiba] came in. The modern theater is awash in a sea of RF noise. Kilowatts of lighting are controlled by triacs which throw out tremendous amounts of noise. Strobes and camera flashes, along with an entire audience carrying cell phones and WiFi devices only add to this. RF noise or not, the show must go on, and The EL costumes and LEDs have to work. To that end, [Akiba] He also created new transmitters for the group. He also changed  the lighting booth mounted transmitter antenna from an omnidirectional whip to a directional Yagi.

The EL wire itself turned out to be a bit of a problem. The wire wasn’t quite bright enough. Doubling up on the wire would be difficult, as the dancers are already wearing 25 meters of wire in addition to the control electronics. Sometimes best engineering practices have to give way to art, so [Akiba] had to overdrive the strings. This means that wires burn out often. The dance troupe has gotten very good at changing out strands of wire during and between shows. If you want a closer look, there are plenty of pictures available on [Akiba’s] flickr stream.

Continue reading “Get Tangled Up In EL Wire With Freaklabs”

A Low-Cost Modular High Altitude Balloon Tracker With Mesh Networked Sensors

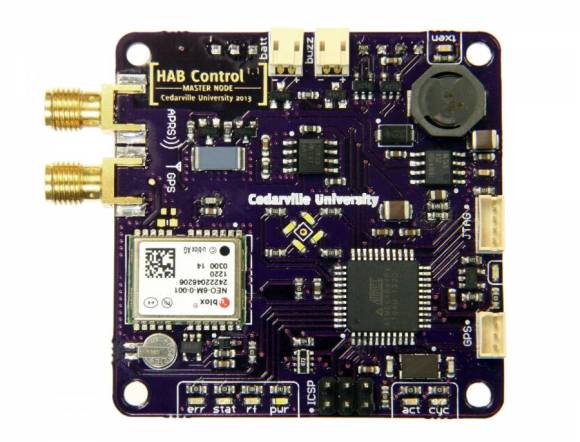
[Ethan] just tipped us about a project he and a few colleagues worked on last year for their senior design project. It’s a low-cost open hardware/software high altitude balloon tracker with sensors that form a mesh network with a master node. The latter (shown above) includes an ATmega644, an onboard GPS module (NEO-6M), a micro SD card slot, a 300mW APRS (144.39MHz) transmitter and finally headers to plug an XBee radio. This platform is therefore in charge of getting wireless data from the slave platforms, storing it in the uSD card while transmitting the balloon position via APRS along with other data. It’s interesting to note that to keep the design low-cost, they chose a relatively cheap analog radio module ($~40) and hacked together AFSK modulation of their output signal with hardware PWM outputs and a sine-wave lookup table.

The slave nodes are composed of ‘slave motherboards’ on which can be plugged several daughter-boards: geiger counters, atmospheric sensors, camera control/accelerometer boards. If you want to build your own system, be sure to check out this page which includes all the necessary instructions and resources.

Robotic Tentacles For A Disturbing Haunted House

testicles

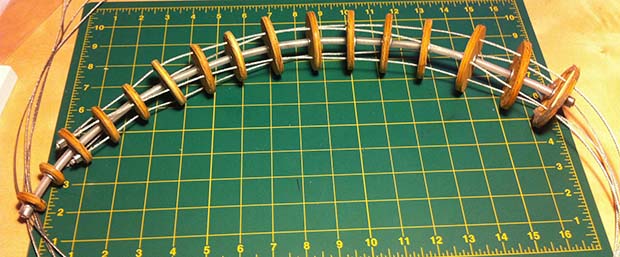
[ivorjawa] is putting on a haunted house this Halloween that we really don’t want to go to. His robot tentacle is already supremely creepy, and we’re assuming it will only be more frightening once it’s covered in fabric and foam rubber.

Each tentacle can move on two axes thanks to four steel cables running through this strange Geiger-esque contraption. In the base of the tentacle are two stepper-motor driven cylinders that take up slack on one cable and draw out another cable. Two of these control boxes, driven by a stepper motor and an Arduino motor shield, allow the tentacle to reach out and grab in any direction. You can check out the mechanics of the build on [ivorjava]’s flickr

On a semi-related note, even though we’re more than a month out from Halloween, we should have more Halloween builds in our tip line by now. If you’re working on one, don’t be afraid to send it in, even if you’re just showing off a work in progress.

Continue reading “Robotic Tentacles For A Disturbing Haunted House”