Digital Caliper Talks For Accessibility, With This App

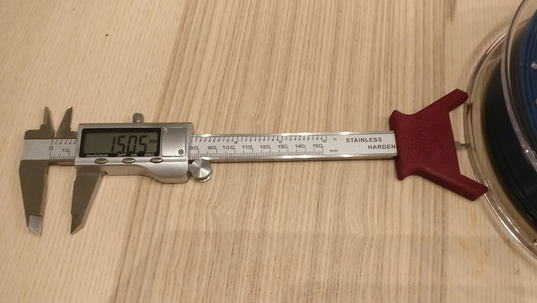
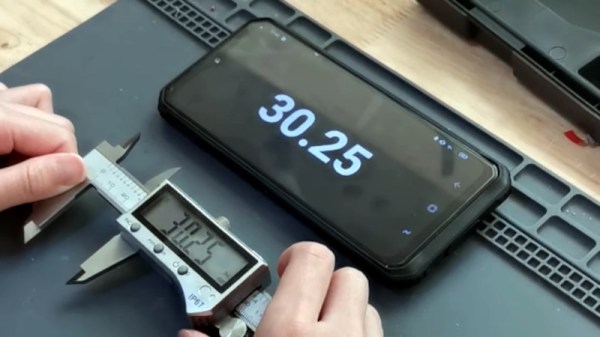
A good instrument stays with its owner for a lifetime, becoming part of their essential trusted toolkit to be consulted as a matter of habit. If you use a caliper to measure dimensions  you’ll know this, and a quick glance at its scale or digital display will be second nature. But if you aren’t fortunate enough to have the eyesight to see the caliper, then it’s off-limits, and that’s something [Naomi Wu] has addressed with her open-source accessible speaking caliper app. It’s an Android app that connects to digital calipers that contain Bluetooth connectivity, and as well as speaking aloud the caliper reading it also displays it in very large text on the device screen. As well as the source link from which you can build the app, it’s available for installation directly from the Google Play Store.

If you’re used to [Naomi] from her video tours of the electronics businesses in her native Shenzhen, her eye-catching wearable projects, or her exploits with an industrial CNC machine in her living room, you might be interested to know that aside from this app she’s been a long-time proponent of open-source in China. She was responsible among other projects for the Sino:bit educational computer board, which holds the distinction for her of having secured the first ever Chinese OSHWA certification.

You can see the caliper app in action below the break.

Continue reading “Digital Caliper Talks For Accessibility, With This App”

Vernier Calipers And Micrometer Screw Gauges, Measuring Without Compromise

I needed a temperature controller module recently, so off I went to Banggood to order one. As one does I found myself browsing, one thing led to another, and I bought a micrometer screw gauge. While micrometers are pretty expensive devices, reflecting their high precision engineering and construction, this micrometer cost me only about £8, or just under $10, definitely in the spirit of our long-running series of reviewing very cheap tools in search of a diamond in the rough. But perhaps more importantly, this is also the cue for an examination of high precision dimensional measurement. So I’ve assembled a collection of micrometers and vernier calipers of varying quality, and it’s time to dive in and measure some very small things.

Some of you will be metrology enthusiasts with an array of the finest devices available, but I am guessing that many of you will not. The ubiquitous precision measurement device in our community appears to be the digital caliper, a sliding clamp with an LCD display, an instrument that can be had in its most basic form for a very small outlay indeed. For the purposes of this piece though we’re not looking at digital devices but their analogue precursors. If you want a feel for metrology and you’d like some of those heritage tools that parents pass onto their kids then it’s time to learn something about the vernier caliper and the micrometer. Continue reading “Vernier Calipers And Micrometer Screw Gauges, Measuring Without Compromise”

Making A Custom Caliper Case For Pros

Every professional has a tool set that they would never part with. Likewise, for experimental physicists, mechanical engineers, and tinkerers, a caliper set can be unspeakably crucial to their work. That’s why [Andrew Birkel] designed his own personal caliper set to fit just the right proportions for his tools while adding a bit of personal flair.

The project uses CNC routing, Solidworks for CAD, laser engraving, and woodworking to design the custom case for a set of calipers, metric and English screw pitch gauges, fillet gauges, and radius gauges. It’s a practical build for a custom tool set that doesn’t already come with a case of its own. The particular tools were chosen for their use in particle physics experiments: for determining threads, inside and outside curvatures, and measuring length, depth, and width.

The box was made from an oversized piece of wood with holes drilled into the sides. After compiling the G-code program for the build, the two halves of the box was was milled from the wood. The first run on the CNC mill with aluminum managed to cause the grain to split, so [Birkel] went with a CNC router instead. Once the piece was sanded, hidden barrel hinges were added. The finished box was wiped down with mineral oil and teak oil to bring out the natural coloration of the wood as well as to add protection (lacquer mixed into the oil). To finish it off, the case was customized with a laser engraved name and email for identification.

It’s a pretty slick build to say the least, and certainly one that can be customized to the dimensions of whatever tools your personal caliper set happens to have.

Hacked Calipers Make Automated Measurements A Breeze

Now, digital calipers with wired interfaces to capture the current reading are nothing new. But the good ones are expensive, and really, where’s the fun in plugging a $75 cable into a computer? So when [Max Holliday] was asked to trick out some calipers for automating data capture, he had to get creative.

[Max] found that cheap Harbor Freight digital calipers have the telltale door that covers a serial connector, making them a perfect target for hacking. A little Internet sleuthing revealed the pinout for the connector as well as some details on the serial protocol used by most digital calipers: 24-bit packets is six four-bit words. [Max] used his SAM32, a neat open-source board with both a SAMD51 and an ESP32 that can run CircuitPython. An inverting buffer interfaces the serial lines to the board, which is just the right size to mount on the back of the caliper head. It’s hard to tell how [Max] is triggering readings, but the SAM32 is mounted as a USB device and sends keystrokes directly to a spreadsheet – yes, with the ESP32 it could have been wireless, but his client specifically requested a wired setup. Taking multiple readings is easy now that the user never has to swap calipers for a pen.

Cheap calipers like these are pretty hackable – you can add Bluetooth, turn them into DROs for a milling machine, or even make them talk.

3D Printed Radius Gauge, Just Add Calipers (And A Wee Bit Of Math)

With 3D printed arms of fixed measurements, the depth reading from a set of digital calipers can be used to calculate the radius of a curve.

Specialized tools that focus on one particular job tend to get distilled right down to their essentials and turned in an economical consumer product. One example of this is radius (or fillet) gauges: a set of curves in different sizes that one uses to measure the radius of a curved surface by trial and error. To some, such products represent solved problems. Others see opportunities for a fresh perspective, like this caliper-enabled 3D printed radius gauge by [Arne Bergkvist].

[Arne]’s 3D printed radius gauge is a simple object; a rigid attachment for a nearly ubiquitous model of digital caliper. By placing the curve to be measured between the two arms of the device and using the depth measurement of the caliper to measure distance to the curve’s surface, a simple calculation (helpfully printed on the unit itself) of radius = distance * 2.414 reveals the radius of the curve. However, this shortened calculation makes a number of assumptions and only works for [Arne]’s specific design.

Another version by [Fredrik Welander] represents a more flexible take on the same concept. His RadGauge design (pictured up top) has a few different sizes to accommodate a variety of objects, and his Git repository provides a calculator tool as well as some tips on fine tuning to allow for variations in the dimensions of the printed attachment.

3D printing has opened a lot of doors, and items like this show that the plastic doodads created aren’t always the end result in and of themselves; sometimes they are the glue that enables a tool or part to work in a different way. To help get the most out of 3D printing, check out the in-depth coverage of how to best tap 3D printed parts for fasteners, and [Roger Cheng]’s guide to using 3D printed brackets and aluminum extrusion to make just about anything.

Replace Your Calipers With A Microscope And Image Analysis

Getting a good measurement is a matter of using the right tool for the job. A tape measure and a caliper are both useful tools, but they’re hardly interchangeable for every task. Some jobs call for a hands-off, indirect way to measure small distances, which is where this image analysis measuring technique can come in handy.

Although it appears [Saulius Lukse] purpose-built this rig, which consists of a microscopic lens on a digital camera mounted to the Z-axis of a small CNC machine, we suspect that anything capable of accurately and smoothly transitioning a camera vertically could be used. The idea is simple: the height of the camera over the object to be measured is increased in fine increments, with an image acquired in OpenCV at each stop. A Laplace transformation is performed to assess the sharpness of each image, which when plotted against the frame number shows peaks where the image is most in focus. If you know the distance the lens traveled between peaks, you can estimate the height of the object. [Salius] measured a coin using this technique and it was spot on compared to a caliper. We could see this method being useful for getting an accurate vertical profile of a more complex object.

From home-brew lidar to detecting lightning in video, [Saulius] has an interesting skill set at the intersection of optics and electronics. We’re looking forward to what he comes up with next.

Precision DIY Calipers? That’s A Moiré!

Moiré patterns are a thing of art, physics, and now tool design! [Julldozer] from Mojoptix creatively uses a moiré pattern to achieve a 0.05 mm precision goal for his custom designed 3D printed calipers. His calipers are designed to validate a 3D print against the original 3D model. When choosing which calipers are best for a job, he points out two critical features to measure them up against, accuracy and precision which he explains the definition of in his informative video. The accuracy and precision values he sets as constraints for his own design are 0.5 mm and 0.05 mm respectively.

By experimenting with different parameters of a moiré pattern: the scale of one pattern in relation to the other, the distance of the black lines on both images, and the thickness of black and white lines. [Julldozer] discovers that the latter is the best way to amplify and translate a small linear movement to a standout visual for measurement. Using a Python script which he makes available, he generates images for the moiré pattern by increasing line thickness ratios 50:50 to 95:5, black to white creating triangular moiré fringes that point to 1/100th of a millimeter. The centimeter and millimeter measurements are indicated by a traditional ruler layout.

Looking for more tool hacks and builds? Check out how to prolong the battery life of a pair of digital calipers and how to build a tiny hot wire foam cutter.


Continue reading “Precision DIY Calipers? That’s A Moiré!”