How To Get Into Lost Wax Casting (with A Dash Of 3D Printing)

I’ve always thought that there are three things you can do with metal: cut it, bend it, and join it. Sure, I knew you could melt it, but that was always something that happened in big foundries- you design something and ship it off to be cast in some large angular building churning out smoke. After all, melting most metals is hard. Silver melts at 1,763 °F. Copper at 1,983 °F. Not only do you need to create an environment that can hit those temperatures, but you need to build it from materials that can withstand them.

Turns out, melting metal is not so bad. Surprisingly, I’ve found that the hardest part of the process for an engineer like myself at least, is creating the pattern to be replicated in metal. That part is pure art, but thankfully I learned that we can use technology to cheat a bit.

When I decided to take up casting earlier this year, I knew pretty much nothing about it. Before we dive into the details here, let’s go through a quick rundown to save you the first day I spent researching the process. At it’s core, here are the steps involved in lost wax, or investment, casting:

  1. Make a pattern: a wax or plastic replica of the part you’d like to create in metal
  2. Make a mold: pour plaster around the pattern, then burn out the wax to leave a hollow cavity
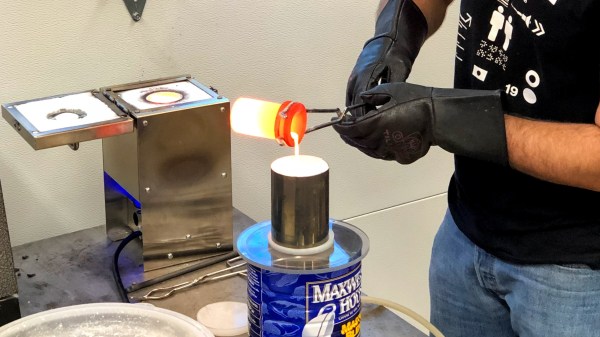
  3. Pour the metal: melt some metal and pour it into the cavity

I had been kicking around the idea of trying this since last fall, but didn’t really know where to begin. There seemed to be a lot of equipment involved, and I’m no sculptor, so I knew that making patterns would be a challenge. I had heard that you could 3D-print wax patterns instead of carving them by hand, but the best machine for the job is an SLA printer which is prohibitively expensive, or so I thought. Continue reading “How To Get Into Lost Wax Casting (with A Dash Of 3D Printing)”

The BYTE Is The Grand Prize Winner Of The 2020 Hackaday Prize

The BYTE, an open-source mouth-actuated input device for people with physical challenges has just been named the Grand Prize winner of the 2020 Hackaday Prize. The award for claiming the top place and title of “Best All Around” in this global engineering initiative is $50,000. Five other top winners and four honorable mentions were also named during this evening’s Hackaday Prize Ceremony, held during the Hackaday Remoticon virtual conference.

This year’s Hackaday Prize focused on challenges put forth by four non-profit partners who have first hand knowledge of the problems that need solving as they work to accomplish their missions. These organizations are Conservation X Labs, United Cerebral Palsy Los Angeles, CalEarth, and Field Ready. Join us below for more on the grand prize winner and to see the Best in Category and Honorable Mention winners from each non-profit challenge, as well as the Best Wildcard project.

Over $200,000 in cash prizes have been distributed as part of this year’s initiative where hundreds of hardware hackers, makers, and artists competed to build a better future. Continue reading “The BYTE Is The Grand Prize Winner Of The 2020 Hackaday Prize”

3D Printing Interactive Maps For The Visually Impaired

Most maps and educational materials for teaching geography are highly visual in nature. For those with a visual impairment, it can make learning more difficult when suitable resources are not available. After visiting a boarding school in Moscow, [Sergei] set out to build an interactive map to teach students geography regardless of their vision status.

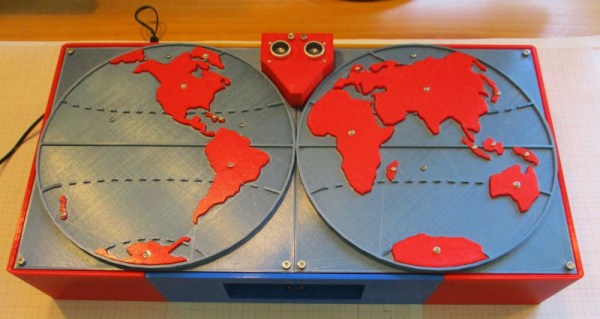
After seeing the poorly embossed paper maps used in the school, [Sergei] decided there had to be a better way. The solution was 3D printing, which makes producing a map with physical contours easy. Initial attempts involved printing street maps and world maps with raised features, such that students could feel the lines rather than seeing them.

Taking things a step further, [Sergei] went all out, producing an interactive educational device. The build consists of a world map, and contains audio files with information about countries, cultures, and more. When the ultrasonic sensor detects a user in range, it invites them to press or pull out the removable continents on the map. The device can sense touch, thanks to a pair of MPR121 capacitive touch sensor boards which are used to trigger the audio files.

It’s a great way to use the sense of touch to teach where the sense of vision may be lacking. Previous Prize entries have worked in this field too, like this haptic glove to help vision-impaired users interpret camera data. We can’t wait to see what comes next as technology improves!

Macros For A Mazda

[Arik Yavilevich] recently upgraded his second-gen Mazda’s control console, going from the stock busy box to an Android head unit that does it all on a nice big touchscreen. It can also take input from the handy steering wheel buttons — these are a great option for keeping your eyes on the road and occasionally startling your unsuspecting passengers when the radio station suddenly changes.

The only problem is that [Arik]’s stock steering wheel doesn’t have any media-specific buttons on it. After a short trip to the junkyard, [Arik] had a fancier wheel to go along with the new head unit.

[Arik] doesn’t use cruise control, and those particular buttons can’t be hooked up with reprogramming the car’s computer, so he made them into macro buttons that control the head unit over Bluetooth, using an STM32 black pill board stashed in the glove box.

[Arik] found out that the cruise control buttons don’t ride the CAN bus — they use a resistor ladder/voltage divider and go directly into the ECU. After that it was mostly a matter of finding the right wires and then cutting and re-routing them to make the buttons work on the ACC setting as well as ON. A brief demo video is idling after the break.

Have an old smart phone lying around? Of course you do. Why not make your own head unit?

Continue reading “Macros For A Mazda”

PPE Testing Hack Chat

Join us on Wednesday, June 17 at noon Pacific for the PPE Testing Hack Chat with Hiram Gay and Lex Kravitz!

When the COVID-19 pandemic unfolded in early 2020, the hacker community responded in the most natural way possible: by making stuff. Isolation and idleness lead to a creative surge as hackers got to work on not only long-deferred fun projects but also potential solutions to problems raised by an overloaded medical system and choked supply chains. And so workshops and hackerspaces the world over churned out everything from novel ventilators to social-distancing aids.

But perhaps the greatest amount of creative energy was set loose on the problem of personal protective equipment, or PPE. This was due in no small part to predictions of a severe shortage of the masks, gowns, and gloves that front-line medical workers would need to keep them safe while caring for pandemic victims, but perhaps also because, at least compared to the complexity of something like a ventilator, building a mask seems easy. And indeed it is as long as you leave unanswered the crucial question: does the thing work?

Answering that question is not as easy as it seems, though. It’s not enough to assume that putting some filtration between the user and the world will work; you’ve got to actually make measurements. Hiram Gay and Lex Kravitz, colleagues at the Washington University School of Medicine in St. Louis, actually crunched the numbers on the full-face snorkel mask they modified for use as a face shield for medical PPE, and they have a lot of insights to share about proper testing of such devices. They’ll join the Hack Chat this week to discuss their findings, offer advice to builders, and reveal how they came up with their idea for a different way to build and test PPE.

join-hack-chatOur Hack Chats are live community events in the Hackaday.io Hack Chat group messaging. This week we’ll be sitting down on Wednesday, June 17 at 12:00 PM Pacific time. If time zones have you down, we have a handy time zone converter.

Click that speech bubble to the right, and you’ll be taken directly to the Hack Chat group on Hackaday.io. You don’t have to wait until Wednesday; join whenever you want and you can see what the community is talking about.
Continue reading “PPE Testing Hack Chat”

Dyeing Fabric To Create Sensors

Fabrics with electrical functionality have been around for several years, but are very rarely used in mainstream clothing. The fabrics are very expensive and the supply can be unreliable. Frustrated by this, [Counter Chemists] developed PolySense, simple open-source technology to make any fibrous material into a conductive material that can be used to sense pressure, stretch, capacitive touch, humidity, or temperature.

PolySense uses a process called in-situ polymerization, effectively dying a fabric to become piezoelectric. This is done by first soaking the fabric in a mixture of water and the organic compound pyrrole, and then adding iron chloride to trigger a reaction. The polymerization process that takes place wraps the individual fibers of the fabric in conductive polymer chains.

Instead of just uniformly coating a fabric, various masking techniques can be used to dye patterns onto the fabric for various use cases. The video after the break shows a range of these applications, including using polymerized gloves and leggings for motion capture, a zipper that acts like a linear potentiometer, and touch-sensitive fabric. The project page lists sources for the required chemicals in both Europe and the US, and we look forward to seeing what other applications the community can come up with.

The project is very well documented, with a number of scientific papers covering all the details. [Counter Chemists] will also be presenting PolySense at the 2020 Virtual Maker Faire.

This technology can also be used to make a fabric piano with a lot less effort. On the more mechanical side of things, you can also 3D print on pre-stretched fabric to make it pop into 3D shapes.

Continue reading “Dyeing Fabric To Create Sensors”

Art of 3D printer in the middle of printing a Hackaday Jolly Wrencher logo

3D Printering: Will A Resin Printer Retire Your Filament-based One?

Adding a resin printer to one’s workbench has never looked so attractive, nor been so affordable. Complex shapes with effortlessly great detail and surface finish? Yes, please! Well, photos make the results look effortless, anyway. Since filament-based printers using fused deposition modeling (FDM) get solid “could be better” ratings when it comes to surface finish and small detail resolution, will a trusty FDM printer end up retired if one buys a resin printer?

The short answer is this: for users who already use FDM, a resin-based stereolithography (SLA) printer is not likely to take over. What is more likely to happen is that the filament printer continues to do the same jobs it is good at, while the resin printer opens some wonderful new doors. This is partly because those great SLA prints will come at a cost that may not always justify the extra work.

Let’s go through what makes SLA good, what it needs in return, and how it does and doesn’t fit in with FDM.

Continue reading “3D Printering: Will A Resin Printer Retire Your Filament-based One?”