See Through Everything With A Home Made X-ray

[Grenadier] built his very own x-ray machine. He’s no stranger to high voltage – we’ve seen his Jacob’s Ladders and Marx generators. Surely he can handle himself with high voltage and dangerous equipment. With this portable x-ray machine, [Grenadier] has begun overloading Geiger counters. We’re just happy he knows what he’s doing.

The key component of [Grenadier]’s portable x-ray machine is the Coolidge tube, a simple vacuum tube that produces x-rays with the help of 75 kilovolts of power. The finished build looks awesome. Two meters display the milliamps and kilovolts going to the x-ray tube, and a trio of nixies display the exposure time.

Even though [Grenadier] doesn’t have x-ray film, he can see through things with a scintillation screen that fluoresces when exposed to ionizing radiation. There are two pictures of the x-ray in action – one showing the inside of a pen and the guts of a hard drive (as shown in the title pic).

The output of the x-ray was measured with a Geiger counter. [Grenadier] was able to get a hit every second or so at 50 yards, and very loud white noise at 1 foot. Check out the video of [Grenadier]’s Buildlounge laser cutter contest submission after the break.

via Buildlounge

Continue reading “See Through Everything With A Home Made X-ray”

22 Miles Straight Up In 90 Seconds

Those little Estes rockets you built as a kid just got blown out of the water.

In response to the Carmack Prize to launch an amateur rocket above 100,000 feet, [Derek Deville] and the rest of the Qu8k team launched a 320 pound, 14-foot-long rocket through 99% of the Earth’s atmosphere.

Unlike our little toy rockets from years ago, more than half of the entire rocket is fuel. This isn’t a plastic or salami-powered hybrid rocket, though. It’s an entirely solid fuel rocket. The fuel grain is specially made for this rocket in a cylinder-with-fins shape that ensures an even burn through the entire flight.

The payload included 2 timers, an accelerometer, a cosmic ray detector (check out the Geiger tube) and 4 GPS units required of the Carmack Prize. The video from the on-board camera shows a fantastic flight, only partially obscured by the plastic aeroshroud that melted when the rocket was going about Mach 3.

Videos of the entire flight and a ‘highlights’ reel are available after the break.

Continue reading “22 Miles Straight Up In 90 Seconds”

Radiation Sensor Shield For The Arduino

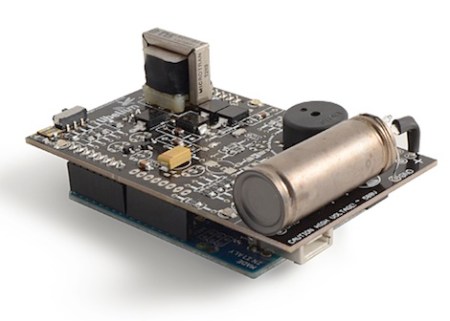
The [Libelium] team wanted to help people in Japan measure radiation in their surroundings following the nuclear accident in Fukushima. Because of the affordability and seeming ubiquity of the Arduino platform, they have been hard at work this last month trying to get their Geiger counter sensor board for an Arduino out the door. We think they’ve done a remarkable job.

A Geiger tube is a remarkably simple device, but getting the part can be a fairly expensive proposition. Thankfully, [Libelium] has already tested and verified a number of tubes from different manufacturers – very helpful if you don’t want to be tied down to one specific component.

This looks like this is just the sort of thing that the folks at [Seed Studio] wanted for an open hardware radiation detector, and [Libelium] has already shipped their first batch to the Tokyo Hackerspace. It’s good to know that help is going where it’s needed.

Video of the sensor board being tested after the break.

Continue reading “Radiation Sensor Shield For The Arduino”

Seeed Looks For Help Developing An Open Source Radiation Detector

Seeed Studios, makers of the Seeeduino and fabricators of small-run PCB orders have put out a call to help develop an open source radiation detector. Will it be of any help to people in the area of Japan that is at risk? We really can’t say. But if you can lend some expertise with this, it can’t hurt. We’ve already seen a simple dosimeter project but this one sounds like it’s more on the level of a DIY Geiger counter. We know it’s possible, but the hacked together unit we saw back in 2007 had very little documentation and used parts that may be hard to come by.

The specific information needed is what type of sensor to use, what supporting circuits should be included, and what method is best to calibrate each unit. There’s a discussion going in the comment thread of that post which should be interesting to read even if you think you don’t have anything to add.

[Thanks Michael]

HOPE Badge Proximity Sensor

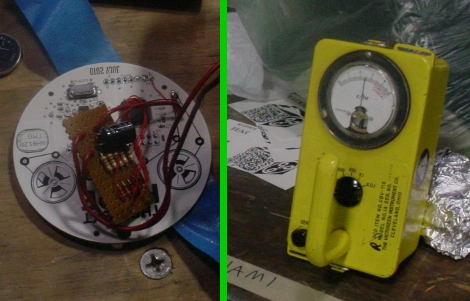
The HOPE conference was last weekend and [Nathan] spent some time with fellow members of Makers Local 256 developing this badge proximity sensor. They took one of the HOPE badges, which have a radio on board for the tracking network, and wrote code for its MSP430 to detect other badges nearby. It uses a Geiger counter they brought with them as an enclosure, re-purposing the analog gauge to reflect the level of active radio signals in the area. You’ll find their demo clip embedded after the break.

If you managed to get your hands on one of these badges, don’t be shy about sharing your hacks. We want to see them.

Continue reading “HOPE Badge Proximity Sensor”

Arduino Muon Detector

100_0627

[Sebastian Tomczak] was borrowing a homeade muon detector from his friend, and managed to hook it up to his computer through an Arduino. The detector itself uses 3 fluorescent tubes to detect radiation. Three separate tubes are used in order to filter out terrestrial radiation; cosmic radiation will fall in-line with the tubes and pass through at least two of them, whereas terrestrial radiation will only hit one. There is some basic circuitry to amplify the signal and then perform the OR operation.

[Tomczak]  used an Arduino to take the raw data and feed it into his computer. He then used Max/MSP to analyze the data and filter out background noise, leaving only the cosmic ray data. He didn’t mention what he was going to use the data for, though. Maybe he’ll hook it up to a synthesizer.

Related: Digital Geiger counter

[via @littlebirdceo]

OmniDirectional Research Platform

[youtube=http://www.youtube.com/watch?v=-bcoAqKhdL4]

[Shachar Geiger] sent in an interesting project that he worked on with [Tal Avivi] at the Bezalel academy in Jerusalem. They were given the task of designing a 1-person electrical urban vehicle. They took some cues from MIT’s Transology and designed the OmniDirectional Research Platform (ODRi). There’s a video of it embedded above. It can be driven using three different input styles: an accelerometer joystick, a traditional gamepad, or body mass shift. They started with an Arduino, but needed more I/O and had to switch to a Wiring board (this was before the Mega). The platform is built mostly from scrap. The accelerometers were placed in an old Microsoft Sidwinder. The standard joystick is from a Sega Mega Drive. The weight sensors are out of cheap home scales.