3D Imaging For Natural Science — For Free

It isn’t that unusual for a home lab to have a microscope, but wouldn’t it be cool to have a CT scanner? Well, you probably won’t anytime soon, but if you are interested in scans of vertebrates — you know, animals with backbones — a group of museums have you covered.

The oVert project is scanning 20,000 specimens and making the results available to everyone. This should be a boon to educators and might even be useful for 3D printing animal forms. Check out the video about the project below.

Continue reading “3D Imaging For Natural Science — For Free”

CT Scan Reveals Secrets Of Heinz’s New Ketchup Cap

Ketchup bottles are a solved technology, right? Wrong! As it turns out, there is still great development being done in this space. Industrial imaging company Lumafield reveals to us the secrets of Heinz’s new ketchup bottle cap, reportedly the result of a seven-figure investment and eight long years of toil.

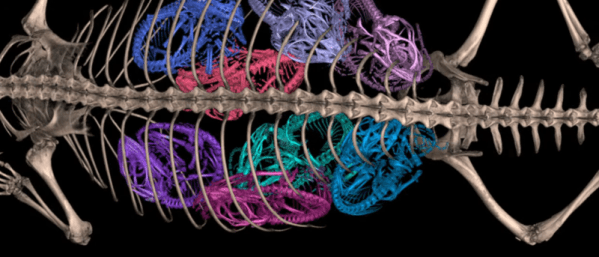
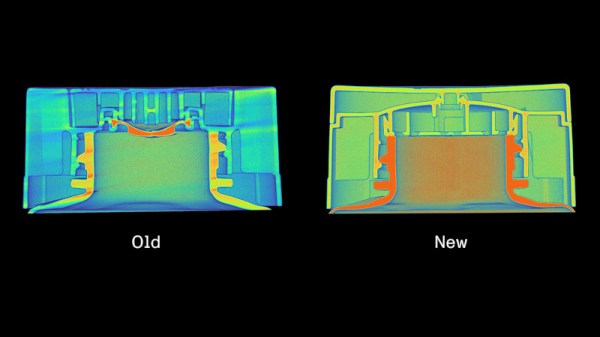
Lumafield put the cap in a CT scanner to generate three-dimensional cutaway images of the cap’s internal structure.  The trick of the new cap is in how it compares to the old design. The previous solution used multiple different plastics: likely polypropylene for the cap itself, along with a small amount of silicone for the flexible nozzle valve. The point of the valve was to regulate the flow of ketchup so the bottle squirts out the red goop in a predictable fashion.

The problem with the old cap is that the use of two materials both makes it more expensive to manufacture, and practically impossible to recycle. A solution was needed, and Heinz finally found one.

The new cap, which is fully recyclable, takes advantage of the properties of ketchup itself. As the ketchup is squeezed out of the bottle, it passes through a complicated array of channels before it gets to the nozzle outlet itself. As a sheer-thinning fluid, ketchup gets less viscous the more its under strain. Thus, as it deforms around the complex channels, it becomes less viscous and more likely to flow out at a predictable rate, rather than in thick gloopy spurts.

It’s amazing to think how much work goes into a simple ketchup cap, and yet, millions of dollars are on the line in projects like these. This isn’t the first time Lumafield used their tech to peel back the layers on a piece of common tech — last year we covered their investigation into what’s inside various AirPod knockoffs.

This Week In Security: Forksquatting, RustDesk, And M&Ms

Github is struggling to keep up with a malware campaign that’s a new twist on typosquatting. The play is straightforward: Clone popular repositories, add malware, and advertise the forks as the original. Some developers mistake the forks for the real projects, and unintentionally run the malware. The obvious naming choice is forksquatting, but the researchers at apiiro went with the safer name of “Repo Confusion”.

The campaign is automated, and GitHub is aware of it, with the vast majority of these malicious repositories getting removed right away. For whatever reason, the GitHub algorithm isn’t catching all of the new repos. The current campaign appears to publishing millions of forks, using code from over 100,000 legitimate projects. It’s beginning to seem that the squatting family of attacks are here to stay.

RustDesk and Odd Certificates

The RustDesk remote access software is interesting, as it’s open source, allows self-hosting, and written in Rust. I’ve had exploring RustDesk as a todo item for a long time, but a bit of concerning drama has just finished playing out. A user pointed out back in November that a test root certificate was installed as part of the RustDesk installation. That root cert is self-signed with SHA1. There is also concern that the RustDesk binaries are signed with a different certificate.

There have been new events since then. First, there was a Hacker News thread about the issue earlier this month. The next day, CVE-2024-25140 was registered with NIST, ranking an insane CVE 9.8 CVSS. Let’s cut through some FUD and talk about what’s really going on.

Continue reading “This Week In Security: Forksquatting, RustDesk, And M&Ms”

A Deep Dive Into A 1980s Radio Shack Computer Trainer

For those of us who remember Radio Shack as more than just an overpriced cell phone store, a lot of the nostalgia for the retailer boils down to the brands on offer. Remember the Realistic line of hi-fi and stereo gear? How about Archer brand tools and parts? Patrolman scanners, Micronta test instruments, and don’t forget those amazing Optimus speakers — all had a place in our development as electronics nerds.

But perhaps the most formative brand under the Radio Shack umbrella was Science Fair, with a line of kits and projects that were STEM before STEM was a thing. One product that came along a little too late for our development was the Science Fair Microcomputer Trainer, and judging by [Michael Wessel]’s deep dive into the kit, we really missed the boat. The trainer was similar to the earlier “100-in-1”-style breadboarding kits, with components laid out on a colorful cardboard surface and spring terminals connected to their leads, making it easy to build circuits using jumper wires. The star of the show in the microcomputer trainer was a Texas Instruments TMS1100, which was a pretty advanced chip with a 4-bit CPU with its own ROM and RAM as well as a bunch of IO lines. The trainer also sported a peppy little 400-kHz crystal oscillator clock, a bunch of LEDs, a seven-segment display, a speaker, and a rudimentary keyboard.

The first video below is a general introduction to the trainer and a look at some basic (not BASIC) programs. [Michael] also pulls out the oscilloscope to make some rough measurements of the speed of the TMS1100, which turns out to be doing only about 400 instructions per second. That’s not much, but in the second video we see that it was enough for him to nerd-snipe his collaborator [Jason] into coding up an 80-nibble Tower of Hanoi solver. It’s a little awkward to use, as the program runs in spurts between which the user needs to check memory locations to see which disc to move to which peg, but it works.

It looks like people are rediscovering the Microcomputer Trainer all of a sudden. It might be a good time to pick one up.

Continue reading “A Deep Dive Into A 1980s Radio Shack Computer Trainer”

Memory Box Shows Photos Based On Fingerprint

With his young son’s birthday coming up in a few weeks, [Mike Buss] wanted to build him something fun that the boy could hold on to all his life. After doing some sketching, [Mike] arrived at the idea to make a memory box uses a fingerprint scanner to show different pictures based on the fingerprint.

[Mike] started by rendering the box in Blender and then cutting a sizable hole in the lid for the E-ink screen. That’s around the time the first problem came up — there were weird vertical lines in the display. Sure enough, that screen was broken. Then he added the SD card reader, but the SD card wouldn’t work, and was heating up besides. Finally, the fingerprint scanner was causing issues, but it turned out that the power supply was at fault.

After all of that, [Mike] switched from an ESP32 to a Raspi Zero W to simplify the whole process of finding a photo tagged with the person’s fingerprint. [Mike] added a Python script that listens for new memories over Wi-Fi. A memory in this case consists of a picture, a description, a list of people tagged in the picture, and some additional metadata.

One important lesson [Mike] learned was that of balancing planning vs. just taking action. If he had taken the time to consider the complexity of the tagged-photo retrieval system, he would have arrived at an SBC solution much sooner. Be sure to check out the build video after the break.

You can have all sorts of fun with fingerprint scanners, like this one that opens a secret bookcase door.

Continue reading “Memory Box Shows Photos Based On Fingerprint”

Friendly Flexible Circuits: The Cables

Flexible cables and flex PCBs are wonderful. You could choose to carefully make a cable bundle out of ten wires and try to squish them to have a thin footprint – or you could put an FFC connector onto your board and save yourself a world of trouble. If you want to have a lot of components within a cramped non-flat area, you could carefully design a multitude of stuff FR4 boards and connect them together – or you could make an FPC.

Flexible cables in particular can be pretty wonderful for all sorts of moving parts. They transfer power and data to the scanner head in your flat-bed scanner, for instance.  But they’re in fixed parts too.  If you have a laptop or a widescreen TV, chances are, there’s an flexible cable connecting the motherboard with one or multiple daughterboards – or even a custom-made flexible PCB. Remember all the cool keypad and phones we used to have, the ones that would have the keyboard fold out or slide out, or even folding Nokia phones that had two screens and did cool things with those? All thanks to flexible circuits! Let’s learn a little more about what we’re working with here.

FFC and FPC, how are these two different? FFC (Flexible Flat Cable) is a pre-made cable. You’ve typically seen them as white plastic cables with blue pieces on both ends, they’re found in a large number of devices that you could disassemble, and many things use them, like the Raspberry Pi Camera. They are pretty simple to produce – all in all, they’re just flat straight conductors packaged nicely into a very thin cable, and that’s why you can buy them pre-made in tons of different pin pitches and sizes. If you need one board to interface with another board, putting an FFC connector on your board is a pretty good idea.

Continue reading “Friendly Flexible Circuits: The Cables”

A white male in a green shirt sitting next to a tall rectangular robot made of green and black components with an aluminum frame. In front of him are a variety of components from several windshield wiper motor assemblies. Casings, gearboxes, and the like are strewn across the wooden table.

A Wiper Motor 101

Need a powerful electric motor on the cheap? [Daniel Simu] and his friend [Werner] show us the ins and outs of using windshield wiper motors.

Through many examples and disassembled components, the duo walk us through some of the potential uses of wiper motors to power a project. Some of the nuggets we get are the linear relationship of torque to current (10-15A max) and speed to voltage (12-15V DC) on these units, and some of the ways the wiring in these motors is a little different than a simple two wire DC motor.

They also discuss some of their favorite ways to control the motors ranging from a light switch to an Arduino. They even mention how to turn one into a big servo thanks to a project on Hackaday.io and a few modifications of their own. [Simu] also discusses some of the drawbacks of wiper motors, the most evident being that these motors use nylon gears which are prone to stripping or failing in other ways when subjected to high torque conditions for too long.

If you recognize [Simu], it may be from his robotic acrobat built with wiper motors. Want to see some more wiper motor hacks? How about a 3D scanner or making sure your wipers always keep the beat?

Continue reading “A Wiper Motor 101”