Unique LED Display Inspired By Fighter Jet Dashboard

Last year, [Mangy_Dog] was asked by a few friends to consult on a project they were working on. The goal was to build an authentic replica of an F-18 cockpit, apparently for the purposes of creating a film. The project never materialized, but it did inspire him to take a hard look at the 1970s era alphanumeric displays utilized in the real aircraft. One thing lead to another, and he ended up using his own take on the idea to build his own “starburst” digit display.

As [Mangy_Dog] explains, while the faces of these original displays might have been quite small, there was a lot going on behind the scenes. Due to the technical limitations of the time, each alphanumeric character was made up of an array of incandescent light bulbs and fiber optic cables. This worked well enough, but was bulky and complex to manufacture.

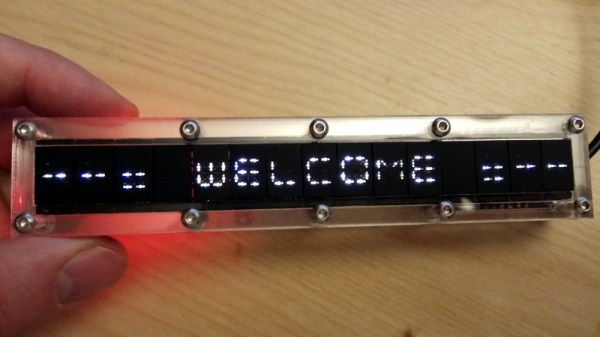
Today, we can do better, even on the hobbyist level. As it turns out, 0402 LEDs are just about the right size to recreate the segments of the original starburst displays. So [Mangy_Dog] came up with a simple PCB design to not only align the LEDs properly, but drive them with a 74HC595 shift register and an array of MOSFETs. While assembly wasn’t without its challenges, he made good use of his custom built reflow oven to get all the diminutive components in place.

He went through a few different ideas for the diffuser, but eventually settled on black plastic with tiny holes drilled through courtesy of his laser cutter. Behind each set of three holes is a small pocket that got filled from both sides with transparent UV resin, which was then sanded down after curing. The end result isn’t perfect as you can still tell the center dot is brighter than its peers, but the overall effect is still very nice and definitely has a sort of faux-retro appeal.

The military naturally has access to some incredible technology, though they have a tendency to hold onto it for decades. That an individual with a meager budget and homemade tools can improve upon a piece of hardware installed in a $60+ million airplane is a testament to just how fast things are moving.

Continue reading “Unique LED Display Inspired By Fighter Jet Dashboard”

Student Rover Explores The Backyard In Tribute

Three students were a little sad when NASA’s Opportunity rover went silent after 15 years on the Martian surface. So they decided to build their own rover inspired by Opportunity to roam their backyards using an off-the-shelf robot chassis, a Raspberry Pi, and the usual list of parts like motors, H-bridges, and batteries.

Like the real rover, the vehicle uses a rocker-bogie system, although it is a little less complex than the version NASA sent blasting off towards the Red Planet. The plucky vehicle comes complete with miniature solar panels to recharge its onboard battery, courtesy of some dollar-store garden lights. A pair of videos after the break show how the rover is controlled, as well as the view sent back from its onboard camera.

The rover ran a simulated Mars mission as part of a school project where it had to find an object and transmit an image of it back to home base, and by the looks of it, is was a rousing success. But the young explorers aren’t resting on their laurels, and are already working on a second version of their exploration vehicle that can operate in inclement weather and includes some new tools such as a robotic arm and infrared illumination for low-light imaging.

We’ve seen plenty of Mars rover clones in the past, but there’s always room for more. Of course, if you’re looking for something a bit easier to start with, you can always go the LEGO route.

Continue reading “Student Rover Explores The Backyard In Tribute”

Cool Off With A Piezo And A Glass Of Water

Some cool-mist humidifiers work by flinging water at a vaporizer, but our favorite kind uses a piezoelectric transducer. These work by using high-frequency sound waves to pound the surface of the water with mechanical energy. That energy introduces standing waves that force the water to break apart into a fine mist on the surface of the piezo disk.

The driving circuit for this DIY mist maker uses a 555 to generate 113 KHz, a trimmer potentiometer to fine-tune it, and a MOSFET to amplify the signal. You don’t need much more than that and a handful of passives to recreate this cool junk box experiment, but the spec of the piezo disk is quite important. The circuit is designed for atomizing transducers, which have a resonant frequency of 113 KHz — much higher than your average junk box piezo. Check out the demo and build video after the break.

Atomizing transducers can do way more than than moisten the air for our comfort. They’re not picky about where the water comes from, so if you have enough of them, you can dry a load of laundry in a few minutes.

Continue reading “Cool Off With A Piezo And A Glass Of Water”

Get Creative With This ESP8266 Photography Light

In today’s fast-paced world of social media, if you want your photos to grab attention, you’ve got to have an edge. Whether it’s a deft touch in Photoshop or an amazing lens, it’s important to stand apart. Another great way is to experiment with lighting and color. To do just that, [Andrei] built a pocket RGB photo light for the home studio.

[Andrei]’s cat models for the camera.
This is a project that any experienced maker should be able to whip up in a weekend. Not that there’s anything wrong with that, of course. The basic enclosure is 3D printed and readily reproducible on any FDM printer. Lighting is provided via the venerable WS2812B LED, 68 of them, to be exact. Finally there’s an ESP8266 running WLED, a webserver for the platform that’s dedicated to controlling LED strips. This makes it easy to tweak the LEDs with your smartphone.

Thanks to the WS2812Bs LEDs, a full range of RGB colors are available for [Andrei] to experiment with. He’s done a great job showing off the light with a few choice cat pics that serve to show its capabilities. While we wouldn’t expect to use such a device for clean white lighting in a serious photographic sense, it’s a perfect tool for art photography.

We’ve covered other studio light builds before, too. Video after the break.

Continue reading “Get Creative With This ESP8266 Photography Light”

Four Years Later, Off-Grid Office Shed Still Rocks

About four years ago, [Russell Graves] created what was, to him, the ultimate work-from-home environment: an off-grid office shed. The shed might look a bit small, but it’s a considerably larger workspace than most people in an office are granted. Four years later, in the middle of a global pandemic, working from home has become much more common and [Russel] shares some thoughts on working from homeĀ and specifically reflects on how his off-grid, solar powered shed office (or “shoffice” as he likes to call it) has worked out. In short, after four years, it rocks hard and is everything he wanted and more.

Its well-insulated plywood walls let him mount monitor arms and just about anything else anywhere he wants, and the solar power system allows him to work all day (and into the night if he wants, which he doesn’t) except for a few spells in the winter where sunlight is just too scarce and a generator picks up the slack. Most importantly, it provides a solid work-life separation — something [Russell] is convinced is critical to basic wellness as a human being.

That’s not to say an off-grid solar shed is the perfect solution for everyone. Not everyone can work from home, but for those who can and who identify with at least some of the motivations [Russell] expressed when we covered how he originally created his office shed, he encourages giving it some serious thought.

The only thing he doesn’t categorically recommend is the off-grid, solar powered part. To be clear, [Russell] is perfectly happy with his setup and even delights in being off-grid, but admits that unless one has a particular interest in solar power, it makes more sense to simply plug a shed office into the grid like any other structure. Solar power might seem like a magic bullet, but four years of experience has taught him that it really does require a lot of work and maintenance. Determined to go solar? Maybe give the solar intensity sensor a look, and find out just how well your location is suited to solar before taking the plunge.

Free Refrigeration In Hot Climates

Passive homes are a fairly recent trend in home building, but promise a future with minimal energy inputs in our day-to-day. One of the challenges in this year’s Hackaday Prize is to envision ways to add utility to earthen homes often used in refugee camps where there is a housing crisis. Adding passive utilities to these adobe buildings would be a fantastic upgrade, so [Cat] decided to tackle the challenge by creating a refrigerator that needs no electricity.

The the plan for the device works by using evaporative cooling to reduce the temperature in a small box which can be used for food storage. Of course, using evaporative cooling means that you need ready access to water and it likely won’t work in a humid or cool environment, but systems like these have been in use for centuries in plenty of places around the world. [Cat]’s plan is a little more involved than traditional methods of evaporative cooling though, and makes use of a specially painted chimney which provides the airflow when heated by sunlight.

The project is still in its infancy but it would be interesting to see a proof-of-concept built in a real-life passive house in an arid environment. Unfortunately, those of us in humid (or tropical) environments will have to look elsewhere for energy-efficient cooling solutions.

Microsoft Flight Simulator’s Data Insanity Spawns Enormous Buildings And Anomalies From OpenStreetMap

The OpenStreetMap project is an excellent example of how powerful crowdsourced data can be, but that’s not to say the system is perfect. Invalid data, added intentionally or otherwise, can sometimes slip through the cracks and lead to some interesting problems. A fact that developers Asobo Studio are becoming keenly aware of as players explore their recently released Microsoft Flight Simulator 2020.

Like a Wiki, users can update OpenStreetMap and about a year ago, user nathanwright120 marked a 2 story building near Melbourne, Australia as having an incredible 212 floors (we think it’s this commit). The rest of his edits seem legitimate enough, so it’s a safe bet that it was simply a typo made in haste. The sort of thing that could happen to anyone. Not long after, thanks to the beauty of open source, another user picked up on the error and got it fixed up.

But not before some script written by Asobo Studio went through sucked up the OpenStreetMap data for Australia and implemented it into their virtual recreation of the planet. The result is that the hotly anticipated flight simulator now features a majestic structure in the Melbourne skyline that rises far above…everything.

The whole thing is great fun, and honestly, players probably wouldn’t even mind if it got left in as a Easter egg. It’s certainly providing them with some free publicity; in the video below you can see a player by the name of Conor O’Kane land his aircraft on the dizzying edifice, a feat which has earned him nearly 100,000 views in just a few days.

But it does have us thinking about filtering crowdsourced data. If you ask random people to, say, identify flying saucers in NASA footage, how do you filter that? You probably don’t want to take one person’s input as authoritative. What about 10 people? Or a hundred?

Continue reading “Microsoft Flight Simulator’s Data Insanity Spawns Enormous Buildings And Anomalies From OpenStreetMap”