Low-cost Autonomous Rover Will Drive Your Projects

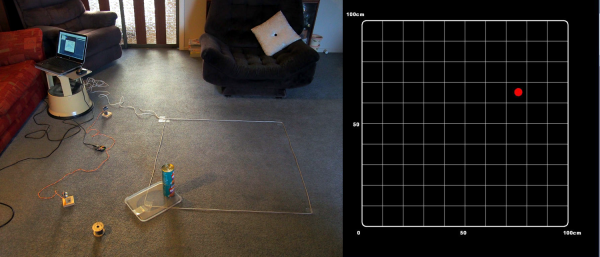
[Miguel] wanted to get more hands-on experience with Python, so he created a small robotic platform as a testbed. But as such things sometimes go, it turns out the robot he created is a worthy enough project in its own right. With a low total cost and highly flexible design, it might be exactly what you’re looking for. Who knows, it might even bootstrap that rover project that’s been wandering around the back of your mind.

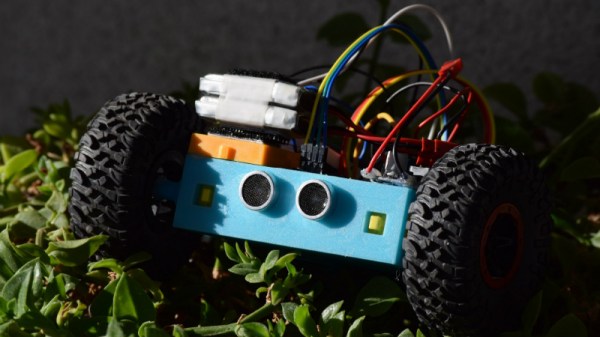
The robot makes use of an exceptionally simple 3D printed frame. No complicated suspension to worry about, no fasteners to hold together multiple printed parts. It’s just a single printed “L” shaped piece that has mounts for the motors and front sensor board. As designed it simply drags its tail around, which should work fine on smooth surfaces, but might need a bit of tweaking if you plan on taking your new robotic friend on an outdoor adventure.

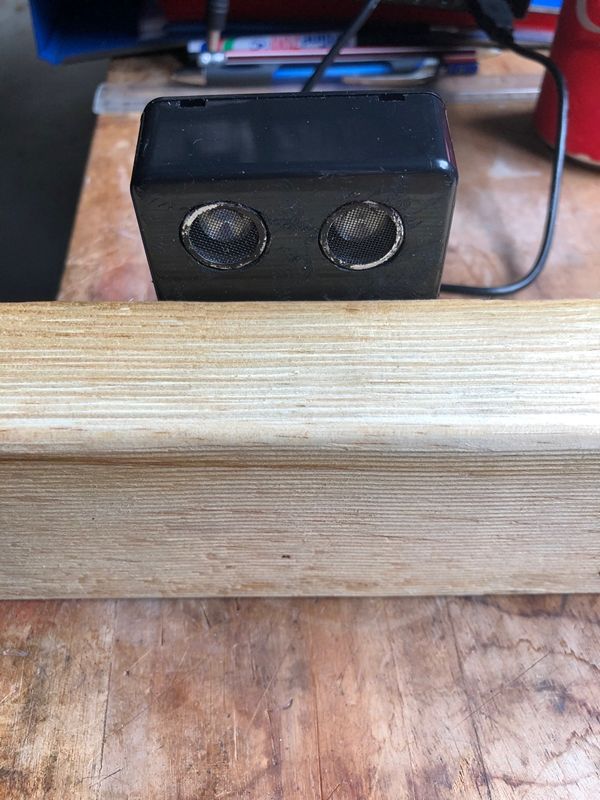
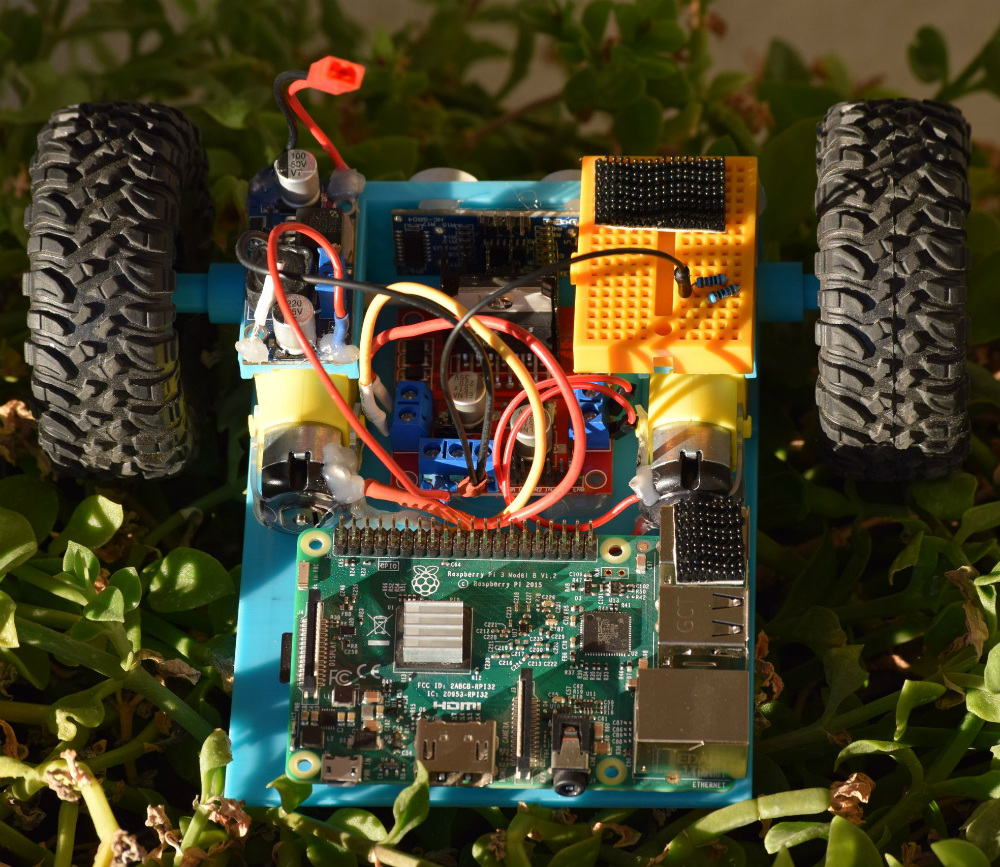
There’s a big open area on the “tail” to mount a Raspberry Pi, but you could really put whatever board or microcontroller you wish here. In the nose is an HC-SR04 ultrasonic sensor, which [Miguel] is using to perform obstacle avoidance in his Python code. A dual H-Bridge motor driver controls the pair of gear motors in the front to provide propulsion and steering, and a buck converter steps down the 7.4V from the 2S LiPo battery to power the electronics. He’s even included a mini breadboard so you can add circuits or sensors as experimental payloads.

If you’re looking for a slightly more advanced 3D printed robotics platform, we’ve seen our fair share. From the nearly fully printed Watney to a tank that looks like it’s ready for front-line combat.

Dual Sensor Echo Locator Gives High Accuracy At Low Cost

Infrared certainly has its uses, but if you’re trying to locate objects, ultrasonic detection is far superior. It’s contact-less, undetectable to the human ear, and it isn’t affected by smoke, dust, ambient light, or Silly String.

If you have one ultrasonic sensor and a microcontroller, you can detect plenty of useful things, like the water level in a rain barrel or the distance traveled by a tablet along a rail. If you have two sensors and a microcontroller, you can pinpoint any object within a defined range using trigonometry.

[lingib]’s dual sensor echo locator uses two HY-SRF05s, but the cheap and plentiful HC-SR04s will work, too. Both sensors are arranged for maximum beam overlap and wired up to an Arduino Uno. One sensor’s emitter is blocked with masking tape, so all it does is listen.

When the system registers the object, it shows up as a red dot on a grid inside a Processing sketch along with a bunch of details like the object’s coordinates, its distance from each sensor, and the area of the triangle formed by the two sensors and the object. [lingib] reports that the system is quite accurate and will work for much larger playgrounds than the 1 meter square in the demo after the break.

Don’t want to detect objects? Ultrasonic sensors are cheap enough to hack into other things, like this one-way data communications module.

Continue reading “Dual Sensor Echo Locator Gives High Accuracy At Low Cost”

Dead Simple Ultrasonic Data Communication

Some of the best hacks are the ones which seem perfectly obvious in hindsight; a solution to the problem that’s so elegant, you wonder how it never occurred to you before. Of course we also love the hacks that are so complex your eyes start to water, but it’s nice to have a balance. This one, sent in by [Eduardo Zola] is definitely in the former group.

In the video after the break, [Eduardo] demonstrates his extremely simple setup for using ultrasonic transducers for one-way data communication. Powered by a pair of Arduinos and using transducers salvaged from the extremely popular HC-SR04 module, there’s a good chance a lot of readers can recreate this one on their own bench with what they’ve got lying around. In this example he’s sending strings of text from one computer to another, but with a little imagination this can be used for all sorts of projects.

For the transmitter, the ultrasonic transducer is simply tied to one of the digital pins on the Arduino. The receiver is a bit more complex, requiring a LM386 amplifier and LM393 comparator to create a clean signal for the second Arduino to read.

But how does it work? Looking through the source code for the transmitter and receiver, we can see it’s about as basic as it gets. The transmitter Arduino breaks down a given string into individual characters, and then further converts the ASCII to eight binary bits. These bits are sent out as tones, and are picked up on the receiving end. Once the receiver has collected a decent chunk of tones, it works through them and turns the binary values back into ASCII characters which get dumped over serial. It’s slow, but it’s simple.

If you’re looking for something a bit more robust, check out this guide on using GNU Radio with ultrasonics.

Continue reading “Dead Simple Ultrasonic Data Communication”

The Simplest Possible DIY Ultrasonic Levitator

We thought that making things levitate in mid-air by the power of sound was a little bit more like magic, or at least required fancy equipment. It turns out that you can do it yourself easily enough with parts that any decent hacker’s closet should have in abundance: a motor-driver IC, two ultrasonic distance pingers, and a microcontroller. This article shows you how (translated here, scroll down).

But aside from a few clever tricks, there’s not that much to show. The two HC-SR04 ultrasonic distance sensors are standard fare, and are just being used as a cheap source of 40 kHz transducers. The circuit uses a microcontroller, but any source of 40 kHz square waves should suffice. Those of you who could do that with a 555 (or a Raspberry Pi), this one’s for you! A stepper motor driver bumps up the voltage applied to the transducers, but you could use plain-vanilla transistors as well.

It’s all the little details that count, however. You need to position the two ultrasonic drivers fairly precisely to create a standing wave, and while you can start at 8.25 mm and trial-and-error it, the article demonstrates using an oscilloscope to align the capsules by driving one and reading the signal out of the other and tweaking them until they’re in phase. Clever!

The author also takes the ultrasonic-transparent grille from one of the unused receivers and uses it as a spoon to help position the styrofoam bits in the sound waves. We always wondered how you’d do that!

It turns out that it’s easy to make a DIY ultrasonic levitation desk toy, and none of the parts are expensive or critical. The missing ingredient is just the gumption to try it, and now we have that, too.

As cool as they are, the HC-SR04 modules aren’t perfect for all distance sensing applications. Here’s everything you need to know about them, including hacks to make them work up-close. And since HC-SR04 sensors come cheapest in ten-packs, you’ll be wondering what you’re going to do with the other eight. That problem has apparently also been solved.

A Bar Graph For Beer Fridge Vitals

[ChrisN219] has an antique Coke machine that used to hold glass bottles. Now it holds around 30 tall boy cans of his favorite post-work suds. The only problem is that [Chris] has no idea how many cans are in it without opening up the door or keeping tally on a nearby slate board. Enter the Arduino.

He wanted to make something completely non-invasive to the machine (phew!) while using as many parts he already had as possible. The result is a simple circuit that uses an ultrasonic sensor mounted inside the machine to ping the depths, and a Nano in a nifty 3D printed box up top to do some math and display the number of cans remaining as a simple bar graph. The sensor reads one bay, and the code multiplies by two to get the total. It was touch and go there for a minute as he wasn’t sure that the HC-SR04s would get a good response from the cylindrical cans. Not only did they give a good reading, the first test was quite accurate.

[Chris] recently finished Mk. II, which replaces the momentary (and the Coke logo) with a second HC-SR04. The first version required the push of a button to do inventory, but now he simply walks up to the machine and knows at a glance if it’s time to make a beer run.

Okay, so maybe you don’t have cool old Coke machine problems. But surely you can find something that needs pinging, like an inconvenient rain barrel.

Pinging The Depths Of A Rain Barrel

Rain barrels are a great way to go green, as long as your neighborhood doesn’t frown upon them. [NikonUser]’s barrel sits up high enough that he has to climb up on an old BBQ and half-dangle from the pipe to check the water level, all the while at the risk of encountering Australian spiders.

Arachnophobia, it turns out, is a great motivator. At first, [NikonUser] dreamed up a solar-powered IoT doodad that would check the level and report the result on a web page. He battled the Feature Creep and decided to build a handheld device that pings the water level with an ultrasonic sensor and displays it on a 7-segment.

Everything is contained in a water-resistant box and driven by an Arduino Pro. The box is mounted on a piece of scrap lumber that lays across the top of the barrel. This allows the HC-SR04’s eyes to peer over the edge and send pings toward the bottom. It also helps to keep the readings consistent and the electronics from taking a swim.

Operation is simple: [NikonUser] reaches up, sets the plank across the barrel, and pushes the momentary. This activates the Arduino, which prompts the HC-SR04 to take several readings. The code averages these readings, does a little math, and displays the percentage of water remaining in the barrel.

Interested in harvesting rain water, but not sure what to do with it? You can use it for laundry, pour it in the toilet tank instead of flushing, or make an automated watering system for your garden.

Ultrasonic Array Gets Range Data Fast And Cheap

How’s your parallel parking? It’s a scenario that many drivers dread to the point of avoidance. But this 360° ultrasonic sensor will put even the most skilled driver to shame, at least those who pilot tiny remote-controlled cars.

Watch the video below a few times and you’ll see that within the limits of the test system, [Dimitris Platis]’ “SonicDisc” sensor does a pretty good job of nailing the parallel parking problem, a driving skill so rare that car companies have spent millions developing vehicles that do it for you. The essential task is good spatial relations, and that’s where SonicDisc comes in. A circular array of eight HC-SR04 ultrasonic sensors hitched to an ATmega328P, the SonicDisc takes advantage of interrupts to make reading the eight sensors as fast as possible. The array can take a complete set of readings every 10 milliseconds, which is fast enough to allow for averaging successive readings to filter out some of the noise that gets returned. Talking to the car’s microcontroller over I2C, the sensor provides a wealth of ranging data that lets the car quickly complete a parallel parking maneuver. And as a bonus, SonicDisc is both open source and cheap to build — about $10 a copy.

Rather use light to get your range data? There are some pretty cheap LIDAR units on the market these days.

Continue reading “Ultrasonic Array Gets Range Data Fast And Cheap”