The Heat Is On With This ESP8266 Controlled Sauna

We’ll be perfectly honest: sitting inside a heated box sounds just a bit too much like torture for our tastes. But if we did somehow find ourselves in possession of a fancy new sauna, we’d more than likely follow in the footsteps of [Al Betschart] and make the thing controllable with the ESP8266. After all, if you’re going to be cooked alive, you might as well do it on your own terms.

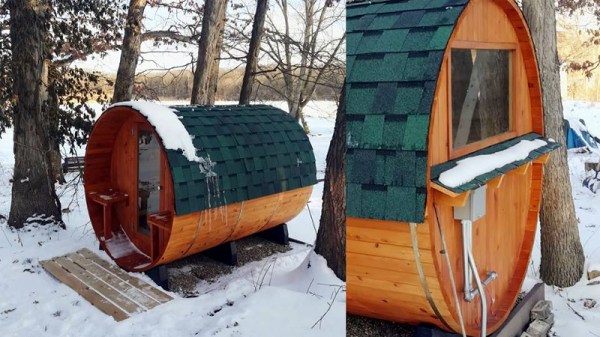
The sauna itself was purchased as a kit, and included an electric heater controlled by a thermostat. As explained in his detailed documentation, [Al] integrated a Sonoff TH16 into the original heater circuit so he could control power to the coils remotely. The TH16 also includes support for a thermal sensor, which allowed him to get a reading on the sauna’s internal temperature. The new electronics were mounted in a weather-proof box on the back of the sauna, complete with an external WiFi antenna to help get a good signal back to the house.

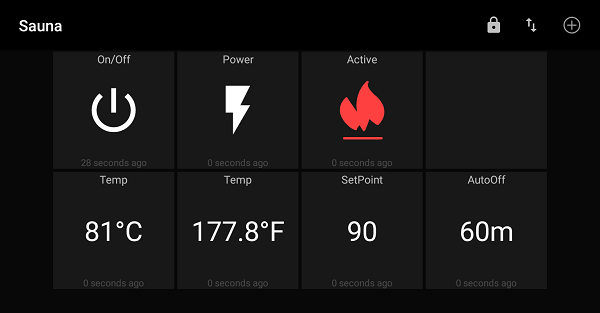
At this point the project could technically be done if all you wanted was remote control, but [Al] wanted to create a replacement firmware for the Sonoff that was specifically geared towards the sauna. So he came up with some code that uses MQTT to connect the heater to his home automation system, and allows configuring things like the maximum temperature and how long the sauna will run before turning itself off.

Interestingly, the company who makes these saunas thought the work [Al] did to integrate their product into his home automation system was so impressive they actually interviewed him about it and put it up on their site for others who might be inspired by his work. We’ve covered a lot of hacks to consumer devices here at Hackaday, and it’s exceedingly rare for a company to be so supportive of customers fiddling around with their products (especially in a case like this where there’s a real chance of burning your house down), so credit where credit is due.

The last time we brought you a sauna hack it was quite literally in a van down by the river, so the addition of an ESP8266 certainly brings this more into our comfort zone. Figuratively, if not literally.

[Thanks to Jon for the tip.]

Watch This LEGO Pantograph Carve Chocolate Messages

[Matthias Wandel] is best known for his deeply interesting woodworking projects, so you might be forgiven for not expecting this lovely chocolate-engraving pantograph made from LEGO. With it, he carves a delightful valentine’s message into a square of chocolate, but doesn’t stop there. He goes the extra mile to cut the chocolate carefully into a heart, and a quick hit with a heat gun takes the rough edges off for a crisp and polished end result.

The cutting end is a small blade stuck inside a LEGO piece, but that’s the only non-LEGO part in the whole assembly. A key to getting a good carve was to cool the chocolate before engraving, and you can see the whole process in the video embedded below.

Continue reading “Watch This LEGO Pantograph Carve Chocolate Messages”

Make XKCD-Style Plots From Python

[Randall Munroe] certainly understands the power of graphical representation of data. The humorous plots in his xkcd webcomic are one of the favorite parts for many readers. Their distinctive, Tufteian style delivers the information – in this case, a punch line – without excessive decoration. To be honest, we can’t get enough of them. A recent reddit thread reminded us that you can generate a similar look for your own data (humorous or otherwise) in Python using Matplotlib.

If you already have a plot generated with Matplotlib, activating xkcd-mode is as simple as calling a method on the pyplot object:

matplotlib.pyplot.xkcd()

The documentation recommends that you install the “Humor Sans” font for best effect. On one of our linux boxes, we were able to do this with a simple:

sudo apt-get install fonts-humor-sans

There will undoubtedly be similar incantations for other operating systems. It’s really that simple. In fact, the featured image above was generated with this minimal script:

#!/usr/bin/env python3

import numpy as np
import matplotlib.pyplot as plt

x = np.linspace(0, 1, 100)
y = (x > 0.5) * (x - 0.5)

plt.xkcd(scale=5, length=400)
plt.xticks([])
plt.yticks([])
plt.ylabel('Downloads of "humor sans" font')
plt.text(0, 0.25, 'Article on xkcd() published')
plt.plot(x, y)
plt.plot([0.3, 0.475], [0.2, 0.025], 'black')
plt.gca().set_aspect(2*9/16)
plt.savefig('xkcd_plot.png', dpi=300)

Beyond generating humorous graphs for those with little artistic talent, these plots can also be used instead of hand-drawn sketches to indicate a simple model or expected result. The comic look of the plots conveys the idea that they don’t represent actual data, perhaps only a concept. We saw this done at one of the talks at the Hackaday SuperConference 2018.

We’ve also covered some of the xkcd comics before, such as when they subtly dissed Arduino back in 2010, before that was cool.

This SDR Uses A Tube

When you think of a software defined radio (SDR) setup, maybe you imagine an IC or two, maybe feeding a computer. You probably don’t think of a vacuum tube. [Mirko Pavleski] built a one-tube shortwave SDR using some instructions from [Burkhard Kainka] which are in German, but Google Translate is good enough if you want to duplicate his feat. You can see a video of [Mirko’s] creation, below.

The build was an experiment to see if a tube receiver could be stable enough to receive digital shortwave radio broadcasts. To avoid AC line hum, the radio is battery operated and while the original uses an EL95 tube, [Mirko] used an EF80.

Continue reading “This SDR Uses A Tube”

A Garbage Bag Skirt Is Fit For A Hovercraft

The hovercraft is an entertaining but much maligned form of transport. While they have military applications and at times have even run as ferries across the English Channel, fundamental issues with steering and braking have prevented us all driving them to work on a regular basis. They do make great toys however, and [HowToMechatronics] has built an excellent example.

The build is primarily a 3D printed affair, with the hull, ducting, and even the propellers being made in this way. The craft is sized to be readily printable on a 30cm square build platform, making it accessible to most printer owners. Drive is via brushless motors, and control is achieved using their previously-featured self-built NRF24L01 radio control transmitter.

What stands out among most other hovercraft builds we see here is the functioning skirt. It’s constructed from a garbage bag, and held on to the hull with a 3D printed clamping ring. Most quick builds omit a skirt and make up for it with light weight and high power, so its nice to see one implemented here. We’d love to see how well the craft works on the water, though it holds up well on the concrete.

Finished in a camouflage paint scheme, the craft looks the part, and handles well too. We’d consider a small correction to the center of gravity, but it’s nothing a little ballast wouldn’t fix. Video after the break. Continue reading “A Garbage Bag Skirt Is Fit For A Hovercraft”

Jaromir Sukuba: The Supercon 2018 Badge Firmware

If you missed it, the Hackaday Supercon 2018 badge was a complete retro-minicomputer with a screen, keyboard, memory, speaker, and expansion ports that would make a TRS-80 blush. Only instead of taking up half of your desk, everyone at the conference had one around their neck, when they weren’t soldering to it, that is.

The killer feature of the badge was its accessibility and hackability — and a large part of that was due to the onboard BASIC interpreter. And that’s where Jaromir comes in. Once Voja Antonic had finalized the design of the badge hardware for our conference in Belgrade in the spring of 2018, as Jaromir puts it, “all we needed was a little bit of programming”. That would of course take three months. The badge was battle-tested in Belgrade, and various feature requests, speed ups, and bugfixes were implemented (during the con!) by Jaromir and others.

Firmware work proceeded over the summer. Ziggurat29 helped out greatly by finding ways to speed up the badge’s BASIC interpreter (that story is told on his UBASIC and the Need for Speed project page) and rolled into the code base by Jaromir. More bugs were fixed, keywords were added, and the three-month project grew to more like nine. The result: the badge was in great shape for the Supercon in the fall.

Jaromir’s talk about the badge is supremely short, so if you’re interested in hacking a retrocomputer into a PIC, or if you’ve got a badge and you still want to dig deeper into it, you should really give it a look. We don’t think that anyone fully exploited the CP/M machine emulator that lies inside — there’s tons of software written for that machine that is just begging to be run after all these years — but we’re pretty sure nearly everyone got at least into the basement in Zork. Dive in!

Continue reading “Jaromir Sukuba: The Supercon 2018 Badge Firmware”

Blacksmithing For The Uninitiated: What Is A Forge?

Blacksmiths were the high technologists of fabrication up until the industrial revolution gained momentum. At its core, this is the art and science of making any needed tool or mechanism out of metal. Are you using the correct metal? Is the tool strong where it needs to be? And how can you finish a project quickly, efficiently, and beautifully? These are lessons Blacksmiths feel in their bones and it’s well worth exploring the field yourself to appreciate the knowledge base that exists at any well-used forge.

I had an unexpected experience a few days ago at the Hacker Hotel weekend hacker camp in the Netherlands. At the side of the hotel our friends at RevSpace in The Hague had set up a portable forge. There was the evocative coal fire smell of burning coke from the hearth, an anvil, and the sound of hammering. This is intensely familiar to me, because I grew up around it. He may be retired now, but my dad is a blacksmith whose work lay mostly in high-end architectural ironwork.

Working the RevSpace forge at Hacker Hotel, in not the most appropriate clothing for the job.

The trouble is, despite all that upbringing, I don’t consider myself to be a blacksmith. Sure, I am very familiar with forge work and can bash metal with the best of them, but I know blacksmiths. I can’t do everything my dad could, and there are people we’d encounter who are artists with metal. They can bend and shape it to their will in the way I can mould words or casually solder a tiny surface-mount component, and produce beautiful things in doing so. My enthusiastic metal-bashing may bear the mark of some experience at the anvil but I am not one of them.

It was a bit of a surprise then to see the RevSpace forge, and I found myself borrowing a blacksmith’s apron to protect my smart officewear and grabbing a bit of rebar. I set to and made a pretty simple standard of the dilletante blacksmith, a poker with a ring on one end. Hammer one end of the rebar down to a point, square off the other end for just over 3 times the diameter of the ring, then bend a right angle and form the ring on the pointy end of the anvil. Ten minutes or so of fun in the Dutch sunshine. Working a forge unexpectedly brought with it a bit of a revelation. I may not be a smith of a high standard, but I have a set of skills by virtue of my upbringing that I had to some extent ignored.

Where others might have put effort into learning them, they’re things I just know. It had perhaps never occurred to me that maybe all my friends in this community didn’t learn how to do this by hanging round the forge next to the house they grew up in. If I have this knowledge merely by virtue of my upbringing, perhaps I should share some of it in a series of articles for those in our community who’ve always fancied a go at a forge but have no idea where to start.

Continue reading “Blacksmithing For The Uninitiated: What Is A Forge?”