Fire Up The 3D Printer And Build Yourself A Spiderbot

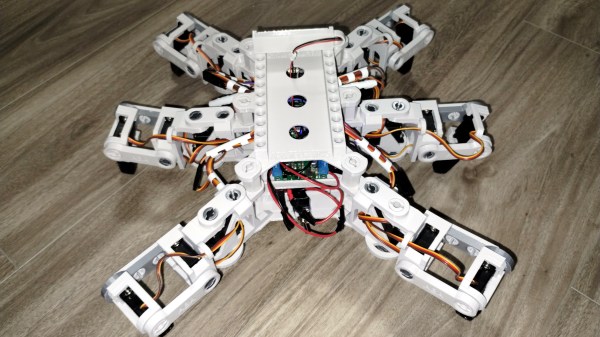
Robots are cool, so check out [Atlin Anderson]’s Spiderbot (video, embedded below) which can be made with 3D printed parts, hobby servos, and ESP32-CAM module for control and a first-person view. Looking for a new project? All of the design details are shared online if you’d like to make a hexapod of your own.

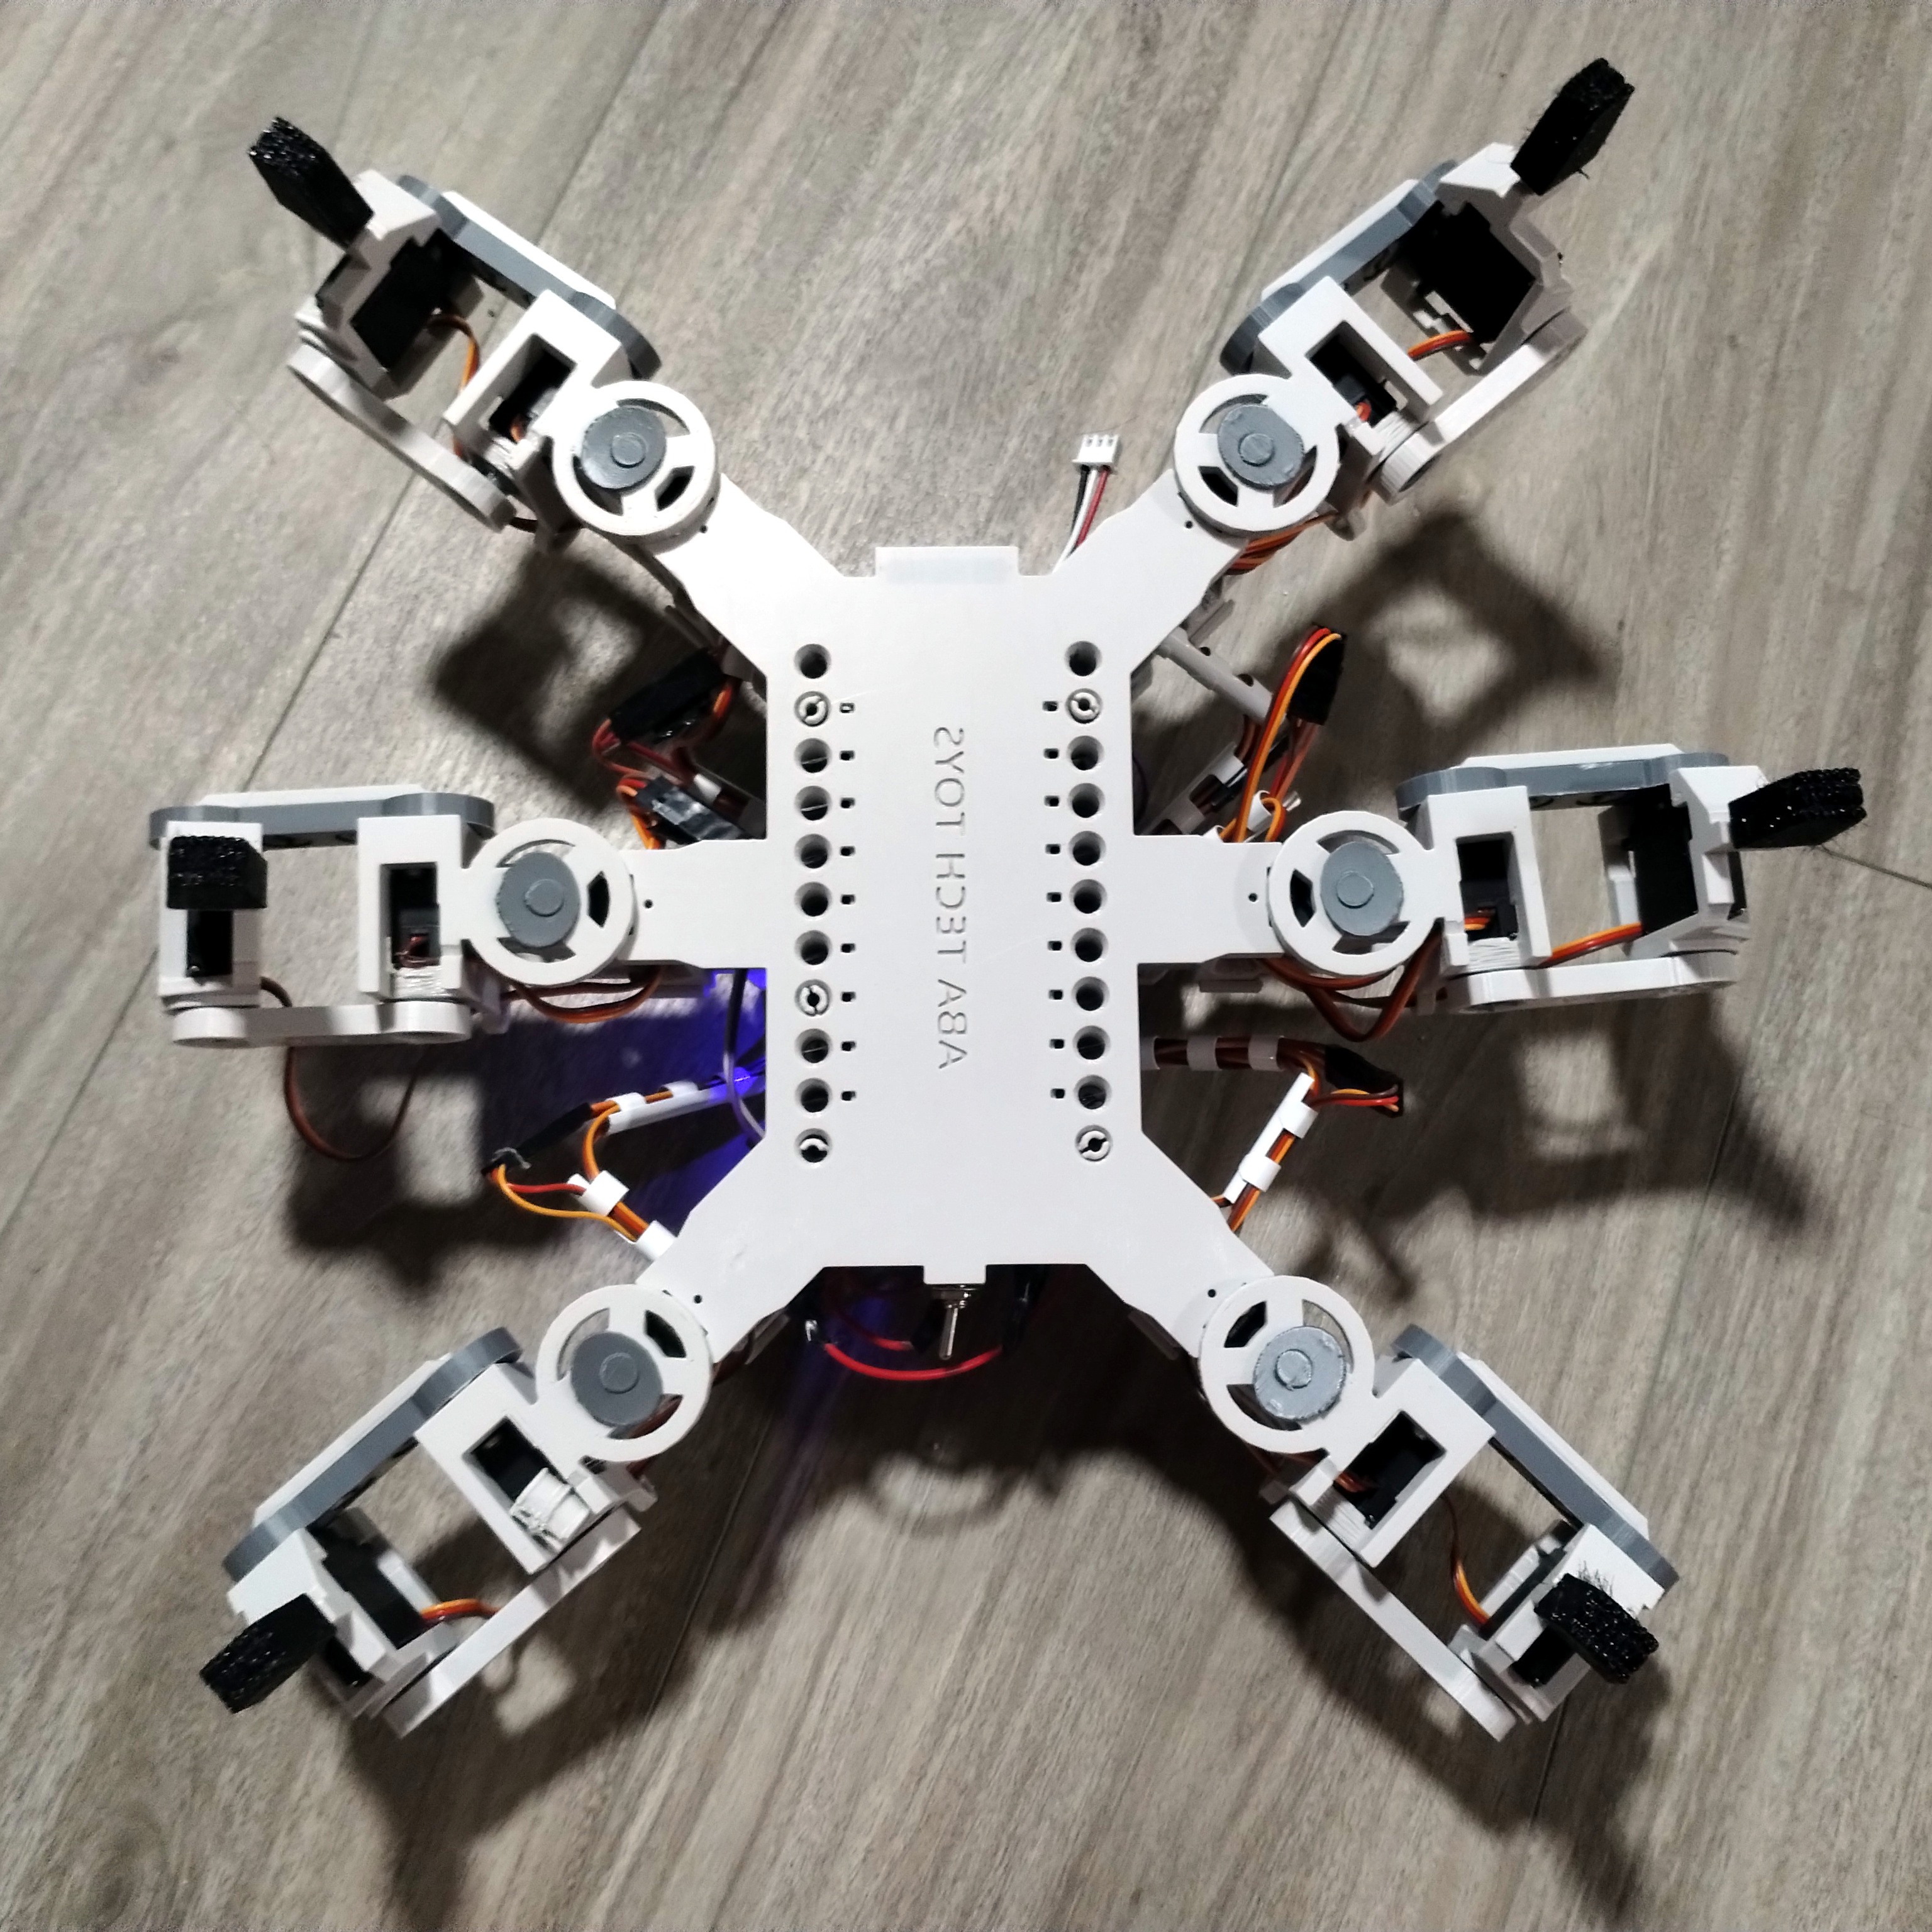
We like the effort [Atlin] put into minimizing hardware fasteners in the design of the 3D-printed parts, and aiming for a modular concept that leaves things open for expansion or modification. There’s plenty of room in the chassis for more hardware, with a convenient peg system for snap-fitting assemblies.

Control is done wirelessly via a mobile phone with an app created using the MIT App Inventor, a fantastic tool that is still going strong as a capable and accessible way to make an Android app.

As for the ESP32-CAM module that drives it all, it is a great piece of hardware with capabilities that are leveraged very nicely here. We’ve seen other projects make good use of it as well, from this 1/64 scale micro RC car to an oddball tripod camera robot.

Continue reading “Fire Up The 3D Printer And Build Yourself A Spiderbot”

SatCat5: UART, SPI And I2C Via Ethernet With FPGA-Based Design

Arty A7-based prototype of SatCat5 with custom switch I/O board. (Credit: The Aerospace Corporation)

To the average microcontroller, Ethernet networks are quite a step up from the basic I2C, SPI and UART interfaces, requiring either a built-in Ethernet MAC or SPI-based MAC, with tedious translation between Ethernet and those other interfaces. Yet what if this translation could be done automatically and transparently?  This is what the SatCat5 FPGA-based project by [The Aerospace Corporation] aims to provide: a gateway akin to an unmanaged Ethernet switch that also supports those non-Ethernet links. Recently they answered a range of questions about the project on Hacker News.

The project name comes from the primary target audience: smallsat and cubesat developers, which is an area where being able to route more traffic over a common Ethernet-based bus is a major boon. The provided Xilinx Artix-7-based reference design (pictured) gives a good idea of how it can be used: it combines an Arty A7 development board with a custom PCB containing an Ethernet switch IC (SJA1105), TJA1100 transceiver, two RJ45 jacks and four PMOD connectors, here connected to two UARTs for bidirectional communication between them. Ethernet frame encapsulation is provided using the standard Serial Line Internet Protocol (SLIP), with more details covered in the FAQ. At a minimum an FPGA like a Lattice iCE40 is required, with an MCU capable of using the provided C++ libraries, or a custom implementation.

Thanks to [STR-Alorman] for the tip.

Electrospinning Artificial Heart Valves

When you think about additive manufacturing, thoughts naturally turn to that hot-glue squirting CNC machine sitting on your bench and squeezing whatever plastic doodad you need. But 3D printing isn’t the only way to build polymer structures, as [Riley] shows us with this fascinating attempt to create electrospun heart valves.

Now, you may never have heard of electrospinning, but we’ll venture a guess that as soon as you see what it entails, you’ll have a “Why didn’t I think of that?” moment. As [Riley] explains, electrospinning uses an electric field to build structures from fine threads of liquid polymer solution — he uses polycaprolactone (PCL), a biodegradable polyester we’ve seen used in other medical applications, which he dissolves in acetone. He loads it into a syringe, attaches the positive terminal of a high-voltage power supply to the hypodermic needle, and the negative terminal to a sheet of aluminum foil. The charge turns the PCL droplets into fine threads that accumulate on the foil; once the solvent flashes off, what’s left is a gossamer layer of non-woven plastic fabric.

To explore the uses of this material, [Riley] chose to make an artificial heart valve. This required a 3D-printed framework with three prongs, painted with conductive paint. He tried a few variations on the design before settling on a two-piece armature affixed to a rotating shaft. The PCL accumulates on the form, creating a one-piece structure that can be gingerly slipped off thanks to a little silicon grease used as a release agent.

The results are pretty impressive. The structure bears a strong resemblance to an artificial tricuspid heart valve, with three delicate leaves suspended between the upright prongs. It’s just a proof of concept, of course, but it’s a great demonstration of the potential of electrospinning, as well as an eye-opening look at what else additive manufacturing has to offer.

Continue reading “Electrospinning Artificial Heart Valves”

A SPIF-fy Way Of Forming Metal

Thanks to 3D printing, most of us are familiar with the concept of additive manufacturing, and by extension, subtractive manufacturing. But what is it when you’re neither adding material nor taking it away to create something? Generally speaking, that’s called forming, and while there are tons of ways to do it, one you might not have heard of is single-point incremental forming (SPIF), and it’s pretty cool.

To explore SPIF as a method for making small parts, [Russell Makes] gave it a go on a small CNC mill. The idea is pretty simple, and the video below makes it pretty clear what’s going on. A forming tool is moved over a sheet metal blank that’s held very securely to the mill’s table. The tool has no cutting edges, just a smooth, hard, spherical tip — [Russell] made his own by brazing a carbide ball to a piece of drill rod. The tool is driven slightly into the blank along the Z-axis, while simultaneously tracing out a tool path in the XY plane. The tool spins, but very slowly; ideally, the spindle speed is controlled to keep a single point of contact with the metal as the tool works around its tool path. The tool steps downward incrementally, drawing the metal down with it as it forms the desired shape.

[Russell]’s experiments were pretty promising. He started with titanium sheet, which behaved pretty well except for some galling thanks to lack of lubrication. Aluminum and stainless worked pretty well too, at least for simple hemispherical and cone shapes. More complex shapes proved trickier, but with time he was able to figure out the correct speeds and feeds to keep the metal intact. The amount of tension built up in the metal is impressive, though, and is especially evident when cutting the finished part free from the blank.

Could this work with a hobbyist-grade machine? Possibly, but we’d be afraid that the forces involved might be a bit much for light-duty machines, especially in the Z-axis. And it’s a slow process, so it’s probably only good for one-offs and low-volume work. Once you’ve got a prototype, die stamping might be a more efficient way to go.

Continue reading “A SPIF-fy Way Of Forming Metal”

Raspinamp: It Really Replicates Questionable Activities Involving Llamas

In the late 90s as MP3s and various file sharing platforms became more common, most of us were looking for better players than the default media players that came with our operating systems, if they were included at all. To avoid tragedies like Windows Media Center, plenty of us switched to Winamp instead, a much more customizable piece of software that helped pave the way for the digital music revolution of that era. Although there are new, official versions of Winamp currently available, nothing really tops the nostalgia of the original few releases of the software which this project faithfully replicates in handheld form.

The handheld music player uses a standard Raspberry Pi (in this case, a 3B) and a 3.5″ TFT touchscreen display, all enclosed in a clear plastic case. With all of the Pi configuration out of the way, including getting the touchscreen working properly, the software can be set up. It uses QMMP as a media player with a Winamp skin since QMMP works well on Linux systems with limited resources. After getting it installed there’s still some configuration to do to get the Pi to start it at boot and also to fit the player perfectly into the confines of the screen without any of the desktop showing around the edges.

Although it doesn’t use the original Winamp software directly, as that would involve a number of compatibility layers and/or legacy hardware at this point, we still think it’s a faithful recreation of how the original looked and felt on our Windows 98 machines. With a battery and a sizable SD card, this could have been the portable MP3 player many of us never knew we wanted until the iPod came out in the early 00s, and would certainly still work today for those of us not chained to a streaming service. A Raspberry Pi is not the only platform that can replicate the Winamp experience, though. This player does a similar job with the PyPortal instead.

Continue reading “Raspinamp: It Really Replicates Questionable Activities Involving Llamas”

Probes connected from a Pi Pico board to the SPI flash chip, with other end of the probes connected tot the level shifter circuit resistors

Motherboard Revived With Simplest 1.8V SPI Shifter Ever

If you have ever had to fix a modern desktop motherboard, you might have noticed that the BIOS (UEFI) SPI flash is 1.8V – which means you can no longer use a Raspberry Pi or a CH341 adapter directly, and you’d need to use a 1.8V level shifter of some sort. Now, some of us can wait for a 1.8V level shifter adapter from an online store of your choosing, but [treble] got a “BIOS flash failed” motherboard from Facebook Marketplace, and decided to make it work immediately.

She tells us a story about reviving the motherboard, and there’s one thing she shows that is interesting in particular – a very simple way to level shift 3.3V signals from a serprog-flashed Pi Pico down to the 1.8V that the flash chip required, something you are guaranteed to be able to build out of the parts in your parts bin, only requiring nine resistors and an NPN transistor. If you ever need to reflash BIOS on a modern motherboard, take note. As for 1.8V rail, she ended up tapping the 1.8V power pin of the SPI chip the motherboard itself to power the chip while programming it.

In the end, after swapping the two BIOS chips places and fixing a broken trace mishap, the motherboard booted, and works wonderfully to this day, a much-needed upgrade to [treble]’s toolkit that allows her to do RISC-V cross-compiling with ease nowadays. This is not the first time we see people reflash modern boards with 1.8V chips – if you want to learn more, check out this incredibly detailed writeup! Need to do some further debugging? Use your Pico as a POST card!

Star Wars-Inspired Cosplay Prop Uses Old Vintage Camera

Lots of people make replica lightsabers from Star Wars or tricorders from Star Trek. Not so many people have tried to recreate the binoculars from The Last Jedi, but [The Smugglers Room] whipped up a pretty rad pair from old parts.

It’s more of an inspired build rather than screen-accurate, but they’re still pretty neat. A Bell & Howell camera was the basis for the binoculars used in the film, in fact, and this build starts with the same tri-lens model. Found vintage objects are often used in sci-fi with some modifications, but more commonly in lower-budget productions. Star Wars can do it too, though, it seems.

Turning them into binoculars requires the construction of a viewfinder, which was made out of hand-cut Sintra PVC foam board. Lots of leather wrap had to be removed from the camera, too, which offered a happy accident—it left a heavily-weathered aluminum surface that looked great for a Star Wars prop. A few random controls were then added to disguise the camera as an advanced pair of futuristic binoculars. LED lighting was also installed internally to make the build glow as if it actually contained some powered sci-fi optics. It also got a hand-made leather strap for that rugged aesthetic so fitting for the film.

It’s not a functional build; we’d love to see someone build a set of AR or rangefinder binoculars that still look the part. However, this would be a great addition to any Poe Dameron costume you might have planned for the next upcoming Comic Con.

Here’s our question, though. Does it suck you out of your suspension of disbelief when filmmakers use found objects as the basis for props? Or is it a neat thing when you spot such an example? Video after the break.

Continue reading “Star Wars-Inspired Cosplay Prop Uses Old Vintage Camera”