Electromagnetic 7-Segment Display Easy On The Eyes AND The Ears

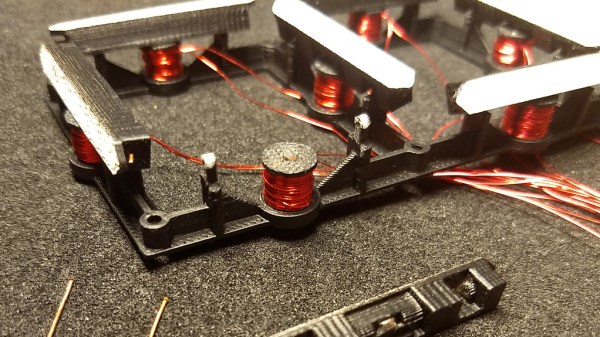
We love electromagnetic displays: take the modern look of a digital readout, combine with the low-tech coil mechanism that you theoretically could create yourself, add a dash of random clacking sounds, and what’s not to like? Evidently, [Nicolas Kruse] shares our affection for these displays, because he’s taken it beyond theory and created a 7-segment magnetically-actuated display from scratch.

The display is 3D-printed, as you would expect these days. Each segment contains a small neodymium magnet, and each coil a 1 mm iron core for flux concentration. The coils are driven with a 1.6 A peak current, causing the segments to flip in less than 10 ms. [Nicolas] provides STL files for the display base, segments, and spools so you can print your own display. He’s also released the schematics and code for the driver, which uses an ATtiny44 to drive the coils through N- and P-channel MOSFETs. Initially designed to drive a passive 4×7 matrix of displays, the driver couldn’t quite manage to flip one segment without affecting its neighbors. However, for a single display, the driver works fine. We hope he figures out the matrix issue soon, because we really want to see a clock made with these displays.

You can see (and hear) a short video of the display in action after the break. The clacking does not disappoint!

Continue reading “Electromagnetic 7-Segment Display Easy On The Eyes AND The Ears”

1973: When Calculators Were Built Like Computers

Should you ever pick up [Steve Wozniak]’s autobiography, you will learn that in the early 1970s when his friend [Steve Jobs] was working for Atari, [Woz] was designing calculators for Hewlett Packard. It seems scarcely believable today, but he describes his excitement at the prospects for the calculator business, admitting that he almost missed out on the emerging microcomputer scene that would make him famous. Calculators in the very early 1970s were genuinely exciting, and were expensive and desirable consumer items.

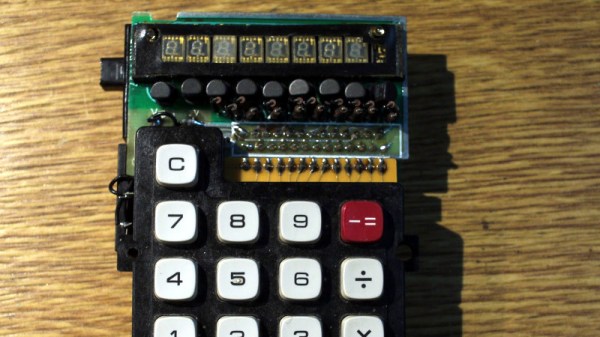
[Amen] has a calculator from that period, a Prinztronic Micro, and he’s subjected it to an interesting teardown. Inside he finds an unusual modular design, with keyboard, processor, and display all having their own PCBs. Construction is typical of the period, with all through hole components, and PCBs that look hand laid rather than made using a CAD package. The chipset is a Toshiba one, with three devices covering logic, display driver and clock.

The Prinztronic is an interesting device in itself, being a rebadged 1972 Sharp model under a house brand name for the British retailer Dixons, and that Toshiba chipset is special because it is the first CMOS design to market. It was one of many very similar basic calculators on the market at the time, but at the equivalent of over 100 dollars in today’s money it would still have been a significant purchase.

Long-tern Hackaday readers will remember we’ve shown you at least one classic calculator rebuild in the past, the venerable 1975 Sinclair!

The 7400 Quad 2-Input NAND Gate, A Neglected Survivor From A Pre-Microprocessor World

There are a range of integrated circuits that most of us would regard as definitive examples of their type, devices which became the go-to for a particular function and which have entered our collective consciousness as electronics enthusiasts. They have been in production since the early days of consumer integrated circuits, remaining in use because of a comprehensive understanding of their characteristics among engineers, and the job they do well.

You can probably name the ones I’m going to rattle off here, the µA741 op-amp designed by David Fullagar for Fairchild in 1968, the NE555 timer from Hans Camenzind for Signetics in 1971, and a personal favourite, Bob Widlar’s µA723 linear regulator for Fairchild in 1967. There may be a few others that readers will name in the comments, but there’s one that until today it’s likely that few of you would have considered. Texas Instruments’ 5400 and 7400 TTL quad 2-input NAND gate has been in continuous production since 1964 and is the progenitor of what is probably the most numerous breed of integrated circuits, yet it doesn’t trip off the tongue when listing famous chips, and none of us can name its designer. So today we’re turning the spotlight on this neglected piece of silicon, and trying to bring it the adulation it deserves. Continue reading “The 7400 Quad 2-Input NAND Gate, A Neglected Survivor From A Pre-Microprocessor World”

IPv6 Christmas Display Uses 75 Internet’s Worth Of Addresses

We’ve seen internet-enabled holiday displays before, and we know IPv6 offers much more space than the older IPv4 addressing scheme that most of us still use today, but the two have never been more spectacularly demonstrated than at jinglepings.com. The live video stream shows an Internet-connected Christmas tree and an LED display wall that you can control by sending IPv6 ICMP echo request messages, more commonly known as pings.

Reading the page, you quickly parse the fact that there are three ways to control the tree. First, you can type a message in the box and press send – this message gets displayed on the crawl at the bottom of the LED screen.  Second, you can light up the tree by sending a ping to the IPv6 address 2001:4c08:2028:2019::RR:GG:BB, where RR, GG, and BB are 8-bit hex values for red, green, and blue. This is a neat abuse of the IPv6 address space, in that the tree has 224 (around 16.8 million) IPv6 addresses, one for each color you can set. We were impressed by this brute-force use of address space, at least until we read on a little further.

You can also make your own drawings on the LED wall, again by sending pings. In this case, the address to set a pixel to a particular color is: 2001:4c08:2028:X:Y:RR:GG:BB, where X and Y are the pixel coordinates. This seems easy enough: to set pixel (10, 11) to magenta, the RGB value (0xFF, 0x00, 0xFF), you’d simply ping the IPv6 address 2001:4c08:2028:10:11:FF:00:FF. Having  an array of addressable LEDs is commonplace in hacker circles today, although each of them having their own live IPv6 address on the Internet seems a little excessive at first. Then it hits you – each LED has an IPv6 address for every possible color, just like the tree: 16.8 million addresses for each LED. The LED display is 160×120 pixels in size, so the total number of IPv6 addresses used is 160x120x224, which is 75 times larger than all possible IPv4 addresses!  This is a hack of monstrous proportions, and we love it.

In case you’re not running IPv6 yet, we’ve got you covered. To send individual pings using your browser, you can use a site like Ipv6now. If you want to send pixels to the display wall, you’re better off using a 6in4 tunnel that lets you access IPv6 sites using your current IPv4 connectivity.  Hurricane Electric offers a free 6in4 tunnel service that we’ve found useful. Then it’s just a matter of writing some code to send pixel values as pings.  The python scapy module is perfect for this sort of thing. But, first you’ll have to fill out the form on jinglepings.com and wait to get your IPv6 address whitelisted before you can draw on the display; evidently the usual bad actors have found the site and started drawing inappropriate things.

If you think this use of addresses seems wasteful, you needn’t worry. There are around 3.4×1038 IPv6 addresses, enough for 1027 such displays. We’re going to go out on a limb here and say it: nobody will ever need more than 2128 IP addresses.

If you’re looking to build an LED holiday display on a smaller budget, check out this one that re-purposes normal LED strings.

Thanks to [Ward] for the tip!

This 6502 Made From 74-Series Logic Can Run At 20 MHz

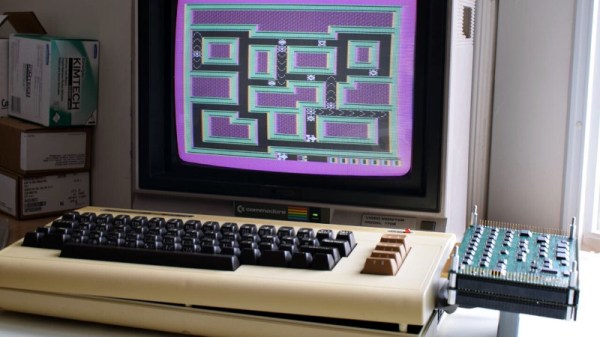
If you always wished you could get closer to the hardware with the 6502 in your classic microcomputer you’re in luck, because [Drass] has created a beautiful implementation of a 6502 using TTL logic chips. What makes it special is that it sits on a very neat set of PCBs, and due to its use of 74AC series logic it can run at much higher speeds than the original. A 20 MHz 6502 would have been revolutionary in the mid-1970s.

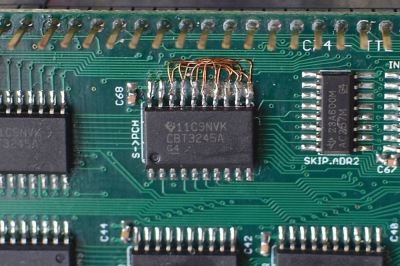
Neat reworking of what looks to be a reversed bus.

Through a flying ribbon cable, it can plug directly into the 6502 socket on classic microcomputers, and the website shows it running a variety of software on a Commodore VIC20. There is also a custom SBC as part of the suite, so no need for a classic micro if you want to put the CPU through its paces. The boards are not quite perfect, the website has a picture of some very neat reworking where it appears that a bus has been applied to a chip in reverse, but it certainly has the feel of a professional design about it.

This is a very tidy 6502, but it’s not the first we’ve seen and neither is it the most dis-integrated. There is a fascinating world of 74 logic CPUs to be explored, so it’s difficult to pick only one other to show you.

Thanks [Jeff] for the tip.

Let’s Look At Some Cool Old LEDs

LEDs are now a mature technology, with all manner of colors and flavors available. However, back in the 1970s, it was early days for this fledgling display tech, and things looked very different. [IMSAI Guy] happened to work at the optoelectronics division of Hewlett-Packard during their development of LED displays, and has a handful of prototypes from those heady days.

The video is a great look at not only vintage display hardware, but also rarely seen prototypes that seldom left the HP offices. Matrix, 7-segment and even 16-segment devices are all in attendance here. There’s great macro photography of the packages, including the now-forgotten bubble displays as well as hermetically sealed glass packages. The parts all have a uniquely 1970s look, drenched in gold plating and otherwise just looking very expensive.

The followup video breaks out the microscope and powers up the displays. [IMSAI Guy] shares some useful tips on how to best tinker with unknown LED parts, as well as knowledge about the chemical compounds and manufacturing processes involved in LED production. If you don’t know your III-V compounds from your II-VI compounds, prepare to learn.

It’s always interesting to take a look back, and even better to get a peek at the experiments of engineers of the past.

If you’re wondering about applications of this hardware, we’ve seen messageboards and watches before. Video after the break.

Continue reading “Let’s Look At Some Cool Old LEDs”

1970s Lab Equipment Turned Retro Pi Terminal

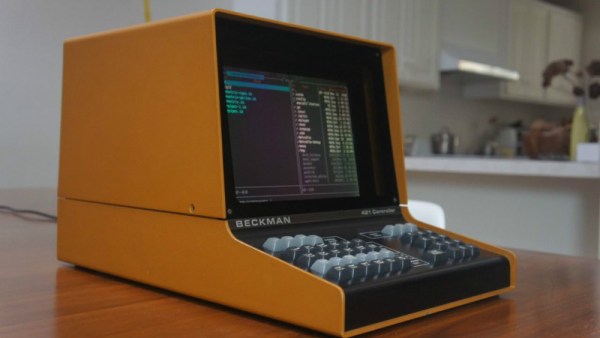
When it was released, the Beckman Model 421 CRT controller represented the latest and greatest in liquid chromatography technology. Its 12 inch screen would allow the operator to view critical information such as flow rate and concentration, and its integrated keyboard simplified system control. It made liquid chromatography faster and easier, allowing lab technicians to focus on analysis rather than the complexities of operating the equipment.

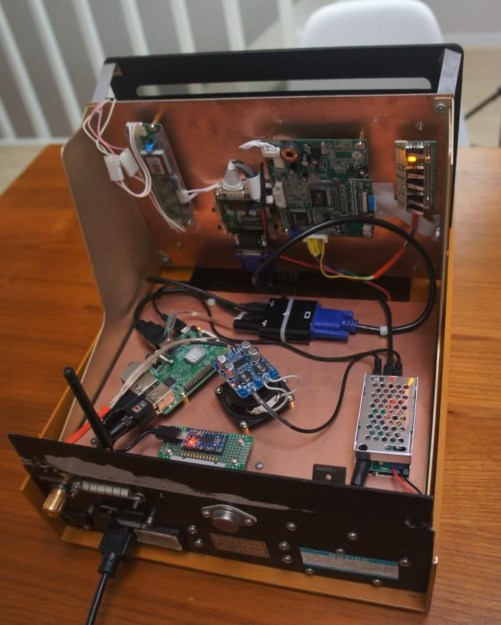
But none of that matters right now. What matters is that [Igor Afanasyev] found one of these gloriously vintage devices at a local swap meet and decided it deserved a second chance at life. With a Raspberry Pi and a surprising amount of support hardware, he was able to turn this roughly 40 year old piece of scientific equipment into a multipurpose device that does everything from classic gaming to multimedia playback. It’s got a few quirks, but overall this is a gadget that any hacker would love to have kicking around their modern-day lab.

[Igor] explains that the Model 412 is essentially just a dumb terminal with no internal logic, so in theory it should have been possible to just hang the thing on a serial port and be done with it. But unfortunately the display drive board was dead, so a full rebuild was in order. This meant that there’s little left of the original device other than the keyboard and the case itself, but since it isn’t exactly a “vintage computer” in the traditional sense, we think the purists will allow it.

For the display, [Igor] used an LCD he salvaged from an old digital picture frame. It was the right size to fit the opening, and thanks to an unpopulated VGA header on the board, wasn’t too difficult to get connected to the Pi with an HDMI adapter. He also added a hardware VGA scanline generator board so that no matter what the Pi shows it will have that classic old-school look; a fantastic detail we don’t usually see on builds like this.

The keyboard on the Model 412 was more of a control panel than a traditional input device, so not only does it have keycaps which say things like “FLOW RATE” and “WRITE TAPE”, but it has a fairly weird layout. After reverse engineering the somewhat unusual key matrix, he spun up a custom firmware for the Arduino Pro Micro using QMK which would let him use the board on the Pi as a standard USB input device. But rather than replace the keys, [Igor] created a little cheat-sheet overlay that he could put over the board to see what keys translate to which letters. It’s awkward for sure, but we really appreciate that he preserved the unique nature and look of the Model 412.

Like the Heathkit H19 that was brought back to life with an internal Raspberry Pi or the DEC VT100 with a BealeBone inside there’s something about the visual aesthetic and no-nonsense approach of these vintage terminals which continue to make them compelling into the 21st century.