Bomb Clock Scares You Awake!

Bomb Clock Scares You Awake

What better way to wake up than by fearing your impending explosion if you don’t hit the correct snooze combination! This is the DEVESTATOR (Translated), [Jacek’s] latest fun project, straight from Poland.

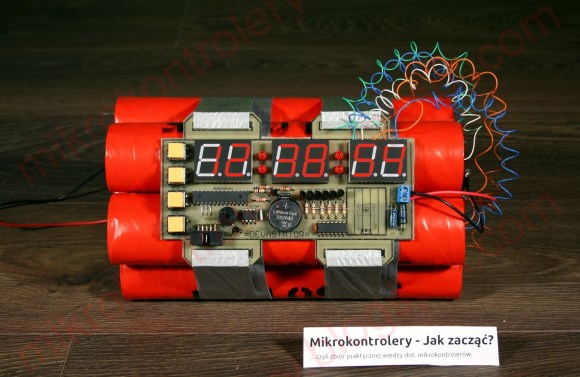
As an avid paintball and airsoft fan, [Jacek] wanted to build a unique clock — so he decided to make his own classic dynamite stick bomb… clock. He’s using a ATmega8 microcontroller at the heart of the project with both a DS1307 RTC and a DS1820 temperature sensor, because just for kicks, the clock also monitors ambient temperature!

To add to the realism of the project he also designed the PCB from scratch using Eagle CAD, which allowed him to make  the whole thing look even more threatening. To actually make the PCB he used the laminate thermal transfer method. The four buttons on the PCB allow you to scroll through the date, time, temperature, and set alarm times.

Oh and the “dynamite”? Paper towel rolls covered in red tape.

Continue reading “Bomb Clock Scares You Awake!”

Hackaday Links: May 4, 2014

hackaday-links-chain

We’ve seen a few builds from the Flite Test guys before, like a literal flying toaster, airsoft guns mounted to planes, and giving an electric plane an afterburner (that actually produced a little extra thrust). Now the Flite Test crew is gearing up for the Flite Fest, an all things remote-controlled flight convention in Malvern, Ohio during the last weekend in July. Seems like a pretty cool way to spend spend a weekend.

Unless you get one of those fancy resistor kits where every value has its own compartment in a case or plastic baggie, you’ll soon rue the day your loose resistors become disorganized. [Kirll] has an interesting solution to hundreds of loose resistors: packaging tape. If you want a resistor, just grab a pair of scissors.

Okay, these Adafruit “totally not Muppets™” are awesome. The latest video in the Circuit Playground series is titled, “C is for Capacitor“. There’s also “B is for Battery“, because when life gives you lemons, light up an LED. Here’s the coloring book.

A few years ago, a couple of people at the LA Hackerspace Crashspace put together an animated flipbook device – something between a zoetrope and the numbers in those old electromechanical clocks – and launched a kickstarter. Now they’re putting on a show, presented by Giant Robot, featuring the animated art of dozens of artists.

Vintage electronics? Yes. Vintage Soviet electronics? Here’s 140 pages of pictures, mostly of old measurement devices.


Sniping 2.4GHz

A long time ago when WiFi and Bluetooth were new and ‘wardriving’ was still a word, a few guys put a big antenna on a rifle and brought it to DefCon. Times have changed, technology has improved, and now [Hunter] has built his own improved version.

The original sniper Yagi was a simple device with a 2.4 GHz directional antenna taped onto the barrel, but without any real computational power. Now that displays, ARM boards, and the software to put this project all together are cheap and readily available, [Hunter] looked towards ubiquitous computing platforms to make his Sniper Yagi a little more useful.

This version uses a high gain (25dBi) antenna, a slick fold-out screen, and a Raspberry Pi loaded up with Raspberry Pwn, the pentesting Raspi distro, to run the gun. There’s a button connected to the trigger that will automatically search the WiFi spectrum for the best candidate for cracking and… get cracking.

[Hunter] says he hasn’t taken this highly modified airsoft rifle outside, nor has he pointed out a window. This leaves us with the question of how he’s actually testing it, but at least it looks really, really cool.

Adding An RPM Readout For A Home Made CNC Mill

rpm_lcd

[Rui] recently put the finishing touches on his homemade CNC mill, which utilizes a dremel-like rotary tool. The problem with using rotary tools for this kind of application is you don’t really have an accurate speed readout… so he designed his own RPM gauge.

The sensor is in itself very simple. He’s using a TLE4935L hall effect sensor, a spare 16FE88 microcontroller, a Nokia LCD, and one tiny neodymium magnet. The magnet has been carefully epoxied onto the motor fan, with the hall effect sensor close by. He’s also built a guard around it, just in case the magnet decides to fly off at high speeds.

During testing he hooked up the hall effect sensor to both his home-made circuit, and an oscilloscope to confirm his findings. Once he was assured everything was working properly he sealed it off and mounted the LCD above the spindle as a nice digital readout.

Continue reading “Adding An RPM Readout For A Home Made CNC Mill”

Flying RC Toaster

Do you remember that screen saver from the 80’s of flying toasters? Well the guys over at Flite Test just made a real flying toaster.

The first challenge was converting a toaster to run off batteries, which [David] accomplished by splitting the elements in the 110V toaster into 4 segments, and running them off of 6-cell LiPo — when the toaster is on, it draws almost 700W. The next question was — how much of an effect does air flow have on a toaster’s ability to toast? As it turns out, not that much! They tested the system by driving down the street holding a toaster out of the passenger window of the car, and while they got some strange looks, they also successfully toasted the bread.

The next step was making a plane capable of carrying the extra batteries, and a bulky, not-so-aerodynamic toaster. This was probably the easiest part, as they have made a flying 20kg cinder block before. Needless to say, making a toaster capable of flight was not much of a challenge.

Our favorite part of the video is the test flight, where [Josh] wears a POV visor system to, wait for it… watch the bread toasting. Check it out after the break!

Continue reading “Flying RC Toaster”

Custom Wireless Headphone Charging Station

wirelessHeadphoneChargingStation

We’ve come to expect quite a lot of convenience from our technology, to the point where repeatedly plugging in a device for recharging can seem tedious. Hackaday regular [Valentin Ameres] decided to ditch the plugs and built his own wireless headphone charger. We’ve seen [Valentin’s] work before, and one thing’s for certain: this guy loves his laser cutter. And he should, considering it’s churned out key components for a gorgeous Arc Reactor replica and his Airsoft Turret. [Valentin] fired it up yet again to carve the charging stand out of acrylic, then used a small torch and the edge of a table to bend the stand into shape.

He sourced the needed coils online and soldered the receiving coil to a spare miniUSB plug. These components are glued onto a laser-cut acrylic attachment, which fits against the side of the headphone and is held in place by plugging directly into the earpiece’s miniUSB jack. The headphones rest on the laser-cut charging stand, which has an extrusion of acrylic on one side that holds the emitter coil in position against the receiver coil. [Valentin] also added a simple momentary switch at the top of the stand to activate both the emitter coil and a status LED when pressed by the headphones.

Stick around for a video of the build below, and check out some other headphone hacks, like adding a Bluetooth upgrade or making a custom pair out of construction earmuffs.

Continue reading “Custom Wireless Headphone Charging Station”

Giving An RC Tank A Fire Control Computer

tank

[Vincent] plays around with remote control tanks, and even though his current model is a WWII-era armor piece, he’d still like modern accoutrements such as a fire control computer and laser sighting for his main gun. His latest project did just that (French, Google translation) with the help of an Arduino, a few modifications to the receiver, and an IR rangefinder.

The stock RC tank includes servos to move the turret and the requisite electronics to fire an Airsoft gun. The precision of the mechanical movements inside the turret weren’t very precise, though, so [Vincent] had to gear down the servos to turn large movements into slight adjustments. After that, he installed an IR rangefinder and laser diode onto the barrel that allowed the gun to sight a target and read its distance.

After some experimentation with the rangefinder and laser, [Vincent] plotted data from firing a few BBs at a whole bunch of distances and targets. The graph came out fairly linear, and after plugging this into a graphing calculator, he was able to find an equation that took into account the distance and angle so the Arduino-powered fire control computer would hit its mark.

The accuracy of the gun is very impressive, all things considered. [Vincent] is able to accurately fire BBs downrange and hit an 8×12 cm target at five meters. You can check out that action below.

Continue reading “Giving An RC Tank A Fire Control Computer”