Analog Clock Goes Digital, Or Vice Versa

Designing a good clock takes a lot of considerations. It’s not just hands, faces, and numbers anymore; there are also word clocks, electronic clocks, marble clocks, or water clocks, and just about anything else imaginable can be used to tell time. Of course, electronic clocks are great for their versatility, and this one shows off an analog-looking clock that is (of course) digital, leveraging all of the perks of analog with all of the upsides of digital electronics.

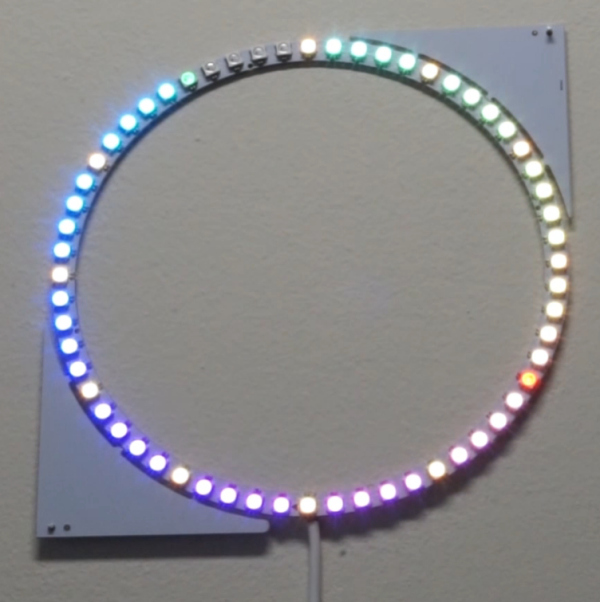
One of the key design considerations that [Sasa] had while building this piece was that it needed to be silent. LEDs certainly fit that description, so the decision was made to go with an WS2812b ring. It runs using a STM ST32F103 Nucleo board (and a cheaper version of it in later versions of this clock) which shows a red LED for the current hour, yellow LEDs for the traditional analog clock divisions, a green LED for the current minute, and glows the rest of the LEDs up to the current minute with a rainbow pattern.

This is a really clean, simple build with good design at its core, and would be easy to replicate if you’re looking for an eye-catching clock to build. As a bonus, all of the schematics and code are available on the project site, so everything you need is there. If you’re looking for more inspiration, there are some clocks that are even more unique, like this marble clock that is a work of art — but is anything but silent.

7 Segment Clockwork Display Made From Cardboard

We’ve seen a variety of oddball 7-segment displays in the past, but this one uses a new material: both for the display and the mechanical mechanism that drives it; cardboard. Yup, the whole thing is made from cardboard, wood and a few rubber bands. [The Q] shows how he put together in this nice video, starting from first principles that show how the segments are made: simple pieces of cardboard painted on one side with fluorescent paint. A piece of wood pushes the element out to blank it, and each element is connected to a cam wheel that pushes the wood in or out.

The really clever bit is that [The Q] mapped digits 0 – 9 onto a matrix for which of the 7 segments is “on” or “off”. He then used this information to create a stack of 7 cams on a central axle. As you rotate the axle, the cams turn, moving the wooding arms. The arms then cause the elements to flip as they count up through the digits. In essence, he engineered a physical decimal to 7 segment decoder, much like the electronic one inside the SN74LS47. The whole assembly is capped by a knob that indicates which digit is currently displayed. If mechanical displays like this are your thing, check out this one made from LEGO parts, or this awesome 3D printed creation.

Continue reading “7 Segment Clockwork Display Made From Cardboard”

A 3D Printed Marble Clock

There are clocks with pendulums, gears, and circuits. How about one with marbles? Initially designed in the ’70s, rolling ball clocks came in many designs and materials, but this is the future, so [gocivici] has created an Instructable to show you how you can 3D print and build your own.

Three rows of marbles keep track of the time, one for one hour intervals, one for five-minute intervals and a third for one minute intervals. It makes reading the time a bit more difficult than a pair of hands, but more fun. The clock uses the weight of the marbles to know when a row needs resetting. When the fifth marble drops onto the minute row, its weight causes the row to tilt, sending all but one marble down to the bottom of the machine. The marble that caused the tilting is sent down to the row underneath, perhaps causing a cascade of marbles down to the bottom.

There is something quite satisfying about seeing the marbles moving around in [gocivici]’s mechanical marble clock. Sure, it’s probably too loud for the nightstand, but it keeps time and looks great. In this build a stepper motor drives the main wheel which acts as an elevator, grabbing a marble from the bottom and raising it to the top to tumble down and find its position among the rows.

Of course, at Hackaday we love clocks so there have been many clock builds showcased here; all you need do is a quick search for “clock” to find some incredible designs and builds. We’ve also featured similar marble clocks.

via BoingBoing

Continue reading “A 3D Printed Marble Clock”

The Nitty-Gritty Of Making A Brass Clock

Among all the timepieces that we feature here at Hackaday, surprisingly we bring you relatively few clocks. That might seem an incomprehensible statement given the plethora of, well, clocks, that appear here, but it’s one that hinges upon the type of clock. Electronic clocks of extreme skill, complexity, and beauty, yes, but traditional mechanical clocks? Not so many.

So [Thonemeister]’s wall-mounted brass alarm clock was a welcome sight on our tips line, and his write-up is a fascinating exposition of the path taken by a novice clockmaker on their first build. He starts by describing his workshop, then steps methodically through each of the constituent parts of the clock.

We see the frame, escapement mechanism, gears, and movement taking shape, and we learn something about clockmaker’s tools from the pitfalls he encountered. He was a complete lathe novice at the start of this build, and it’s fun to follow along with his learning curve. As we see thed finished clock taking shape, we even get to see the little touches like forming the hooks for the weights. He bought the bell for the clock off-the-shelf, not wishing to expend the considerable piece of brass stock it would have taken to machine it himself. But for the most part, this is an engaging scratch build you won’t want to miss.

Many of us will never make a traditional clock. But that need not stop us finding the work that goes into one an extremely fascinating read. We have more for you if this has whetted your appetite: you’ll be interested in the escapement mechanism, and if brass is a bit much, how about wood?

Clock This! A 3D-Printed Escapement Mechanism

Traditional mechanical clockmaking is an art that despite being almost the archetype of precision engineering skill, appears rarely in our world of hardware hackers. That’s because making a clock mechanism is hard, and it is for good reason that professional clockmakers serve a long apprenticeship to learn their craft.

Though crafting one by hand is no easy task, a clock escapement is a surprisingly simple mechanism. Simple enough in fact that one can be 3D-printed, and that is just what [Josh Zhou] has done with a model posted on Thingiverse.

The model is simply the escapement mechanism, so to make a full clock there would have to be added a geartrain and clock face drive mechanism. But given a pair of 608 skateboard wheel bearings and a suitable weight and string to provide a power source, its pendulum will happily swing and provide that all-important tick. We’ve posted his short video below the break, so if Nixie clocks aren’t enough for you then perhaps you’d like to take it as inspiration to go mechanical.

A pendulum escapement of this type is only one of many varieties that have been produced over the long history of clockmaking. Our colleague [Manuel Rodriguez-Achach] took a look at some of them back in 2016.

Continue reading “Clock This! A 3D-Printed Escapement Mechanism”

How To Reverse Engineer Mechanical Designs For 3D Modeling

If you’re interested in 3D printing or CNC milling — or really any kind of fabrication — then duplicating or interfacing with an existing part is probably on your to-do list. The ability to print replacement parts when something breaks is often one of the top selling points of 3D printing. Want some proof? Just take a look at what people made for our Repairs You Can Print contest.

Of course, to do that you need to be able to make an accurate 3D model of the replacement part. That’s fairly straightforward if the part has simple geometry made up of a primitive solid or two. But, what about the more complicated parts you’re likely to come across?

In this article, I’m going to teach you how to reverse engineer and model those parts. Years ago, I worked for a medical device company where the business model was to duplicate out-of-patent medical products. That meant that my entire job was reverse engineering complex precision-made devices as accurately as possible. The goal was to reproduce products that were indistinguishable from the original, and because they were used for things like trauma reconstruction, it was critical that I got it right.

Continue reading “How To Reverse Engineer Mechanical Designs For 3D Modeling”

The White Rabbit Nixie Clock

Instructables user [hellboy] — a recent convert to the ways of the laser cutter — is a longtime admirer of Nixie tubes. In melding these two joys, he has been able to design and build this gorgeous work of art: The White Rabbit Nixie Clock.

Going into this build, [hellboy] was concerned over the lifespan of the tubes, and so needed to be able to turn them off when not needed. Discarding their original idea of having the clock open with servos, [hellboy]’s clock opens by pressing down on a bar and is closed by snapping the lid shut — albeit slightly more complicated than your average timepiece. Given the intricacy of the mechanism, he had to run through numerous prototypes — testing, tweaking and scrapping parts along the way.

With the power of steam-bending, [hellboy] lovingly moulded walnut planks and a sundry list of other types of wood to define the ‘rabbit’ appearance of the mechanism, and the other parts of the clock’s case. Once again, designing the clock around a row of six pivoting Nixie tubes was no mean feat — especially, as [hellboy] points out, when twenty or so wires need to rotate with them! After a few attempts, the Nixie tubes, their 3mm blue LEDs and associated wires were properly seated.

Continue reading “The White Rabbit Nixie Clock”