New (mis)Use For Lithophanes: Miniature Diorama Backgrounds

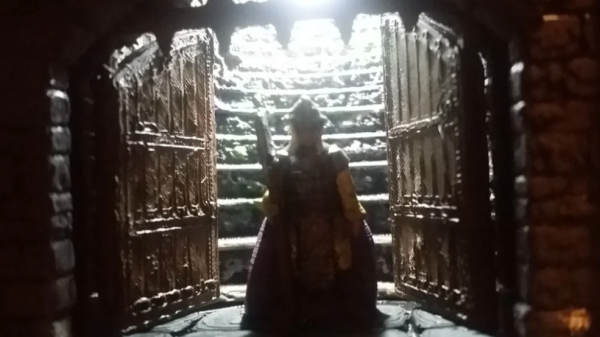
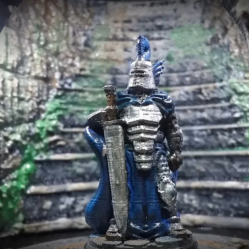
What’s better than a well-lit photo of a 3D-printed miniature? A photo of the miniature in a mini diorama, of course. [OrionDeHunter] shows off a clever technique that has something in common with old-timey photo stages and painted backgrounds, and (mis)uses 3D-printed lithophanes to pull it off. What [OrionDeHunter] does is use a curved and painted lithophane as a stand-in for a background, and the results look great!

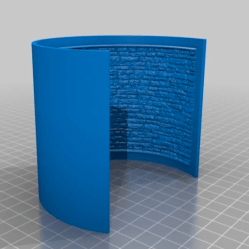
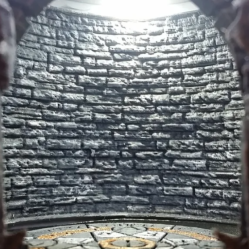
Lithophanes are intended to be illuminated from behind to show an image, with thin areas showing as lighter and thicker areas darker, but when it comes to high contrast patterned images like brick walls, the same things that make a good lithophane just happen to also make a pretty good 3D model in the normal sense. No 3D scanning or photogrammetry required.

Here is the basic process: instead of creating a 3D model of a brick wall from scratch, [OrionDeHunter] simply converted an image of a brick wall (or stairs) into a curved lithophane with an online tool. The STL model of the lithophane is then 3D printed, painted, and used as a swappable background. When macro shots of the miniatures are taken, the curved background looks just right and allows for some controlled lighting. It’s a neat trick, and well applied in this project. Some sample images demonstrating how it works are just under the break.

Lithophanes were originally made using marble or thin porcelain, but a modern spin has been put on the technique with 3D printing. Enterprising hackers have even discovered ways to add color, too.

Art of 3D printer in the middle of printing a Hackaday Jolly Wrencher logo

3D Printering: Will A Resin Printer Retire Your Filament-based One?

Adding a resin printer to one’s workbench has never looked so attractive, nor been so affordable. Complex shapes with effortlessly great detail and surface finish? Yes, please! Well, photos make the results look effortless, anyway. Since filament-based printers using fused deposition modeling (FDM) get solid “could be better” ratings when it comes to surface finish and small detail resolution, will a trusty FDM printer end up retired if one buys a resin printer?

The short answer is this: for users who already use FDM, a resin-based stereolithography (SLA) printer is not likely to take over. What is more likely to happen is that the filament printer continues to do the same jobs it is good at, while the resin printer opens some wonderful new doors. This is partly because those great SLA prints will come at a cost that may not always justify the extra work.

Let’s go through what makes SLA good, what it needs in return, and how it does and doesn’t fit in with FDM.

Continue reading “3D Printering: Will A Resin Printer Retire Your Filament-based One?”

Tiny ThinkPad Plays Tiny Games

[Paul Klinger] can’t seem to get enough of building tiny, amazing gaming rigs, and we love him for that. They combine two of our favorites: miniatures and portable gaming. His newest creation honors the form of the formidable ThinkPad.

Of course it has the red nipple and lid LED—wouldn’t be a ThinkPad without ’em. ThinkTiny’s nipple is a 5-way joystick that plays Snake, Tetris, Lunar Lander, and more on an OLED screen. Like its predecessor the Tiny PC, [Paul] used an ATtiny1614, which (FYI) has a new one-wire UDPI interface. He can easily reprogram it through pogo pin holes built into the case.

There are some nice stylistic details at play here, too. The lid LED is both delivered and diffused by a 2mm grain of fiber-optic cable. And [Paul] printed the cover with a color change to transparent filament to make the Think logo and the charging LEDs shine through. Maneuver your way past the break to see it in action.

If you haven’t leveled up to AVR programming yet, introduce yourself to Arduboy.

Continue reading “Tiny ThinkPad Plays Tiny Games”

Rocking Playmobil Wedding

Many of us have put our making/hacking/building skills to use as a favor for our friends and family. [Boris Werner] is no different, he set about creating a music festival stage with Playmobil figures and parts for a couple of friends who were getting married. The miniature performers are 1/24 scale models of the forming family. The bride and groom are on guitar and vocals while junior drums.

Turning children’s toys into a wedding-worthy gift isn’t easy but the level of detail [Boris Werner] used is something we can all learn from. The video after the break does a great job of showing just how many cool synchronized lighting features can be crammed into a tiny stage in the flavor of a real show and often using genuine Playmobil parts. Automation was a mix of MOSFET controlled LEDs for the stage lighting, addressable light rings behind the curtain, a disco ball with a stepper motor and music, all controlled by an Arduino.

Unless you are some kind of Playmobil purist, this is way cooler than anything straight out of the box. This is the first mention of Playmobil on Hackaday but miniatures are hardly a new subject like this similarly scaled space sedan.

Continue reading “Rocking Playmobil Wedding”

Casting Metal Directly Into 3D Printed Molds

Casting metal and 3D printing go together like nuts and gum, and there are no shortage techniques that use the two together. Lost PLA casting is common, and sculptors are getting turned on to creating their works in plastic first before sending it off to the foundry. Now the folks at FormLabs have turned the whole ‘casting metal and 3D printer’ thing on its head: they’re printing sacrificial molds to cast pewter.

There are two techniques demonstrated in this tutorial, but the real winner here is printing a complete sacrificial mold for pewter miniatures. While this technique requires a little bit of work including washing, curing, and a bit of post-processing, you would have to do that anyway with anything coming out of a resin printer.

The material of choice for these molds is a high temp resin with a heat deflection temperature of 289 °C. Using a pewter alloy that melts at 260 °C, casting a metal miniature is as simple as pouring molten metal into a mold. Demolding might be a little finicky, but with a small screwdriver used as a chisel, it’s possible to get the cast newly parts out.

We’ve seen pewter casting with PLA, but the quality available from the Form resin printers is truly amazing and produces some great looking miniatures.

A Tiny Sharp MZ-80K That Really Works!

If you were a computer enthusiast in the late 1970s and early 1980s, one of your objects of desire may well have been a Sharp MZ-80K. This was an all-in-one machine from the Japanese electronics giant, and like Commodore’s PET line it included a CRT monitor, full alphanumeric keyboard and cassette tape drive in a smart console.

[Yasushi Enari] is a modeller of miniatures, and while at high school back in 1981 he made a perfect 1/5 scale model of an MZ-80K as an art project. Fast-forward to 2017, and with the help of a Raspberry Pi Zero, a miniature LCD composite video screen, and a Li-Po battery, he’s turned his 1981 model into a functioning computer.

Sadly he was not able to make his tiny 1981 plastic keyboard work, so an external Bluetooth unit is required to perform that function. And he makes no mention of running an MZ-80K emulator on the little machine, either. But the result is a work of art, and an odd collaboration between his adult and teenage self, something we are guessing most readers would be proud to own.

This isn’t the first tiny replica computer we’ve shown you, an Odroid W went into making this tiny Powermac from an American Girl doll’s toy computer.

Thanks [RC2014] for the tip.

Hackaday Links: May Day, 2016

Humble Bundle is a great way to fill up your Steam library – just pay what you want, and get some indie video games. The Humble Bundle is much more than video games, because No Starch Press just put up a bundle of books on hacking. No, there are no books about wearing balaclavas and using laptops with one hand. I haven’t written that book yet. There’s some choice books in this bundle, including [Bunnie]’s Hacking the XboxAutomate the Boring Stuff with Python, and Practical Malware Analysis.

The Raspberry Pi camera – the $25 add-on webcam that plugs directly into the Pi – is getting an upgrade. The original camera was a five Megapixel sensor that was EOL’d at the end of 2014. The Raspberry Pi foundation bought up a lot of stock, but eventually there would be a replacement. The new sensor is a Sony IMX219 eight Megapixel deal, available at the same price. We assume a NoIR version without the IR filter will be released shortly.

Here’s a little hardware review that doesn’t quite merit a full post. The Raspberry Pi Zero is great, and will be even better once production ramps up again and stock lands in warehouses. One problem with the Zero is the lack of USB ports, leading to at least two Hackaday posts with the exact same headline, ‘Yet Another Pi Zero USB Hub‘. Obviously, there’s a market for an easy to use USB hub for the Zero, and this company is stepping up to fill the need. The killer feature here is the use of pogo pins to tap into the USB differential lines, power and ground pads on the bottom of the Pi Zero. The USB hub is based on the popular FE 1.1 4-port USB hub controller, giving the Pi Zero four USB 2.0 ports. Does it work? Yeah, and it’s only $10. A pretty neat little device that will be very useful when Pi Zeros flood workbenches the world over.

It was announced in 2014, released in 2015, but the STM32F7 hasn’t seen a lot of action around these parts. A shame, because this is the upgrade to the famously powerful STM32F4 microcontroller that’s already capable of driving high-resolution displays through VGA, being an engine control unit for a 96 Ford Aspire, and being a very complex brushless motor driver. The STM32F7 can do all of these and more, and now ST is cutting prices on the F7’s Discovery Board. If you’re looking for a high-power ARM micro and don’t need to run Linux, you won’t do better elsewhere.

Need to reflow a board, but don’t have a toaster oven? Use a blowtorch! By holding a MAPP blowtorch a foot away from a board, [whitequark] was able to successfully reflow a large buck converter. There’s a lot of water vapor that will condense on the board, so a good cleaning afterward is a good idea.

A few weeks ago, [Mr. LeMieux] built a 360 degree, all-metal hinge. He’s been up to something a little more dangerous since then: building piles of mini table saws. Small table saws are useful for miniatures, models, and the like. [Mr. LeMieux]’s table saw is a piece of CNC’d aluminum, with a bearing and saw arbor that attaches to an electric drill. Dangerous, you say? Not compared to the competition. Behold the worst forty dollars I’ve ever spent. This Horror Freight mini table saw is by far the worst tool I’ve ever used. The bed was caked with streaky layers of paint, uneven, the blade wasn’t set at 90 degrees, and the whole thing was horrifically underpowered. Trust me when I say the CNC electric drill version is safer.