Logic Analyzers: Decoding And Monitoring

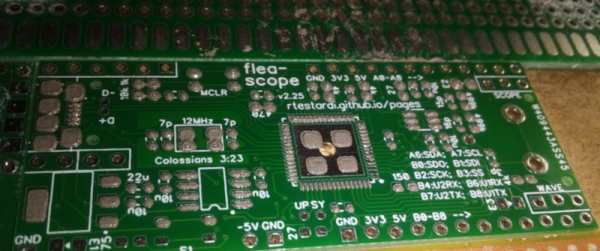
Last time, we looked into using a logic analyzer to decode SPI signals of LCD displays, which can help us reuse LCD screens from proprietary systems, or port LCD driver code from one platform to another! If you are to do that, however, you might find a bottleneck – typically, you need to capture a whole bunch of data and then go through it, comparing bytes one by one, which is quite slow. If you have tinkered with Pulseview, you probably have already found an option to export decoded data – all you need to do is right-click on the decoder output and you’ll be presented with a bunch of options to export it. Here’s what you will find:

2521888-2521888 I²C: Address/data: Start
2521896-2521947 I²C: Address/data: Address write: 22
2521947-2521954 I²C: Address/data: Write
2521955-2521962 I²C: Address/data: ACK
2521962-2522020 I²C: Address/data: Data write: 01
2522021-2522028 I²C: Address/data: ACK
2522030-2522030 I²C: Address/data: Start repeat
2522038-2522089 I²C: Address/data: Address read: 22
2522089-2522096 I²C: Address/data: Read
2522096-2522103 I²C: Address/data: ACK
2522104-2522162 I²C: Address/data: Data read: 91
2522162-2522169 I²C: Address/data: NACK
2522172-2522172 I²C: Address/data: Stop

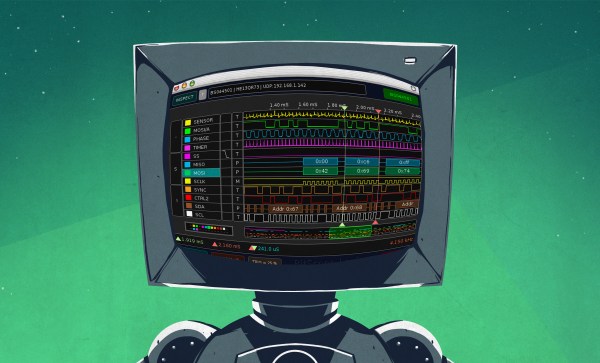
Whether on the screen or in an exported file, the decoder output is not terribly readable – depending on the kind of interface you’re sniffing, be it I2C, UART or SPI, you will get five to ten lines of decoder output for every byte transferred. If you’re getting large amounts of data from your logic analyzer and you want to actually understand what’s happening, this quickly will become a problem – not to mention that scrolling through the Pulseview window is not a comfortable experience.

The above output could look like this: 0x22: read 0x01 ( DEV_ID) = 0x91 (0b10010001). Yet, it doesn’t, and I want to show you how to correct this injustice. Today, we supercharge Pulseview with a few external scripts, and I’ll show you how to transfer large amounts of Sigrok decoder output data into beautiful human-readable transaction printouts. While we’re at it, let’s also check out commandline sigrok, avoiding the Pulseview UI altogether – with sigrok-cli, you can easily create a lightweight program that runs in the background and saves all captured data into a text file, or shows it on a screen in realtime! Continue reading “Logic Analyzers: Decoding And Monitoring”

Decoding The 8088

There is a lot to like about open software, and in some areas, a well-thought-out piece of software can really make a huge impact. A great example of this is the Sigrok project. Creating simple devices that act like a logic analyzer is relatively easy. What’s hard is writing nice software for such a setup including protocol decoders. Sigrok has done it and since it is open, you can add your device and decode your protocol. [GloriousCow] had done the hardware part of interfacing to the 8088 in an IBM PC using an off-the-shelf logic analyzer that uses a customized version of Sigrok. But the output was a CSV file you had to process in a spreadsheet program. The next step: write a decoder for Sigrok to understand 8088 bus cycles.

The post covers the details of writing such a plug-in for Pulseview, the Sigrok GUI. It will also work for the command line interface if you prefer that. The code is in Python.

Continue reading “Decoding The 8088”

Bus Sniffing The Model 5150 For Better Emulation

At the risk of stating the obvious, a PC is more than just its processor. And if you want to accurately emulate what’s going on inside the CPU, you’d do well to pay attention to the rest of the machine, as [GloriousCow] shows us by bus-sniffing the original IBM Model 5150.

A little background is perhaps in order. Earlier this year, [GloriousCow] revealed MartyPC, the cycle-accurate 8088 emulator written entirely in Rust. A cycle-accurate emulation of the original IBM PC is perhaps a bit overkill, unless of course you need to run something like Area 5150, a demo that stretches what’s possible with the original PC architecture but is notoriously finicky about what hardware it runs on.

Getting Area 5150 running on an emulator wasn’t enough for [GloriousCow], though, so a deep dive into exactly what’s happening on the bus of an original IBM Model 5150 was in order. After toying with and wisely dismissing several homebrew logic analyzer solutions, a DSLogic U3Pro32 logic analyzer was drafted into the project.

Fitting the probes for the 32-channel instrument could have been a problem except for the rarely populated socket for the 8087 floating-point coprocessor on the motherboard. A custom adapter gave access to most of the interesting lines, including address and data buses, while a few more signals, like the CGA sync lines, were tapped directly off the video card.

Capturing one second of operation yielded a whopping 1.48 GB CSV file, but a little massaging with Python trimmed the file considerably. That’s when the real fun began, strangely enough in Excel, which [GloriousCow] used as an ad hoc but quite effective visualization tool, thanks to the clever use of custom formatting. We especially like the column that shows low-to-high transitions as a square wave — going down the column, sure, but still really useful.

The whole thing is a powerful toolkit for exploring the action on the bus during the execution of Area 5150, only part of which [GloriousCow] has undertaken as yet. We’ll be eagerly awaiting the next steps on this one — maybe it’ll even help get the demo running as well as 8088MPH on a modded Book8088.

$13 Scope And Logic Analyzer Hits 18 Msps

We aren’t sure what’s coolest about [Richard Testardi’s] Flea-Scope. It costs about $13 plus the cost of making the PCB. It operates at 18 million samples per second. It also doesn’t need any software — you connect to it with your browser! It works as an oscilloscope, a logic analyzer, and a waveform generator. Not bad. The board is basically a little life support around a PIC32MK and the software required to run it.

Of course, for $13, you need to temper your expectations. One analog input reads from -6 to 6V (hint: use a 10X probe). The goal was for the instrument to be accurate within 2%.  There are also nine digital inputs sampled simultaneously with the analog sampling. The signal generator portion can output a 4 MHz square wave or a 40 kHz arbitrary waveform.

Continue reading “$13 Scope And Logic Analyzer Hits 18 Msps”

Reverse-engineering The Milwaukee M18 Redlink Protocol

In an ideal world, every single battery pack for power tools would use the same physical interface and speak a clearly documented protocol with chargers. Since we live in a decidedly less-than-ideal world, we get to enjoy the fun pastime of reverse-engineering the interfaces and protocols of said battery packs.

Hooking up a logic analyzer to a M18 battery and charger.

A recent video from the [Tool Scientist] goes over what is already known about the Milwaukee M18 Redlink protocol, used with the manufacturer’s M18-series of batteries, before diving into some prodding and poking of these packs’ sensitive parts to see what comes out of their interface.

Previously, [Buy It Fix It] shared their findings on Reddit, covering the basic protocol, including the checksum method, but without an in-depth analysis of the entire charging protocol. Meanwhile [Quagmire Repair] performed an in-depth teardown and reverse-engineering of the M18 hardware, including the circuitry of the BMS.

Putting these two things together, [Tool Scientist] was able to quickly get some of his M18 packs strapped down into the analysis chair for both passive analysis, as well as the effect of overvoltage, undervoltage, overheating and freezing the battery pack on the output reported by the battery’s BMS.

One of the lists of commands and response messages obtained by [Tool Scientist] on YouTube.
The result is a rather comprehensive list of instructions obtained under these various conditions, including a fault condition (05) returned by the BMS of one pack indicating its likely demise. Overall, it does not appear to be a particularly special (or well-designed) protocol, but it does make for a good reverse-engineering target, while adding to the body of collective knowledge on these widely available battery packs.

Hopefully the same inertia that prevents people from moving outside the designated power tool ecosystem due to the incompatible battery packs will also ensure that this level of  knowledge will remain relevant for the foreseeable future, especially since the manufacturers of knock-off battery packs seem rather unwilling to share the results of their own reverse-engineering efforts.

Continue reading “Reverse-engineering The Milwaukee M18 Redlink Protocol”

Logic Analyzers: Capabilities And Limitations

Last time, we’ve used a logic analyzer to investigate the ID_SD and ID_SC pins on a Raspberry Pi, which turned out to be regular I2C, and then we hacked hotplug into the Raspberry Pi camera code with an external MCU. Such an exercise makes logic analyzers look easy, and that’s because they are! If you have a logic analyzer, you’ll find that a whole bunch of hacks become available to you.

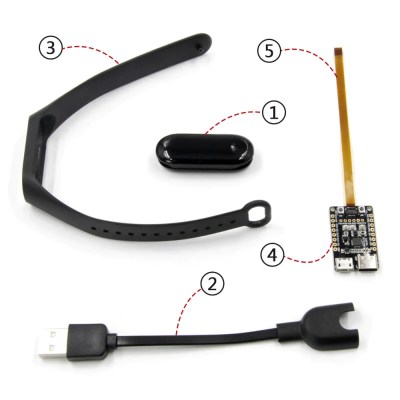
In this article, let’s figure out places where you can use a logic analyzer, and places where you can’t. We’ll start with the first limitation of logic analyzers – capture speed. For instance, here’s a cool thing you can buy on Aliexpress – a wristband from TTGO that looks like a usual fitness tracker, but has an ESP32 in it, together with an IMU, an RTC, and an IPS screen! The seller also has an FFC-connectable devboard for programming this wristband over UART, plus vibromotor and heartrate sensor expansion modules.

You can run C, MicroPython, Rust, JavaScript, or whatever else – just remember to bring your own power saving, because the battery is super small. I intended to run MicroPython on it, however, and have stumbled upon a problem – the ST7735-controller display just wouldn’t work with the st7735.py library I found; my image would be misaligned and inverted.

The specifications didn’t provide much other than “ST7735, 80×160”. Recap – the original code uses an Arduino (C++) ST7735 library and works well, and we have a MicroPython ST7735 library that doesn’t. In addition to that, I was having trouble getting a generic Arduino ST7735 library to work, too. Usually, such a problem is caused by the initialization commands being slightly different, and the reason for that is simple – ST7735 is just the name of the controller IC used on the LCD panel.

Each display in existence has specifics that go beyond the controller – the pixels of the panel could be wired up to the controller in a bunch of different ways, with varying offsets and connection types, and the panel might need different LCD charge pump requirements – say, depending on the panel’s properties, you might need to write 0x10 into a certain register of the ST7735, or you will need 0x40. Get one or more of these registers wrong, and you’ll end up with a misaligned image on your display at best, or no output at worst. Continue reading “Logic Analyzers: Capabilities And Limitations”

Logic Analyzers: Tapping Into Raspberry Pi Secrets

Today, I’d like to highlight a tool that brings your hacking skills to a whole new level, and does that without breaking the bank – in fact, given just how much debugging time you can save, how many fun pursuits you can unlock, and the numerous features you can add, this might be one of the cheapest tools you will get. Whether it’s debugging weird problems, optimizing your code, probing around a gadget you’re reverse-engineering, or maybe trying to understand someone’s open-source library, you are likely missing out a lot if you don’t have a logic analyzer on hand!

It’s heartbreaking to me that some hackers still don’t know the value that a logic analyzer brings. Over and over again, tactical application of a logic analyzer has helped me see an entirely different perspective on something I was hacking on, and that’s just the thing I’d like to demonstrate today.

Diving In

A logic analyzer has a number of digital inputs, and it continuously reads the state of these digital inputs, sending them to your computer or showing them on a screen – it’s like a logic-level-only oscilloscope. If you have an I2C bus with one MCU controlling a sensor, connect a logic analyzer to the clock and data pins, wire up the ground, launch the logic analyzer software on your computer, and see what’s actually happening.

For instance, have you ever noticed the ID_SC and ID_SD pins on the Raspberry Pi GPIO connector? Are you wondering what they’re for? Don’t you want to check what actually happens on these pins? Let’s do that right now! Continue reading “Logic Analyzers: Tapping Into Raspberry Pi Secrets”