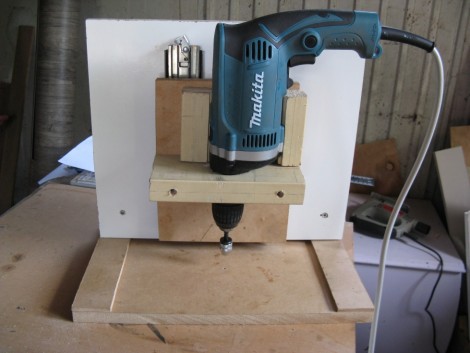
This drill press was built to drill through-hole printed circuit boards. [Rhys Goodwin] didn’t want to shell out for new equipment, so he dug through his scraps to see what he could accomplish. He already had the power drill, and there was no shortage of wood and fasteners. Once he had a mounting platform for the power tool he grabbed a pair of slides from and old rack-mount server rail. This provides smooth and precise movement, along with a tension sprint to keep the rig elevated above the work surface. Turns out the only thing he didn’t already have was the mini-chuck for gripping the 0.8 mm drill bit.
It seems as if [Rhys] is hacking up a storm lately. This drill press is for use with his Inkjet/Toner PCB process from two weeks ago. We also covered his bulk component salvaging system in Sunday’s Links post.


I am totally going to do this.
More expensive than a real drill press if you don’t already have a drill/wood to spare. Especially more expensive if it shakes at all as you will break expensive wire drill bits.
My press was only like $80 and it’s solid steel, gives nice perfect cuts.
Clever idea and would work in a pinch, but like already said, drill presses aren’t that much money.
If you are going to cheap out on anything, it really shouldn’t be your tools.
I just use the plunge router attachment for a Dremel, and use bits (mostly abrasive carbide, not HSS) that can be chucked into a Dremel.
A+ for ingenuity. Harbor Freight currently sells drill presses for $69.95. I purchased one on sale for $49.95.
You’ll break enough bits to slow you down with a dremel press too. This might actually be better. Funny he’s not complaining about that HSS bit getting dull.
Figure on $150-$250 (USD) for a decent drill press with 1/4″ chuck that’s fast enough for fine carbide bits in fiberglass. Remember that even then you’re compromising: look at what old Electro-Mechano iron (found in a quick fact-checking search—it’d be real interesting to know what the real market is for first-quality high speed manual drill presses) still goes for.
My personal solution: I use cheap refurbished (Harbor Freight) drill bits in a Dremel with a drill press stand, and send any remotely complicated (think, more than you’d want to hand wire AGAIN) PCB out before I even think about etching and drilling. But I don’t live in New Zealand either.
A little rule of thumb when drilling(anything)
The velocity of the outside of the bit is proportional to the diameter. In other words the smaller the bit the faster you need to spin it. Obviously different materials and bits require different speeds, but given the same material a smaller bit will need a higher RPM. That is why a dremel, which operates at a very high RPM compared to a hand held drill is preferred to this type of setup.
I use a dremel model 220 stand. There are some adjustable brass screws on the side that should be tightened to get less “play” I also use a large rubber band(the kind you find wrapped around the base of broccoli) at the top of the press wrapping the power cord end of the drill to the metal cylinder of the stand this prevents any play that will quickly kill bits. I set the drill for as high of an RMP as I can stand(earplugs are a must) and am still on the FIRST BIT! after 6 months of use.(hundreds of holes)
I use a dremel for this myself. It works wonders.
dremel tool all the way,drill is way to slow, running at 20,000rpm bits can be reliability fed at 7in/min for well over a hundred holes
I used to use a Dremel with a tiny drill bit (the one that came with the red plastic hand crank drill sold at Radio Shack). The secret to fast efficient hole drilling for a homebrew PCB was to use a piece of perfboard as a template drill guide (set on top). The holes to be drilled should be premarked with a sharpie.
I like this one ( http://hackaday.com/2010/03/18/pcb-drill-press-on-a-budget/ ) and also this one ( http://hackaday.com/2008/07/22/home-made-pcb-drill-press/ ) a lot better. The high RPMs are necessary and that drawer slide above is going to wobble a lot with that big heavy drill hanging off it…that’s a carbide breaker for sure.
Hackaday featured a proper PCB drill press a while back, manufactured by Proxxon:
http://hackaday.com/2009/02/27/tools-proxxon-drill-press-tbm115tbm220/
While the press isn’t cheap, Proxxon makes a whole line of high-speed rotary tools which are priced similarly to Dremel’s offerings but have much better construction. I have their smallest tool, the Micromot 50 ($35-45 on Amazon). It’s a 12V, 20,000 RPM drill with several advantages over the Dremels: steel collets instead of aluminum, a machined metal neck for securing to your ghetto press, surprisingly small size, low noise, and virtually no vibration.
I was impressed enough to try to build my own press based on the Proxxon, and here’s a pic of the work in progress:
http://reboots.g-cipher.net/minidrill.jpg
My grandfather actually has the same things to say about the aluminum collets…
He is one of the members of a (the?) product testing group for dremel and has his fingers in many of the design improvements that dremel has been rolling out in the last few years.
Just wanted to let some of you know that your complaints about some of the things dremels have are getting to their ears lol
@Reboots: Your press looks awesome! As for Proxxon, thanks for the tip. I just checked them out and it looks like I can get them in NZ. (Amazon won’t ship here). When funds permit I’ll be looking to get some kind of decent rotary tool and ether adapt the above press or try to make a really smart one like your yours.
Cheers,
Rhys
@Masta Squidge, great to know. Dremel has a large market segment and improvements will benefit a lot of people. I used the same Moto-Tool for 20 years before bearing runout became unacceptable, but have heard from many corners that quality had fallen off since then.
@Rhys, thanks for the kind words. If I were going to build the press over again I’d just use a precision linear bearing like this:
http://www.linearmotion.skf.com/upload/img274-274bc/linear4.jpg
These are very expensive new but occasionally pop up on eBay for $20+. The result would be a simple, compact, high-tolerance press.
Having said that, cheap drawer slides can be surprisingly precise. Arranging a pair in a V shape might improve stability in both directions.
I’ve seen many reviews of the official dremel drillpress attachment and everybody always says it’s loose and awful until you mod it yourself to make it stable, so that’s the reality but I guess it’s not bad since if you have a dremel you are into modding anyway :)
hi
your idea is absolutely ossom!! just tel me ??” chuck u used to hold the 0.8mm bit and the type of material of bits fits for PCB drilling?