In 1991, Apple released the Quadra line of computers, named after their utilization of the new Motorola 68040 CPU. The Quadra line initially consisted of two models, the Quadra 700 and the Quadra 900. These two models, and the Quadra 950, released as a slight upgrade to the 900, were the peak of performance. You could conceivably load these machines up with 256 Megabytes of RAM, in an era where hard drives hovered around 80 Megabytes. This much RAM would cost as much as a house. These were powerhouses, the first ProTools workstations, and they ran Jurassic Park. If you wanted peak performance in the early 90s, you got a Quadra.
The Quadra 900 and 950 were tower computers, and there were options for floppy, Zip drives, Bernoulli drives, and a CD-ROM drive. They were introduced a little before the ‘multimedia’ hubub, and right now, the plastic bezel for the CD-ROM option is an absurdly expensive piece of plastic. People have paid $150 for an original CD-ROM bezel. Seems like the perfect application of 3D printing, doesn’t it? That’s exactly what [360alaska] over on the 68k Macintosh Liberation Army forms did. The unobtanium bezel can now be sent off to Shapeways.
This project is a continuation of a thread where various forum members shared their .STLs for random bits of Apple plastic, ranging from rubber feet for PowerBooks to the clip-on ‘programmer’s switch’ for the Macintosh SE. The crowning achievement of this community endeavour is the Quadra 950 CD-ROM bezel. There are a few varieties, ranging from one that fits a standard 5 1/4″ drive, to a nearly exact replica of the official Apple offering for their official drive. All the files are there for the downloadin’.
Printing these bezels will be a bit of a challenge for a filament-based printer, but resin printers are getting cheap and Shapeways is always there for you. Painting to match the brominated patina of old plastic is also a challenge, but the forum members have had some success with off-the-shelf spray paints.


Yes 3D printing really is the way to bring these old computer panels, bezels and brackets back from the dead and for very little cost. I’ve been doing some repops for the venerable PDP-11, here is the bezel and switch paddle for the PDP-11/03 https://www.thingiverse.com/thing:2829191
I fully agree, functional prints reach a pinnacle when it comes to NLA parts like faceplates from defunct companies and such. Obviously strength can be an issue, but for cosmetics it’s unmatched.
Though, seems the author isn’t familiar with how 3D printers work?
> Printing these bezels will be a bit of a challenge for a filament-based printer, but resin printers are getting cheap and Shapeways is always there for you.
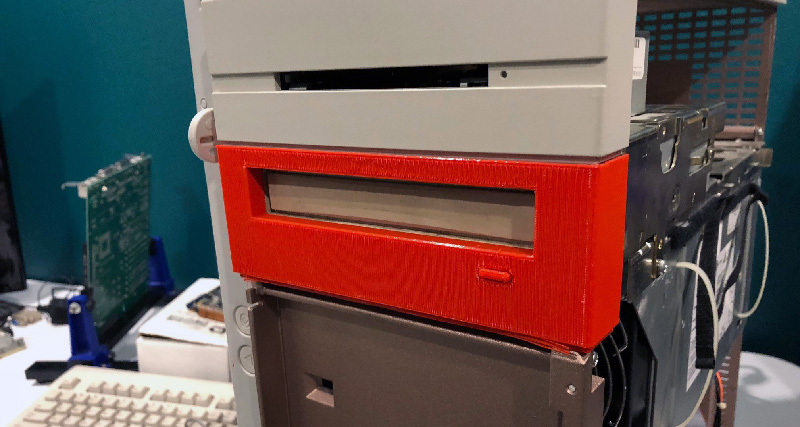
I’ll debunk this one now, that print shown above is dead easy. Front on bed, use supports for overhangs (are there even any?). Resin is trash for this, too brittle and still doesn’t age well. Not to mention a resin printer that can handle a print that huge is expensive. Way more than, say, anything Creality, Monoprice Deltas, the list is ever-evolving anymore, even with upgrades and such. FDM has been around a solid decade. Prevalence brings down prices. Form1 still sells for a grand and Form2 is about the same (even secondhand), you can grab a decent secondhand FDM for a couple hundred right now (I just checked eBay even), some are about that price brand new. Define “cheap” again?
> Painting to match the brominated patina of old plastic is also a challenge, but the forum members have had some success with off-the-shelf spray paints.
Most people will happily settle for a “close enough” match (I would) and 3D filament doesn’t just come in red ya know — us guys that make and share designs (yup, I’m on Thingiverse too) tend to do that to accent (or “highlight”) the part in question. Mixing nozzles even exist to get that perfect [literal] blend, between 1 to 4 simultaneous filaments. I don’t think color matching is really a problem that FDM is baffled by. I would’ve thought resin can mix colors though, but guess I’m wrong, news to me.
The problem with having access to 3D printers is: Everything looks as though it’s a perfect printing task. In this case I’m very much in doubt. I mean, it’s okay, and it probably was a lot of fun in the making. And then there’s the apple parts community project which is brilliant by itself. But an old-school woodwork and maybe a lasercut front would look much nicer, wouldn’t it? Or maybe use the 3D print as a moulding positive (after leveling and priming).
This is about making hard to find parts for people that don’t want wood or acrylic. Your suggestion is valid for some folks, but a majorty want something that looks factory original, and a select few want something that looks custom but still fits like the original.
I do normally agree but it’s nice to also have a low-labor option for people who don’ have those kinds of craftsmanship skills yet.
Are you seriously suggesting trying to carve something this complex out of a block of wood?
More to the point, who would want one weird wood panel on the front of their computer?
LGR’s Clint.
You might not realize it from just seeing this one picture on the top of the article, but the design of these things is quite complex. Looks like some of them even have integrated buttons with printed springs.
This is really the PERFECT application for 3D printing: rapidly prototyping and producing complex one-off parts that don’t have enough demand for a proper production run.
> an old-school woodwork and maybe a lasercut front would look much nicer, wouldn’t it?
#DidntReadTheArticle alert
Name one wood-paneled Apple product. Seriously, one. Saying 3D printing “looks difficult” doesn’t make it so, nor is it a valid basis for saying anybody that likes stock has no taste. (No seriously, that’s the implication, read what you wrote: “wood looks much nicer [than 3D printed plastic]” — isn’t art subjective at best? Not even a “looks better *to me*” either). If layer lines are an issue use ABS/ASA and a cold vapor bath, it’ll look quite injection molded.
The guy provided the STL. It’s as dead easy as “upoad file –> print” and check back when it’s done (with a good machine, anyway). Then grab off printer and put on computer. A cool $100+ saved with minimal effort (more if you count how many others save money too).
Good luck with the omnipresent click-mount tabs that rely on the flexibility of plastic. Or rubber feet. Or power switches…
” These were powerhouses, the first ProTools workstations, and they ran Jurassic Park. If you wanted peak performance in the early 90s, you got a Quadra.”
Except that they weren’t. When fitting out a new lab at that time these seemed like a great platform to work with, so I called Apple in Cupertino and asked if these would run engineering simulation software or interface with any instrumentation. The company was apparently completely unaware of the concepts. The best answer I got was “Well, there are some drawing programs….I guess.”
Apple never really catered to the CAD/CAM or real world interface market segments at all. Even as far back the 90’s all the instrumentation interfacing I saw was done with PC’s with GPIB cards, HP1000’s or PLC’s.
Even back then Apple was seen as a computer for “artistic” types with lots of money to burn.
We wound up with DOS 6.22/WIndows 3.1 machines and enormous HPIB/GPIB busses. In the long run, maybe it was a blessing since we were able to evolve into low-cost machines in a competitive market rather than being captive to Apple’s whims.
As I recall, LabView was originally written for the Mac. Also, I used VersaCad (2D CAD system with a separate 3D visualizer) on a MacII in 1989ish but yeah it was always pretty limited. Eventually I think they gave up on engineering applications entirely.
The Jurassic Park part was tongue-in-cheek… besides, everyone knows the park *really* runs on a UNIX system with a 3d filesystem browser!
Yup. SGI workstations using SGI’s File System Navigator. Just because it looked stupid and fake doesn’t mean it really was fake.
Apple catered to the art and desktop publishing people for a long time. Much of that then went into web stuff. That’s where the genesis of scalable fonts, vector drawing, PDF, Flash and more were. Bryce* and some other 3D modeling and rendering software started on Macintosh.
The Macintosh platform didn’t see a lot of use in industrial and scientific control and instrumentation. Uses I do know of are a pair of twin radio telescopes, one in the USA and one in South America. They use Macintosh IIci boxes with special built NuBus cards to do stuff with the data from the telescope. A scientist from the South American site joined the vintage macs e-mail list looking for a replacement motherboard. An industrial use was a company that made CNC punch presses. They used some variety of Macintosh II series motherboard and custom NuBus cards in their lower cost** series. Someone from a shop with one of those presses joined the list in search of an exact replacement motherboard, wanted same model, revision etc. just in case the custom hardware and control software wouldn’t work with a different Mac model.
*Crazy thing about Bryce, when the company released its first version for Windows they created a new programming language to code the software – and managed to get more errors into the simultaneously released Macintosh version built with tools they’d used for years. One of the gaffes was swapping two of the axis control directions in one function – and they didn’t bother to pull the release to fix it or release a patch. The “Real World Bryce 2” book tells what’s wrong and how to work around it.
**If a CNC punch press with Macintosh based control was “lower cost” I wouldn’t want to know the original OEM price for their high end press control board.
“That’s where the genesis of scalable fonts, vector drawing, PDF, Flash and more were. ”
Except that wasn’t the case, either. They were pilfering from PARC as usual.
http://www.historyofinformation.com/detail.php?entryid=1213
Time to dig in my “old Macs box” – I still have that 300 CD drive and the tray for sure.
Anyone interested? Should be OK and working – at last it was last time I checked it in the late 90s :-)
“Printing these bezels will be a bit of a challenge for a filament-based printer,”
Don’t have a Mac but looking at it I was puzzled by this quote so I loaded up the Stl. Not sure why this appears challenging to you but resin printers aren’t done special magic that eliminates the need for support. I’m fairly sure my mk3 would print this perfectly.
Because it’s a bezel… It’d need a lot of finish work to look good, which is the key. A resin printer would produce a smoother result that likely would need less effort to finish. That was my take on the quote. Personally, I find filament printed stuff to be pretty ugly.
you are in the past. There are plenty of really nice surfaces for fdm now. not just glass or similar. I have 3 different textured PEI flexible steel beds that put an amazing surface on the bottom layer and with a bezel you are going to be printing face down. https://photos.app.goo.gl/yU1F44p4G3oHecsu8 the surface is an ebay powdercoated PEI flex sheet and you can see the resulting surface for that (black) and the prusa powdercoated (blue) it looks like it was injection molded all at once rather than layed down line by line.
i’m wrong, black is the prusa powdercoated and blue is theking ebay sheet.
Not with all the Quadra bezels. Some Quadra machines, like the 840av had this weird curved surface, so no, you couldn’t have the bottom surface be your front surface. That’s the point I was trying to make is not all the Quadra and Centris bezels are flat, and you need to actually build up the front surface of the bezel. I was merely pointing out that I’ve not seen filament printers that don’t take a fair bit of finish work to make look good. A resin printer with a decent resolution will produce a part that requires less finish work.
https://cdn.myminifactory.com/assets/object-assets/5c02fceecf30c/images/720X720-20180120-110137.jpg
Picture is from a Power PC 8100, but it uses the same curved style bezels found on the 840av. I didn’t have a good image of a 3D printed 840av bezel, but yeah, same difference. Filament printing is simply not gonna look as good as resin printing for this type of bezel without extensive finish work after printing is complete.
I’m not sure why you think resin printers are any different. They do not produce a part in the middle of the resin. It has to sit on a base or on support just as an ffd printer. so if the top is curved you orient the part different. But what you started talking about and what i replied about was a flat faced bezel that would print face down and would print fine.
So first, why don’t you stop trying to justify what you said by bringing up another bezel that is different?
Second, why not admit you like the “new hotness” even though you don’t know anything about 3d printers?
third, Resin printers are expensive, smelly, and require all sorts of extra steps than ffd. Resin isn’t cheap, doesn’t have a long shelf life and smells worse than a nail salon with every seat filled. It then requires washing to get the excess off, and then further curing. so it is not just a slow process but a slow, tedious, and extra work process.
btw, Printing that curved bezel would be a piece of cake on an FDM printer. just pick the correct orientation and you would need minimal support and minimal cleanup. If you used tree supports it would be virtually no cleanup.
So I was thinking about this again today and I wonder when you say “a fair bit of finish work” on any print, that you don’t know about soluble supports. SUpport material that just dissolves in water. So once you are done printing you take the print over to the sink sent it in a pan or water, come back and the support is all gone. or soluble interface, where only the interface points are soluble so you soak it in water and the support material interface dissolves and the support material drops off. I have a prusa mk3 with mmu (mutli material) and it can do this. but most of the time I don’t even bother because if you use tree supports and/or selective support you have so little to cleanup it is not even worth it because the soluble material is expensive.