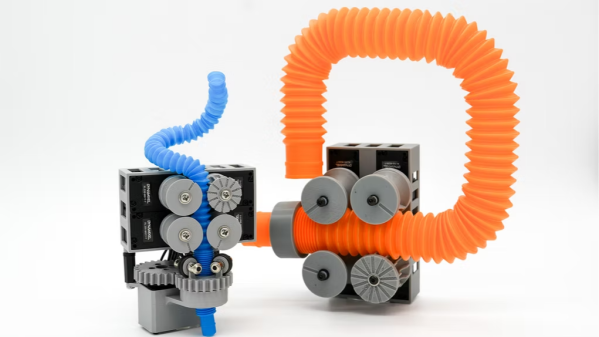
Turbine Blower 3D Prints Every Part, Including Triple Planetary Gears

There was a time when print-in-place moving parts were a curiosity, but [Tomek] shows that things are now at a point where a hand-cranked turbine blower with integrated planetary gears can be entirely 3D printed. Some assembly is needed, but there is no added hardware beyond the printed parts. The blower is capable of decent airflow and can probably be optimized even further. Have a look at it work in the video below.

Every piece being 3D printed brings a few advantages. Prefer the hand crank on the other side? Simply mirror everything. Want a bigger version? Just scale everything up. Because all of the fasteners are printed as well as the parts, there’s no worry about external hardware no longer fitting oversized holes after scaling things up (scaling down might run into issues with tolerances, but if you manage an extra-small version, we’d love to hear about it).

There are a few good tips that are worth keeping in mind when it comes to print-in-place assemblies with moving parts. First, changing the seam location for each layer to ‘Random’ helps make moving parts smoother. This helps prevent the formation of a seam line, which can act as a little speed bump that gets in the way of smooth movement.

The other thing that helps is lubrication. A plastic-safe lubricant like PTFE-based Super Lube is a handy thing to have around the workshop and does wonders for smoothing out the action of 3D-printed moving parts. And we can attest that rubbing candle wax on mating surfaces works pretty well in a pinch.

One downside is that the blower is noisy in operation. 3D printed gears (and even printed bearings) can be effective, but do contribute to a distinct lack of silence compared to their purpose-built versions.

Still, a device like this is a sign of how far 3D printing has come, and how it enables projects that would otherwise remain an idea in a notebook. We do love 3D-printed gears.

Continue reading “Turbine Blower 3D Prints Every Part, Including Triple Planetary Gears”

Building A 3D-Printed RC Dump Truck

Whatever your day job, many of us would love to jump behind the controls of a dump truck for a lark. In the real world, that takes training and expertise and the opportunity is denied to many of us. However, you can live out those dreams on your desk with this 3D-printed build from [ProfessorBoots.]

The build exists as two separate parts—the tractor, and the trailer. The tractor is effectively a fairly straightforward custom RC build, albeit with a few additional features to make it fit for purpose. It’s got six wheels as befitting a proper semi, and it has a nifty retractable magnetic hitch mechanism. This lets it hook up to various trailers and unhitch from them as desired, all from a press on the remote. The hitch also has provision for power and control lines that control whatever trailer happens to be attached.

As for the trailer, it’s a side-dumper that can drop its load to the left or right as desired. The dumping is controlled via a linear actuator using a small DC motor and a threaded rod. A servo controls a sliding locking mechanism which determines whether the truck dumps to the left or right as the linear actuator rises up.

The design video covers the 3D printed design as well as some great action shots of the dump truck doing its thing. We’ve featured some builds from [ProfessorBoots] before, too, like this neat 3D-printed forklift . Video after the break.

Continue reading “Building A 3D-Printed RC Dump Truck”

Spiral Connector Makes Fastener-Free Assemblies

[Anton Gaia]’s SPIRAL sculpture resembles an organizer or modern shelving unit, but what’s really interesting is how it goes together. It’s made entirely from assembling copies of a single component (two, if you count the short ‘end pieces’ as separate) without a fastener in sight. [Anton] made the 3D model available, so check it out for yourself!

The self-similar design of the joint, based on the golden spiral, makes a self-supporting joint that requires neither glue nor fasteners.

The ends of each part form a tight, spiral-shaped joint when assembled with its neighbors. Parts connect solely to themselves without any need of fasteners or adhesives.

The end result is secure, scalable, and with a harmonious structure that is very pleasing to look at. Small wonder [Anton] used it as the basis for artistic work. You can see more pictures here.

The design of the joint is based on the golden spiral (which it turns out is also a pretty useful chicken coop architecture.)

The parts lend themselves quite well to 3D printing, and we’d like to take a moment to appreciate that [Anton] shared the .step file instead of just an STL. STEP (or STP) files can be imported meaningfully into CAD programs, making it much easier to incorporate the design into one’s own work. STEP is also supported natively in many 3D printer slicers, so there’s no need to convert formats just to print them.

A brief video describing SPIRAL is embedded just below, with a closer look at how the pieces fit together.

Continue reading “Spiral Connector Makes Fastener-Free Assemblies”

Tune In To “Higher Lower”, The Minimal Handheld Electronic Game

[Tommy] has a great write-up about designing and building a minimalistic handheld electronic game called “Higher Lower”. It’s an audio-driven game in which the unit plays two tones and asks the player to choose whether the second tone was higher in pitch, or lower. The game relies on 3D printed components and minimal electronics, limiting player input to two buttons and output to whatever a speaker stuck to an output pin from an ATtiny85 can generate.

Fastener-free enclosure means fewer parts, and on the inside are pots for volume and difficulty. We love the thoughtful little tabs that hold the rocker switch in place during assembly.

Gameplay may be straightforward, but working with so little raises a number of design challenges. How does one best communicate game state (and things like scoring) with audio tones only? What’s the optimal way to generate a random seed when the best source of meaningful, zero-extra-components entropy (timing of player input) happens after the game has already started? What’s the most efficient way to turn a clear glue stick into a bunch of identical little light pipes? [Tommy] goes into great detail for each of these, and more.

In addition to the hardware and enclosure design, [Tommy] has tried new things on the software end of things. He found that using tools intended to develop for the Arduboy DIY handheld console along with a hardware emulator made for a very tight feedback loop during development. Being able to work on the software side without actually needing the hardware and chip programmer at hand was also flexible and convenient.

We’ve seen [Tommy]’s work before about his synth kits, and as usual his observations and shared insights about bringing an idea from concept to kit-worthy product are absolutely worth a read.

You can find all the design files on the GitHub repository, but Higher Lower is also available as a reasonably-priced kit with great documentation suitable for anyone with an interest. Watch it in action in the video below.

Continue reading “Tune In To “Higher Lower”, The Minimal Handheld Electronic Game”

Add Wood Grain Texture To 3D Prints – With A Model Of A Log

Adding textures is a great way to experiment with giving 3D prints a different look, and [PandaN] shows off a method of adding a wood grain effect in a way that’s easy to play around with. It involves using a 3D model of a log (complete with concentric tree rings) as a print modifier. The good news is that [PandaN] has already done the work of creating one, as well as showing how to use it.

The model of the stump — complete with concentric tree rings — acts as a modifier for the much-smaller printed object (in this case, a small plate).

In the slicer software one simply uses the log as a modifier for an object to be printed. When a 3D model is used as a modifier in this way, it means different print settings get applied everywhere the object to be printed and the modifier intersect one another.

In the case of this project, the modifier shifts the angle of the fill pattern wherever the models intersect. A fuzzy skin modifier is used as well, and the result is enough to give a wood grain appearance to the printed object. When printed with a wood filament (which is PLA mixed with wood particles), the result looks especially good.

We’ve seen a few different ways to add textures to 3D prints, including using Blender to modify model surfaces. Textures can enhance the look of a model, and are also a good way to hide layer lines.

In addition to the 3D models, [PandaN] provides a ready-to-go project for Bambu slicer with all the necessary settings already configured, so experimenting can be as simple as swapping the object to be printed with a new 3D model. Want to see that in action? Here’s a separate video demonstrating exactly that step-by-step, embedded below.

Continue reading “Add Wood Grain Texture To 3D Prints – With A Model Of A Log”

This BB Shooter Has A Spring, But Not For What You Think

[It’s on my MIND] designed a clever BB blaster featuring a four-bar linkage that prints in a single piece and requires no additional hardware. The interesting part is how it turns a trigger pull into launching a 6 mm plastic BB. There is a spring, but it only acts as a trigger return and plays no part in launching the projectile. So how does it work?

There’s a spring in this BB launcher, but it’s not used like you might expect.

The usual way something like this functions is with the trigger pulling back a striker of some kind, and putting it under tension in the process (usually with the help of a spring) then releasing it. As the striker flies forward, it smacks into a BB and launches it. We’ve seen print-in-place shooters that work this way, but that is not what is happening here.

With [It’s on my MIND]’s BB launcher, the trigger is a four-bar linkage that transforms a rearward pull of the trigger into a forward push of the striker against a BB that is gravity fed from a hopper. The tension comes from the BB’s forward motion being arrested by a physical detent as the striker pushes from behind. Once that tension passes a threshold, the BB pops past the detent and goes flying. Thanks to the mechanical advantage of the four-bar linkage, the trigger finger doesn’t need to do much work. The spring? It’s just there to reset the trigger by pushing it forward again after firing.

It’s a clever design that doesn’t require any additional hardware, and even prints in a single piece. Watch it in action in the video, embedded just below.

Continue reading “This BB Shooter Has A Spring, But Not For What You Think”

3D Print ABS Without A Screaming Hot Bed

ABS is a durable material that can be 3D printed, but requires a 100° C build surface. The print bed of [Pat]’s Bambu Lab A1 Mini is unable to get that hot, which means he can not print ABS…or can he? By fiddling a few settings, he prints ABS no problem with only a 60° C bed, thanks to a PLA interface layer.

Here’s what’s going on: first [Pat] prints a single layer of PLA, then does a filament swap for ABS (which the printer thinks is PETG with extrusion temperature bumped to 255° C and a tweaked flow rate) and lets the print finish. The end result is an ABS part with a single layer of PLA at the bottom, all printed on a 60° C bed. That PLA layer peels off easily, leaving a nice finish behind.

[Pat] is printing small parts in ABS for a custom skeletal mouse shell (pictured above) and his results are fantastic. We’re curious how this technique would fare with larger ABS objects, which tend to have more issues with warping and shrinkage. But it seems that at least for small parts, it’s a reliable and clever way to go.

We originally saw how [JanTec Engineering] used this technique to get less warping with ABS. As for why PLA is the way to go for the interface layer, we’ve learned that PLA only really truly sticks to PLA, making it a great interface or support for other filaments in general. (PETG on the other hand wants to stick to everything but PLA.)