Strobe For Wood Turning Makes Inspection Easy

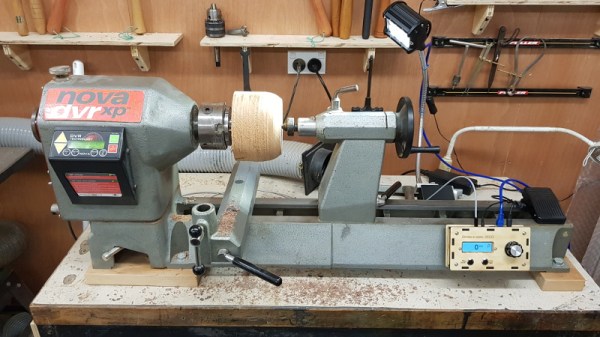
The lathe is a simple enough tool to understand, but requires much practice to truly master. During the turning process, it’s often necessary to inspect the workpiece. This generally necessitates stopping the lathe, waiting for everything to spin down, and then starting again. This can be a major time sink when added up across the full scope of a project. However, the magic of strobes can help.

The basics of [Darcy]’s project will be familiar to any hacker who has worked with rotating machinery before. The rotational speed of the lathe is measured, in this case using a reed switch and a magnet. This signal is fed to a microcontroller, which controls the strobing of an LED lamp. By synchronizing the flashes to the speed of the lathe, it’s possible to view the workpiece as if it were standing still. By adjusting the offset of the flashes to the position of the lathe, it’s also possible to rotate this view to see the entire workpiece – all while the lathe remains spinning.

Further photos and videos are available in the Reddit thread. [Darcy] reports that despite his best efforts, he couldn’t quite find a business case for producing the hardware commercially, but the idea was too useful to leave languishing in a notebook. We’d love to hear your ideas on how this could improve turning projects, so be sure to let us know in the comments. If you’re just getting started with turning, it might be worth cutting a test bar to make sure your rig is up to snuff.

Always Have A Square To Spare

Some aspects of humanity affect all of us at some point in our lives. Whether it’s getting caught in the rain without an umbrella, getting a flat tire on the way to work, or upgrading a Linux package which somehow breaks the entire installation, some experiences are truly universal. Among these is pulling a few squares of toilet paper off the roll, only to have the entire roll unravel with an overly aggressive pull. It’s possible to employ a little technology so that none of us have to go through this hassle again, though.

[William Holden] and [Eric Strebel] have decided to tackle this problem with an innovative bearing of sorts that replaces a typical toilet paper holder. Embedded in the mechanism is a set of magnetic discs which provide a higher resistance than a normal roll holder would. Slowly pulling out squares of paper is possible, but like a non-Newtonian fluid becomes solid when a higher force is applied, the magnets will provide enough resistance when a higher speed tug is performed on the toilet paper. This causes the paper to tear rather than unspool the whole roll, and also allows the user to operate the toilet paper one-handed.

This is a great solution to a problem we’ve all faced but probably forgot about a minute after we experienced it. And, it also holds your cell phone to keep it from falling in the toilet! If you’d like to check out their Kickstarter, they are trying to raise money to bring the product to market. And, if you want to upgrade your toilet paper dispenser even further, there’s also an IoT device for it as well, of course.

Continue reading “Always Have A Square To Spare”

MIDI Association Announces MIDI 2.0 Prototyping

MIDI was introduced at the 1983 NAMM show as a means to connect various electronic instruments together. Since then, our favorite five-pin DIN has been stuffed into Radio Shack keyboards, MPCs, synths, eurorack modules, and DAWs. The standard basically hasn’t changed. Sure, we have MIDI SysEx messages to configure individual components of a MIDI setup, but at its core, MIDI hasn’t changed since it was designed as a current-loop serial protocol for 8-bit microcontrollers running at 1 MHz.

Now, ahead of the 2019 NAMM show, the MIDI Manufacturers Association (MMA) in conjunction with AMEI, Japan’s MIDI Association, are announcing MIDI 2.0. The new features include, “auto-configuration, new DAW/web integrations, extended resolution, increased expressiveness, and tighter timing”. It will retain backwards-compatibility with MIDI 1.0 devices.

The new initiative, like the release of the first MIDI spec, is a joint venture between manufacturers of musical instruments. The company lineup on this press release is as follows: Ableton/Cycling ’74, Art+Logic, Bome Software, Google, imitone, Native Instruments, Roland, ROLI, Steinberg, TouchKeys, and Yamaha.

This is not an official announcement of the MIDI 2.0 specification. This is the ‘prototyping’ phase, where manufacturers implement the MIDI 2.0 spec as envisioned, write some documentation, figure out what the new logo will look like, and design a self-certification process. Prototyping is expected to continue through 2019, when the final MIDI 2.0 spec will be released on the MIDI Association website.

As far as hardware hackers are concerned, there shouldn’t be any change to your existing MIDI implementation, provided you’re not doing anything new. It should be backwards compatible, after all. The new spec will allow for increased range in expression and ‘tighter’ timing, which might be an indication that the baud rate of MIDI (31,250 baud +/- 1%) may change. There’s some interesting things in store for the last old-school physical layer in existence, and we can’t wait to see what comes out of it.

TOTO Forever Widescreen

Somewhere Down In Africa Toto Is Playing On Loop

Amidst the vast expanse of sand dunes in the Namib desert, there now exists a sound installation dedicated to pouring out the 1982 soft rock classic “Africa” by Toto. Six speakers connected to an MP3 player all powered by a few solar powered USB battery packs, and it is literally located somewhere down in Africa (see lyrics). The whole project, known as TOTO FOREVER, was the creation of film director [Max Siedentopf] who himself grew up in Namibia.

“I set up a sound installation which pays tribute to probably the most popular song of the last four decades…and the installation runs on solar batteries to keep Toto going for all eternity.”

Max Siedentopf, Creator of TOTO FOREVER

[Siedentopf] certainly chose a song that resonates with people on a number of levels. Toto’s “Africa” was one of the most streamed songs on YouTube in 2017 with over 369 million plays. The song continues to reach a new generation of fans as it has also been the subject of a number of internet memes. Though those local to the sound installation have had some less than positive things to say. [Siedentopf] told BBC, “Some [Namibians] say it’s probably the worst sound installation ever. I think that’s a great compliment.”

The idea of the installation “lasting for all eternity” will certainly be difficult to achieve since the components most certainly lack any serious IP rating. The audio player itself appears to be a RHDTShop mp3 player that according to its Amazon listing page, has three to four hours of battery life per charge. Considering the size of those solar cells the whole thing will probably be dead in a week or two (it is in a desert after all), but no one can deny the statement TOTO FOREVER makes. Below is some footage of the art piece in action taken by the artist himself.
Continue reading “Somewhere Down In Africa Toto Is Playing On Loop”

Automate Your Home From The Clearance Rack

The month or so after the holidays have always been a great time to pick up some interesting gadgets on steep clearance, but with decorations and lights becoming increasingly complex over the last few years, the “Christmas Clearance” rack is an absolute must see for enterprising hackers. You might just luck out like [ModernHam] and find a couple packs of these dirt cheap wireless light controllers, which can fairly easily be hacked into the start of a home automation system with little more than the Raspberry Pi and a short length of wire.

In the video after the break, [ModernHam] walks the viewer through the start to finish process of commanding these cheap remote plugs. Starting with finding which frequencies the remotes use thanks to the FCC database and ending with using cron to schedule the transmission of control signals from the Pi, his video really is a wealth of information. Even if you don’t have this particular model of remote plug, or don’t necessarily want to setup a home automation system, there’s probably some element of this video that you could still adapt to your own projects.

The first step of the process is figuring out how the remote is communicating to the plugs. [ModernHam] noticed there was no frequency listed on the devices, but using their FCC IDs he was able to find the relevant information. In the United States, devices like these must have their FCC IDs visible (though they could be behind a battery door) by law, so the searchable database is an invaluable tool to do some basic reconnaissance on a poorly documented gadget.

An RTL-SDR receiver is then used to fine tune the information gleaned from the FCC filing. [ModernHam] found that the signals for all four of the remote plugs were being broadcast on the same frequency, which makes controlling them all the easier. Using the rtl-sdr command, he was able to capture the various signals from the transmitter and save them to separate files. Then it’s just a matter of replaying the appropriate file to get the plugs to do your bidding.

Of course, the RTL-SDR can’t transmit so you’ll have to leave your dongle behind for this last step. Luckily all you need to transmit is the rpitx package created by [F5OEO], along with a supported Raspberry Pi and a small length of wire attached to the appropriate GPIO pin. This package contains the tool sendiq which can be used to replay the raw captures made in the previous step. With some scripting, it’s fairly straightforward to automate these transmissions to control the remote plugs however you wish from the Pi.

The RTL-SDR Blog put together their own guide for “brute forcing” simple remote control devices like this as well, and we’ve even seen similar techniques used against automotive key fobs in the past. Amazing what a piece of wire and some clever code can pull off.

Continue reading “Automate Your Home From The Clearance Rack”

Full Color Dot Matrix Is The Art We Need

Fans of 80s-era computer printing technology are few and far between, but Apple’s ImageWriter II was a beast of a printer. This tractor feed dot-matrix printer is nigh-indestructible. The print quality was actually pretty great. It was loud as hell, which is a mark of quality electromechanical components. It could do color, and color dot-matrix art on tractor feed paper is the aesthetic we need. If you’re not convinced yet, you can also take off the perforations from tractor feed paper and make a cool little paper snake.

[Dandu] isn’t one to let things like serial printers and obsolete color dot matrix ribbons get in his way of creating ImageWriter art. A while ago, he printed off some incredible art using some obsolete equipment, and the results are better than what you would expect.

The process for creating full-color art on a dot-matrix printer was to plug the ImageWriter into an old Mac (an LC III in this case, with 12 MB of RAM). Photoshop (version 3.0!) was used to open a JPEG, and MacPallete II used to send the data to the printer. This isn’t a process that prints all the colors all at once; first the yellow is printed, and the tractor feed paper is brought back to the beginning. Then the magenta is printed, then the cyan, then the black. The single page of art took 20 minutes to print, and you can see a sped-up version of this process below.

Yes, the ImageWriter II can print in full color, but who cares about this now? A few people apparently — a company is now remanufacturing ImageWriter II color ribbons — opening the door to retro art for all. Yes, that ImageWriter in your basement still works, so let’s see what you can do with it.

Continue reading “Full Color Dot Matrix Is The Art We Need”

Unobtanium Bezels Finally Modeled For 3D Printing

In 1991, Apple released the Quadra line of computers, named after their utilization of the new Motorola 68040 CPU. The Quadra line initially consisted of two models, the Quadra 700 and the Quadra 900. These two models, and the Quadra 950, released as a slight upgrade to the 900, were the peak of performance. You could conceivably load these machines up with 256 Megabytes of RAM, in an era where hard drives hovered around 80 Megabytes. This much RAM would cost as much as a house. These were powerhouses, the first ProTools workstations, and they ran Jurassic Park. If you wanted peak performance in the early 90s, you got a Quadra.

The Quadra 900 and 950 were tower computers, and there were options for floppy, Zip drives, Bernoulli drives, and a CD-ROM drive. They were introduced a little before the ‘multimedia’ hubub, and right now, the plastic bezel for the CD-ROM option is an absurdly expensive piece of plastic. People have paid $150 for an original CD-ROM bezel. Seems like the perfect application of 3D printing, doesn’t it? That’s exactly what [360alaska] over on the 68k Macintosh Liberation Army forms did. The unobtanium bezel can now be sent off to Shapeways.

This project is a continuation of a thread where various forum members shared their .STLs for random bits of Apple plastic, ranging from rubber feet for PowerBooks to the clip-on ‘programmer’s switch’ for the Macintosh SE. The crowning achievement of this community endeavour is the Quadra 950 CD-ROM bezel. There are a few varieties, ranging from one that fits a standard 5 1/4″ drive, to a nearly exact replica of the official Apple offering for their official drive. All the files are there for the downloadin’.

Printing these bezels will be a bit of a challenge for a filament-based printer, but resin printers are getting cheap and Shapeways is always there for you. Painting to match the brominated patina of old plastic is also a challenge, but the forum members have had some success with off-the-shelf spray paints.