Let’s be honest. Paying electricity bills sucks. The amount paid is always too much, and the temperatures in the building are rarely set at a comfortable level. But now, with the help of this DIY Climate Control system, power-users can finally rejoice knowing that the heating and cooling process of their home (or commercial space) can be easily controlled through the utilization of an XBee Remote Kit and a process called zoning.
The team behind the project is [Doug], [Benjamin] and [Lucas]. They hope to solve the inconsistent temperature problems, which are caused by a moving sun, by open-sourcing their work into the community.
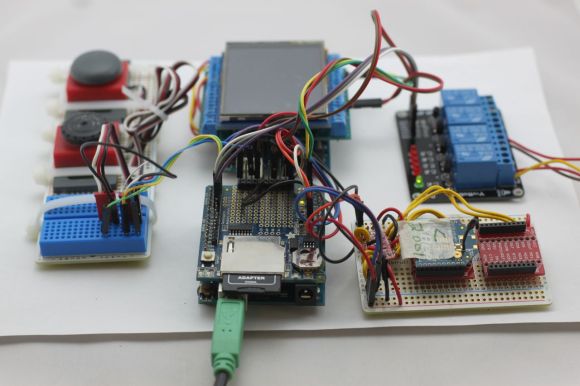
Their XBee system runs on a mesh network making it a perfect tool for sensing and communicating which areas in the house are too hot or too cold. Once the data is collected, XBee modules route the information wirelessly to each other until it reaches a central Arduino gatekeeper; which then decides if it wants to heat, ventilate, or air condition the room.
Not to mention all the added benefits posted below:
For one, you can hook-up temperature ICs like the TMP36 (PDF) without the need to buy extra parts. Better yet, the XBee can be programmed to fall asleep thus saving battery life. This means that the whole module can run on rechargeable AAA batteries.
Even further, it can be coded at its various ports to read other devices. This is great because it gives the setup the potential to turn on and off devices that are hooked to the module, transforming it into a networked hub of interconnected devices.
This approach not only allows you to be involved in saving the planet, but it keeps your home, warehouse, or office building at a much more comfortable level in the process, a real win-win.
![]() The project featured in this post is an entry in The Hackaday Prize. Build something awesome and win a trip to space or hundreds of other prizes.
The project featured in this post is an entry in The Hackaday Prize. Build something awesome and win a trip to space or hundreds of other prizes.


What if the xbee goes into sleep, is the mesh network then brocken? Or does it have a remote wake up function?
Only leaf nodes are supposed to be allowed fall asleep in a zigbee network. Routers and the Coordinator must stay awake.
Allen is right, the coordinator stays awake since it is connected to a power source. Only the remote XBee sleep to save the batteries.
Cool stuff, we are building something quite similar.
http://www.flair.zone
Look forward to talking next week.
To do all this requires the HVAC system to have all the zone controls in place first. If that is the case then it just wasn’t wired up right in the first place. Other than occupancy sensing, thermostats are all that is needed. If you are putting in duct dampers etc. then wire the system for high reliability and easy maintenance. Only if wiring is difficult then use radio but not if it means frozen pipes if it fails.
I am zoning my house and it does not have zoning in place, most houses don’t. First step is knowing the temperature of each zone next is controlling the vents. Not sure what you mean by “frozen pipes” if you mean causing the HVAC to freeze that is a concern so what I do is put one of the sensors on the output of the HVAC to make sure it does not go below a certain temperature, if it does then it shuts down the HVAC or opens more vents.
I think better than the analog TMP36 is to use the digital one-wire DS18B20. You avoid the pain of noise when measuring millivolts on the TMP36 outputs (perhaps I did something wrong?). And you can get them rather cheap on aliexpress when you buy 10 pieces. I use the DS18B20s at work in our (unpleasantly large) office to measure temperature across the space; the output is quite interesting http://bitcumulus.appspot.com/iot/teplomer ( temperatures are in deg.C, the blue line is air-conditioning output and the violet is on the window (“insulating”.. haha) frame).
Moreover, I was surprised the old telephone two-wire cables (with no shielding or twisting) are up to 20m long and still the one-wire protocol is fine with that :)
That’s really cool; what device is collating and graphing the data? I once tried something similar, getting an Arduino to generate a graph and serve it up on the web but I didn’t finish it.
The actual data ‘distilling’ is not done on the atmega8, it is collected and presented by an appengine-based application. On the other hand, the as the chart is drawn by RGraph library [http://www.rgraph.net/] on the client side it could be very easily served by the AVR if it were somehow connected to the internet.
I choose the TMP36 because it could work with the XBee and was very low current usage. I am getting back very good data from them. Here is a graph of a 24 hour period. https://dl.dropboxusercontent.com/u/51329481/24%20hour%20readout.jpg
It shows temperature of each room. This is without zoning in place and shows the wide variation of temperatures around the house. The line with large variation is thee output of the HVAC to make sure it is not going too low and freezes.