Automating Window Shades With Home Assistant

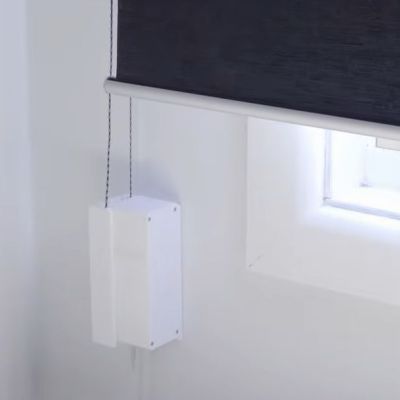
Most people love window shades, but many dislike the tedium of having to open and close them over the course of each day. While there are automation options here, if you’re in a rental place like [Rooster Robotics], then you’d prefer something less intrusive, as well as less cloud-bound. This is basically why he opted to build his own solution from scratch to open and close roller shades via Home Assistant.

The comments to the video helpfully point out that technically his point about there not being commercial options with a forced remote account ‘feature’ is false, as the Aqara Roller Shade Driver E1 for example is just a regular Zigbee device which can be used with a wide range of home automation ecosystems. That said, it’s always nice to have your own device that you fully control.

Of course, these devices are deceptively simple, as you still have to somehow know how far open the curtain is, which is also useful if you just want to open the curtain a certain amount. The other issue is the need to have the motor parallel with the wall unless you enjoy having a big wart sticking out from the wall.

Solving the first issue was attempted with a Hall effect sensor, and the second with angled gearing. With some refinements this led to a functioning design, allowing the development of a custom PCB with an ESP32-S3 module for WiFi control. In the final design the Hall effect sensor and magnets were replaced with an AS5600 magnetic rotatory position sensor that requires just one magnet and offers a much higher resolution.

Currently the design files are not available, but [Rooster Robotics] has indicated that they are looking at open sourcing the files in the future.

Continue reading “Automating Window Shades With Home Assistant”

Could Your Next House Be Built From Giant Lego By An Inchworm Robot?

Well, it depends when you’re going to be househunting– if it’s anytime soon, Betteridge’s law applies, but if your time horizon is a ways further out, [Miana Smith] at MIT wants to make it happen. She’s got a paper out with an open-source inchworm robot designed to assemble structures from voxels– and what is a voxel but a giant, LEGO-esque brick?

There’s a demo video below, and it’s easier to understand the motion of this thing when you see it in action. The 5 degree-of-freedom MILAbot has actuators on both ends, and no traditional base– that’s the inchworm part. It grabs a brick while anchored to one part of the structure, then stays anchored to the new brick to keep building from that locale, so on and so on.

Note that we’re not talking about concrete bricks here, though conceivably you could use an inchworm-style actuator to assemble those. The ‘voxels’ in the study are engineered space-frame blocks which come together very easily, though admittedly would make for a very drafty home– you’d want to fill them with spray foam as a finishing step. So it’s more of a framing technique than a one-and-done thing. Still it is a technique that has something to recommend it compared to the 3D-printed concrete houses that get so much hype— and are already being torn down. 

For instance, the researchers find that weather the voxels are plywood, PLA, or metal, the resulting structure has less embodied energy than any concrete structure, with 3D printed concrete being worst option by that metric– though the balloon-frame stick-build we in North America consider “conventional” is still the lowest of all. On the other hand, that balloon-frame building takes a crew to put together, and labour is expensive compared to robots. At the moment, however, the study admits balloon-framing wins on price, but that doesn’t mean it always will, and it’s a fun hack regardless.

So while your next house might not be made of LEGO by a robot inchworm, we’re still grateful to [Miana] for the tip.

Most building hacks we see here are of the 3D printed variety, but don’t count out plain old dirt. For that matter, as long as someone is willing to live in it, anything can be a house– even an airliner. Continue reading “Could Your Next House Be Built From Giant Lego By An Inchworm Robot?”

DIY Electrolysis Machine Removes Hair Permanently

If you talk to the FDA, there’s only one permanent method of hair removal—electrolysis. This involves sticking a needle into a hair follicle, getting it very hot or running a current through it, and then letting heat and/or the lye generated kill the root of the hair dead. Normally, you’d pay someone with a commercial machine to do this for you at great expense. Or, you could do it yourself with a home-built machine, as [n3tcat] did.

Based on the available information out in the wild, [n3tcat] decided to build a galvanic electrolysis machine. This specifically passes current through a needle in the hair follicle to generate lye at the hair bulb, which kills it. The amount of lye generated depends on the amount of current and the time over which it is applied. More lye is more likely to kill a follicle permanently, though there are limits with regards to avoiding scarring, other skin damage, and excessive pain.

Continue reading “DIY Electrolysis Machine Removes Hair Permanently”

E-paper Dashboard Reimagines Smart Home’s Connection With Technology

When [Joel Hawksley] and his partner got married, they had a goal to create a home with a healthy relationship to technology, which largely means avoiding smartphone use. Smartphones aren’t without their benefits, though, like being clocks and calendars, so [Joel] started looking for other options to replace these capabilities. At first he went with a “magic mirror” solution, but quickly pivoted to a wall-mounted e-paper solution he calls Timeframe which has evolved into a respectable overview for his home and life.

E-paper has a number of advantages over LCD and LED displays, one of which being that its resemblance to real paper makes it feel more organic. The first e-paper iterations of Timeframe used multiple displays in wooden frames, and [Joel] had a few different ones stationed around the house. They received their data from a custom-built Rails backend which sent pictures to the devices. This made the refresh rate possible fairly low, but a new 23.5″ display from Boox eventually enabled an acceptably high resolution and refresh rate which could support more traditional display uses. But this display required that [Joel] rewrite the entire back-end, an effort that took quite a bit of time but resulted in an impressive final product.

Like any custom-built project like this, [Joel] still has plans for improvements including those around further integration with his Home Assistant and reducing costs for future platforms. E-paper displays are popular pieces of technology for home dashboards like this, in the past we’ve seen similar, smaller builds which coincidentally have the same name.

IR Device Control That Lives Off The Cloud

There are lots of smart home systems that will let you blast your older dumb appliances with infrared to control them. However, many are tied to ugly cloud systems that can frustrate you on a regular basis. [Steelcuts] whipped up a cloudless solution to this problem instead.

IR2MQTT does pretty much exactly what it says in the name. It allows integrating things like air conditioners and televisions into a Home Assistant setup with the use of an IR blaster and a neat, tidy web app. You use it with an ESP32 or ESP8266 running a firmware based on ESPHome to actually do the IR blasting. In turn, IR2MQTT is a back-end plus a web interface that lets you setup all your IR devices without having to manually capture IR codes and create YAML files to do everything. It’s also integrated with large databases of IR codes for common appliances so in many cases, you can just look up your gear and get it working the easy way.

Sometimes all you need to get the job done is an IR LED and the will to use it. If you’re cooking up your own infrared hacks, don’t hesitate to let us know on the tipsline.

A Smart Thermostat For 120V Fan Coil Systems

Many HVAC systems in North America operate off 24V systems, which can be readily upgraded with off-the-shelf  smart thermostats quite easily. However, there are many people living in buildings with 120-volt fan coil units who aren’t so lucky. [mackswan] is one such individual, who set about building a smart thermostat to work in these situations.

The build is based around an ESP32 running ESPHome firmware. It rocks a 2.42″ OLED screen with automatic brightness adjustment for showing temperature and control parameters. There’s a rotary encoder on the front with an integrated button for control, with [mackswan] building the physical device to look as clean and neat as possible. The device uses a relay to switch the fan coil system on and off to heat or cool as needed, with an SHTC3 temperature and humidity sensor used to monitor current conditions in the home.

If you’re in an apartment building or live in a condo with this kind of setup, [mackswan’s] build might be just what you’re after to improve your HVAC control. We’ve featured plenty of other DIY thermostat hacks over the years, too. Meanwhile, if you’re finding creative ways to better heat and cool your living space, we’d love to hear about it on the tipsline!

DIY UPS Keeps Home Assistant Running

If you put a bunch of computers in charge of your house, it’s generally desirable to ensure their up-time is as close to 100% as possible. An uninterruptible power supply can help in this regard. To that end, that’s why [Bill Collis] whipped one up for his Home Assistant setup.

[Bill]’s UPS is charged with one job—keeping the Home Assistant Green hub and an Xfinity XB7 cable modem online when the grid goes dark. The construction is relatively straightforward. When the grid is up, everything is powered via a Mean Well AC-DC 12 V power supply, while the power is also used to charge a 12.8 V 10 Ah lithium iron phosphate battery pack. When the grid goes out, the system switches over to running the attached hardware on pure battery power. A Victron BatteryProtect is used to automatically disconnect the load if the battery voltage drops too low. Meanwhile, a Shelly Plus Uni module is used to monitor battery voltage and system status, integrated right into Home Assistant itself.

If you want to keep the basics of your smart home going at all times, something like this is a pretty simple way to go.  We’ve featured some other great UPS builds in the past, too. If you’re whipping up your own hardware to keep your home or lab alive in the dark of night, don’t hesitate to notify the tipsline.