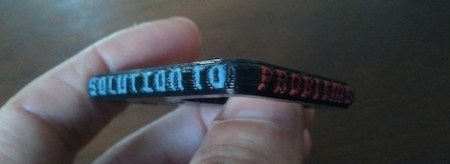
After drooling over the Makerbot dual-head extruder, [Brett] decided to get off his duff and make a proper multi-color print.
[Brett] has been making a few bottle openers for friends and has been successfully experimenting with switching filaments in the middle of a print. For his “Saturday Killer” bottle opener, he decided to push multicolored prints to the limit. For the “Saturday Killer,” [Brett] decided to print an abridged version of the classic Simpsons quote, “Beer, the cause of, and solution to, all of life’s problems” on the side of a bottle opener in 4 different colors.
The files necessary to print the Saturday Killer were generated in OpenSCAD. The general principle behind the design is to generate separate .STL files for the bottle opener and the sides, split those files into 2-layer chunks, and print those files while constantly adjusting the z-height. It’s not called the Saturday Killer for nothing, so [Brett] had to change the color of his filament 25 times.
A much simpler version of a complex multi-color print is [Brett]’s Shepard Fairey inspired self-portrait. Still, we’re thinking a dual head extruder is somewhere in [Brett]’s future. At least he’s got the technique down.


I chatted with Brett at NY Makerfaire, he’s a pretty awesome dude.
This work is fantastic, and makes me wonder why there are no automatic filament changers.
The complexity of changing filament in most diy 3d printers is not trivial. Dual heads are actually much simpler, even though it might seem like it should be the other way around. My Reprap is still in the build stage and I’ve gone through 3 extruder designs before it’s even functional. The most recent is the same as what is used on an Orca and is by far the simplest to change filament on, but even it requires removing some nuts and springs, folding back the piece the holds the bearing and threading the new filament, also if the new filament has a different width, that requires even more tweaking. This would also likely result in bleed-over from the previous color. So, at least for now, dual extruder heads seem to be the best option.
That’s pretty impressive work.
I think I would try to solve the problem with uncolored filament and an extruder that adds pigment as it’s extruded.
http://www.thingiverse.com/thing:11742
There are some experiments with adding color. But so far the results with ABS are good, and PLA are bad. But with a bunch of Markers and some servos you should be able to do multicolor prints from white filament.
Just painting your models afterwards also works:
http://www.thingiverse.com/derivative:15126
(Just print your robotic painting arm first, so you can automate painting!)
Next up:
Make shot glasses with the original quote.
Hi everyone, thanks for the positive feedback.
one of the things missing from the color-change discussion is the transition zone when you switch colors. It’s not as though it goes immediately from one color to the next. It usually takes 10-20cm of extrusion before you’re completely on to the next color. I added a picture of all my color-change scrap to the flickr set:
http://www.flickr.com/photos/38917611@N08/6263685278/in/set-72157627783358031
@Simon that is a great idea. I’ve worked up the font such that it can be rotated, so it wouldn’t be that tough to make. Now spiraling it up the glass? THAT I wouldn’t do without dual heads.