

Needless to say, the World Maker Faire had a ton of 3D printers. It’s really becoming an obligatory fixture of any booth, whether you’re Microsoft announcing to the world Windows 8 now supports 3D printer drivers (don’t ask), or you just have a Makerbot Replicator on your table for some street cred.
Even the 3D Printing section of the faire wasn’t without a lot of what we’ve all seen before. Yes, the RepRap Morgan and Simpson made a showing, but 3D printing to most people attending the faire is just plastic trinkets, Minecraft figures, and single-thickness vases and jars.
Deep in the outskirts of the faire, right by the Porta Potties and a generator, one booth showed everyone how 3D printing should be done. It was AS220 Labs‘ table, and they’re doing their best to make 3D printers more than just printing out owl sculptures and plastic octopodes.
Fun With Filaments
[youtube=http://www.youtube.com/watch?v=NgHDf6Qg5Cc&w=580]
First up from AS220 is [Matt Stultz] who has been experimenting with filaments other than the usual ABS and PLA. He gave a talk at the 3D Printing stage where he introduced the crowd to High Impact Polystyrene (HIPS), an amazing filament that produces unimaginably smooth objects, but can also be dissolved away with Limonene. This allows [Matt] to create objects with incredible overhangs with direct-off-the-printer mechanical builds such as gear trains and transmissions possible in the future.
If you’re running a 1.75 mm extruder, I highly suggest you pick up a spool of HIPS from Filaco just to play around with. It has the same dissolvable support qualities of PVA, but it also produces wonderful prints to boot. If the people running Filaco read this, I highly suggest you make some 3 mm spools of HIPS because somewhere around half the market has 3mm hot ends.
Along with HIPS, [Matt] also showed off two interesting filaments you need to feel to believe. The first is Laywood, a type of PLA embedded with wood fibers. It doesn’t exactly feel like wood, more like a big chunk of MDF that someone had taken a rasp to.
Laybrick, the PLA infused with chalk dust to emulate a stone texture, also made a showing at [Matt]’s table. It feels a little like a very fine-grained sandstone, but isn’t cool to the touch as a normal stone should be. With a greater infill, [Matt] should be able to come up with something that really does feel like a natural material.
Using 3D Printers as Intended
[youtube=http://www.youtube.com/watch?v=xkSeqfb93os&w=580]
Also at the AS220 booth was [Dan] who can produce ten sets of MendelMax printed parts in under three hours.
Although we would not be where we are today without the RepRap project, the idea of using 3D printers solely to print more 3D printers is a dumb idea. Self-replication is a fine goal, but rapid manufacturing techniques should be used to build one of something, not an army of something.
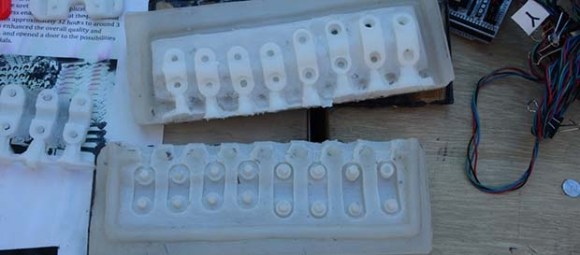
When [Dan] decided he should look into building another 3D printer, he came to the same conclusion. Printing all the parts for his printer is a 30 hour job, but by making molds of the parts and pouring in some resin, he’s able to crank out a new set of parts in one tenth the time. It’s brilliant, and kind of depressing that this technique wasn’t seen more at Maker Faire.
To make his molds, [Dan] is using silicone rubber, with all the holes in each part plugged with steel rods before being cast. After the silicone cures, the halves of the mold are separated, the parts removed, and resin poured into the mold. Despite the complex geometries, this can be done, and is the way 3D printers should be used to replicate themselves.
It was great talking with the guys from AS220, and I can’t wait to see what they come up with next year. If you want to follow their 3D printing adventures for yourself, you can check them out at 3D Printing Providence,
If I could make one suggestion, has anyone looked into printing the molds themselves? They have a great dissolvable support material…


+1, Yes indeed. Silly to reproduce flat stuff using a printer. Much simpler than resin and faster is to use laser cutting for gears and other such flats.
Seeing how Dan was using his 3D printer to print molds doesn’t really make me want to purchase a 3D priner, it makes me want to get a desktop CNC. Being a poor NY-based student, I don’t have the room in my wallet/apartment for both a printer and a desktop CNC, and with the rise of tons of DIY CNCs and off-the-shelf versions coming soon (like Other Machine and Pocket NC), it’s been seeming like the better solution for a maker would be to choose the mill. While I acknowledge that there are some benefits to a printer over a 3-axis mill, wouldn’t getting a mini CNC to make positives for resin casting be more accurate than using a printer? Faster, too?
That being said, I was at Matt Stultz’s talk, it was super interesting stuff!
I definitely use my CNC mill more than my 3D printer.
There’s plenty of Quick-Fit CNC routering tools available on thingiverse if this two-birds-one-stone solution suits you?
Nylon printing is extremely dangerous because of the fumes. These experiments are neglecting safety.
a fumehood akin to that used by laser cutters should be able to do the trick, that or do unattended printing in your outside workshop with the door open.
many of these techniques are what i find interesting when it comes to 3d printing, replacing cnc cut positive forms for mold making would be brilliant, the machine price for those two tasks are quite far apart.
No nylon printing IS NOT extremely dangerous. Nylon is a thermoplastic with no special processing requirements. If you injection mould with it then you will need to dry it to stop steam coming out in the screw extruder, but this is true of many thermoplastics – including PLA. With FDM systems there is no need for even this drying because the pressures are so low.
If you get fumes when you process nylon then you are using the wrong temperature.
By the way the combustion products of nylons are similar to those of ABS.
What? No!
Nylon is extremely dangerous because it releases hydrogen cyanide: http://en.wikipedia.org/wiki/Nylon#Incineration_and_recycling
Ignition temperatures are very close to the printing temperatures so it might start burning from the internal friction in the melted nylon.
On the other hand ABS fumes are ok: http://www.fire.nist.gov/bfrlpubs/fire86/PDF/f86017.pdf
Be safe
Due to our desire not to perpetuate myths, [taulman] tested some of their nylon and found no HCN was released at normal extrusion temperatures.
As for weed trimmer line, 0.1 ppm was released. OSHA maximums for HCN exposure is 4.7 ppm.
Please stop spreading this misinformation.
It is not misinformation. Your test showed there is gas release. While it is not a concern if everything with the print goes well what happens if there is a fault with the printer? These are DIY machines that are prone to any number of failures. The danger is there and that is why I absolutely oppose printing in nylon unless you have a properly setup lab space with a venting system. Any accident would has the potential to be lethal.
There are a lot of people using printers in their bedrooms at home and they are at risk.
If you’re worried about fumes, a simple fan should do the trick. It’s not like you have 100 kilograms all burning at once.
Put it in a basement, where you have a fan to avoid buildup of radon.
I’ve been producing silicone moulds and casting parts in polyurethane ‘resin’ for quite some time myself, and find myself feeling that 3d print results are, well crap, but very promising for the future. The combination of each method seems a really bright idea though.
Silicone mould making and PU resin production provides awesome detail levels if done right, and any shape can be made in a much weaker easily machinable material, then a mould made from it. I recently made a custom gopro case and mount out of two moulds, one part the ‘connector’ to the standard Gopro mounting kit and the other a case around the camera which allowed access to the USB port. A metal screw holds the two components together. I can make as many as I need from the one mould and each can be considered sacrificial to protect the camera.
I’ve been working on an xbox 360 laptop, and I’m stuck on how to do the case. One of the things I was thinking of doing was making it out of an easily machinable material, making a silicon mould, and then using an epoxy resin for the final piece. What would you recommend I use for material for the initial piece, the mould, and the final product? I’ve been looking into it, but the choices seem to be too varied to make up my mind without any previous experience using them.
I’m working on an object right now that will be moulded and cast. I just need to be done sanding it down. Couldn’t risk the acetone vapour method as it took 7.5 hours to print and I’m afraid of borking it up. So yeah… 7.5 hours of filing instead i guess. Dissolvable support material would have made this process MUCH easier.
https://scontent-a-ams.xx.fbcdn.net/hphotos-ash4/999142_669308899746248_1700550753_n.jpg
aww
It has a monster on the back ;)
http://www.thingiverse.com/thing:18053
The interviewer Hackaday have this time is really unprofessional and appear to be not just uninterested at what he is doing, but also kinda rude to the makers he interviewed.
(More a body language thing in my opinion.)
3D Printing is not a novelty with my company. Our president and founder is a supporter of 3D printing. There are several parts contained in our products that are farmed out to a company that provides 3D printing.
Using rapid prototyping for production is by definition dumb – if you want 10+ of something, use a production system.
I still can’t understand why anyone 3D prints parts like this when I can walk into a CNC shop and they’ll turn 10, 100, or 100000 of whatever I want out of a usefully rigid and strong material such as aluminium or steel for peanuts. The finish will be beautiful, every part will be identical, the precision will be at least 100x better, it will take none of my time and cost very little, and it only gets cheaper the more you make.
But then, if you’re not 3D printing moar printaz or useless trinkets you’re faced with the problem of having to find something actually useful to justify having spent $1000 on the thing.
Lucky you, you have a CNC shop nearby that bothers working with consumers.
Seriously!
I consider myself lucky if they even reply to an RFQ. I actually bribe the head machinist at a local university with good beer to get in the queue.
Id say most people 3D Printing dont want “10,100,10000” identical things.
They just want 1 thing, unique to them.
Really? You have CNC shops where you can just walk in off the street and get a 10x run done for CHEAP? Lucky bastard…
I’m running a 36 hour print job right now on a $40k printer. We’re about to buy a nearly $200k printer. If CNC machining were peanuts around here (or anywhere) we’d be having the parts mahined instead, but we’d easily spend over $200k over the next couple years on machining. We also print a TON of stuff that either isnt machinable (geometry), or would cost tens of thousands of dollars to machine, but costs $50 in plastic and a weekend to print. A particular housing I make would take maybe a couple hours to print. I “know a guy” that machines them on the side for $100 each out of PVC. The cheapest quote I got from any other shop was about $400. Them are some expensive peanuts!
We talked about getting a “home” type printer , but I can walk up to this one, hit start and run 36 hours at .007″ resolution without a problem. We run it non stop for weeks at a time some months. Now if i could get that at home for even $5k I’d have one tomorrow!
They have printable wood and sandstone filament at our local FabLab here in Tilburg. Not sure its the exact same, but the Ultimakers they have are often using them.
Results are nice, especially the sandstone.
Now, the obligatory plug, I did a webshow about 3D Printing and the Fablab in Tilburg here;
http://www.randomreviewshow.com/
:P
What would you suggest for a custom, 1-off calculator style keypad? Individual key caps, or a batch? How would you apply labelling?
Labeling depends on the shape… for flat stuff, silk-screen is fairly easy, but once stuff becomes curved, you have to get creative…
Calculator keys are rarely curved, but HP keys have text on a diagonally shaped front edge. I’m suspecting a bulk of identical blanks is the way to go- followed by labelling via CNC, and paint / plastic injected to highlight the text.
In short, a great job to sub-contract to someone with a 3D printer and CNC. Now I just have to find them.
The mass production way would be silicone pad printing.
Or laser engrave…