Prices of 3D Printers have certainly been falling quite a bit over the last few years. Even so, it is still, at a minimum, a few hundred dollars to get going in the hobby. [mikelllc] thought it would be a fun challenge to see if he can build a functional 3D printer for under $100.
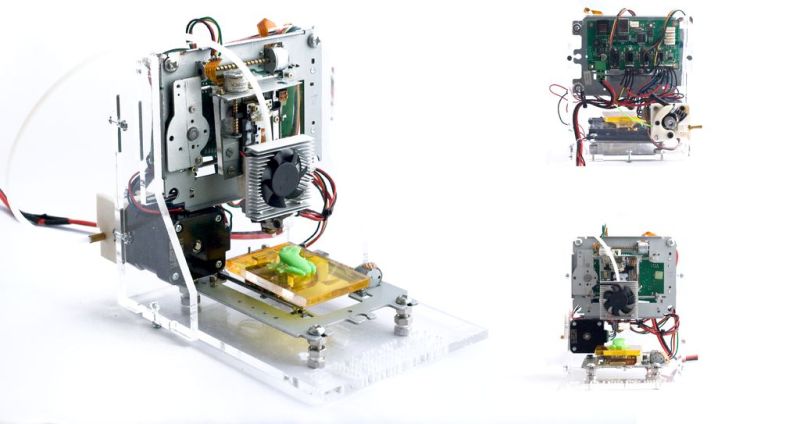
To stay under his budget, [mikelllc] took a reasonable route and decided to use as many recycled parts as he could. In every DVD and floppy drive, there is a stepper motor, lead screw and carriage that is used to move the read/write head of the drive. These assemblies will be used to drive the 3 axes of the printer. Two DVD drives and one floppy drive were dissembled to access the needed components.
 Luckily [mikelllc] has access to a laser cutter. He made the frame from 5mm acrylic sheet stock. All of the pieces have slots and tabs to ease assembly and keep everything straight and square. The motors and frames from the DVD and floppy drives are mounted to the acrylic frame pieces in strategically pre-planned holes. The Y axis is responsible for moving the print bed back and forth. It is mounted on screws so that it can be adjusted to ensure a level bed.
A little DVD drive stepper motor just isn’t powerful enough to be used as an extruder motor so a standard NEMA17 motor was purchased for this task. The motor is part of a MK7/MK8 style direct drive extruder that is made from mostly 3D printed parts. The extruder is mounted on the frame and a bowden tube guides the filament to the hot end mounted to the printer’s moving carriage. Remotely mounting the extruder motor keeps it’s mass off of the axes, which in this case may be too heavy for the small, scavenged drive stepper motors.
The electronics are standard RepRap type and the same with for the hotend. The recycled motors work well with the RepRap electronics. After all that hard work, the printable area is a mere 37mm x 37mm x 18mm, but that’s not the point of this project! [mikelllc] met his goal of building a super cheap printer from recycled parts. He has also made the extruder and laser cut frame files available for download so anyone can follow in his footsteps. If you’re digging this e-waste 3D Printer but want a larger print volume, check out this printer.


Luckily he had access to a $5000 laser cutter :)
I have access to several, thanks to my local makerspace.
$5000 not required.
I wouldn’t bother with the steppers out of 3.5″ floppies. They only have about 25mm of travel and you have to support the far end of the shaft.
CD / DVD burners have about 50mm of travel and they have a frame that supports the far end of the shaft and has mounting holes, perfect.
I was impressed with the speed he got from these little steppers. I tested one using a micro-controller and could only get it to move rather slowly (with no load). After seeing this, I expect the limitation for me was that I was directly driving it from the micro-controller pin which is limited to about 40mA. I will give it another go after seeing this.
The 50mm I mentioned above is the total length of the threaded part of the shaft. So the travel is really 50mm minus the width of the platform mount. You will see what I mean if you pull one apart.
You… You tried to drive a stepper motor by directly attaching it to a Microcontroller’s IO pin!?
Yep, lol. These things are tiny. 40mA will drive them (no load). The micro-controller I used has diode clamping on all I/O pins. I wasn’t intending to use it this way. I was just trying to see how many micro step I could get between phases as these steppers are 22.5 degrees per step.
Microstepping helps alot with the speed on these tiny motors. I made a cnc plotter with one floppy and two dvd drives.
big overgeneralization here, but current gives you torque and voltage gives you speed.
ZZZZZZZZZZZZZZZZ TDTDTDTDT
Stepper zerod.
:)
Is it bad I know exactly what sound you were making?
Whats wrong with acoustic limit sensors.
What a fun little machine. Really impressive Instructable, too. I’ll be following links for a little while…
I love it. Cute!
That’s awesome! am dissappointed that the NEMA17 is required for the extruder. I was planning on trying to make an extruder with a floppy stepper. Oh well :/ .
Was the NEMA17 chosen because you knew it would work or because it was th smallest stepper that would work from testing?
I am actually really impressed by the extruder driver bing stationary and only the hotend moving. I did not think the tube would be good enough to prevent major slop from happening.
I assumed the filament would just bunch up in the tubing when it is pulled and pushed into the hot end. Every printer could work like this and that would significantly reduce requirements on the x and y axis steppers. Brilliant!
Yeah, they’re PTFE tubes generally. You can get that sort of stuff at RC hobby stores. Google Bowden extruder.
It would be useful to know if a RepRap Gen6 could be replaced with any Arduino. Because in 3rd world countries we dont have enough money to buy it ;) (I say that to start thinking a way to make it more cheaper)
Under $100.00 dollars , that would seem hard to believe as the electronics to drive it are not that cheap. !
Is the build envelope large enough to print the parts for a ‘normal’ (Prussa) type 3d printer?
If you’re clever, the Z axis can be driven by another CD-stepper assembly, giving you a max print envelope of 38 x 38 x 38 mm.
No.
Can anybody identify the cold-end assembly he’s using here? (That’s the assembly that uses the NEMA 17 to push the filament through the Bowden tube.) Lots of people are clamoring for more details, and I’m trying to build one myself.
FWIW, I am going to use some atypical CD-steppers for the bridge axis and Z axis, since their stepper motors are “underslung” (bottom mounted), compared to the top-mounted arrangement that typical in modern designs. More here: https://www.tumblr.com/blog/3dprinterforayard
After thinking about this Instructable for a while, I have come to the conclusion that the CD-based assembly is useful only as a design and learning exercise. Yes, it’s “cute” and “tiny”, but you can’t make anything practical with it.
I got mine 90% complete with 90% effort – two prototypes, everything moves, the extruder runs, the hot-end works, just lovely. And then I realized that getting the Y and Z axes perpendicular was going to be another 90% effort.
So I’m starting over, with two discarded flatbed scanners as X and Y axes. One is an Apple Color OneScanner, and the other is some ancient Epson beast. These scanners meet the “e-waste” criterion just as well as the CD drives do. They have 5v bipolar steppers, just like the CD drives do. By starting with scanners I can achieve a 200mm x 200mm print area, which is the same as many Reprap designs. The construction process will be just as easy, maybe even easier. The only thing I am changing is the size of the (free) raw materials.
And THEN I can print a RepRap Morgan, or a Prusa.