Social Logons

SpoofedMe Attack Steals Accounts By Exploiting Social Login Mechanisms

We’ve all seen the social logon pop up boxes. You try to log into some website only to be presented with that pop up box that says, “Log in with Facebook/Twitter/Google”. It’s a nice idea in theory. You can log into many websites by using just one credential. It sounds convenient, but IBM X-Force researchers have recently shown how this can be bad for the security of your accounts. And what’s worse is you are more vulnerable if the service is offered and you are NOT using it. The researcher’s have called their new exploit SpoofedMe. It’s aptly named, considering it allows an attacker to spoof a user of a vulnerable website and log in under that user’s account.

So how does it work? The exploit relies on vulnerabilities in both the identity provider (Facebook/Twitter/etc) and the “relying website”. The relying website is whatever website the user is trying to log into using their social media account. The easiest way to describe the vulnerability is to walk through an example. Here we go.

Let’s imagine you are an attacker and you want to get into some victim’s Slashdot account. Slashdot allows you to create a local account within their system if you like, or you can log in using your LinkedIn account. Your victim doesn’t actually have a LinkedIn account, they use a local Slashdot account.

The first step of your attack would be to create a LinkedIn account using your victim’s email address. This needs to be the same address the victim is using for their local Slashdot account. This is where the first vulnerability comes in. LinkedIn needs to allow the creation of the account without verifying that the email address belongs to you.

The second step of the attack is now to attempt to log into Slashdot using your newly created LinkedIn account. This is where the second vulnerability comes in. Some social media services will authenticate you to websites like Slashdot by sending Slashdot your user information. In this case, the key piece of information is your email address. Here’s the third vulnerability. Slashdot sees that your LinkedIn account has the same email address as one of their local users. Slashdot assumes that LinkedIn has verified the account and permits you, the attacker, to log in as that user. You now have access to your victim’s Slashdot account. In another scenario, Slashdot might actually merge the two credentials together into one account.

What’s really interesting about this hack is that it isn’t even very technical. Anyone can do this. All you need is the victim’s email address and you can try this on various social media sites to see if it works. It’s even more interesting that you are actually more vulnerable if you are not using the social logons. Some real world examples of this vulnerability are with LinkedIn’s social logon service, Amazon’s service, and MYDIGIPASS.com’s service. Check out the demonstration video below. Continue reading “SpoofedMe Attack Steals Accounts By Exploiting Social Login Mechanisms”

Computer Built Into A Board Uses Only 10 Watts

In the realm of low-powered desktop computers, there are some options such as the Raspberry Pi that usually come out on top. While they use only a few watts, these tend to be a little lackluster in the performance department and sometimes a full desktop computer is called for. [Emile] aka [Mux] is somewhat of an expert at pairing down the power requirements for desktop computers, and got his to run on just 10 watts. Not only that, but he installed the whole thing in a board and mounted it to his wall. (Google Translated from Dutch)

The computer itself is based on a MSI H81M-P33 motherboard and a Celeron G1820 dual-core processor with 8GB RAM. To keep the power requirements down even further, the motherboard was heavily modified. To power the stereo custom USB DAC, power amplifier board, and USB volume button boards were built and installed. The display is handled by an Optoma pico projector, and the 10-watt power requirement allows the computer to be passively cooled as well.

As impressive as the electronics are for this computer, the housing for it is equally so. Everything is mounted to the backside of an elegant piece of wood which has been purposefully carved out to hold each specific component. Custom speakers were carved as well, and the entire thing is mounted on the wall above the bed. The only electronics visible is the projector! It’s even more impressive than [Mux]’s first low-power computer.

e-waste small 3d printer

E-Waste Printer Looks Nice, Prints Really, Really Small

Prices of 3D Printers have certainly been falling quite a bit over the last few years. Even so, it is still, at a minimum, a few hundred dollars to get going in the hobby. [mikelllc] thought it would be a fun challenge to see if he can build a functional 3D printer for under $100.

To stay under his budget, [mikelllc] took a reasonable route and decided to use as many recycled parts as he could. In every DVD and floppy drive, there is a stepper motor, lead screw and carriage that is used to move the read/write head of the drive. These assemblies will be used to drive the 3 axes of the printer. Two DVD drives and one floppy drive were dissembled to access the needed components.

e-waste small 3d printer
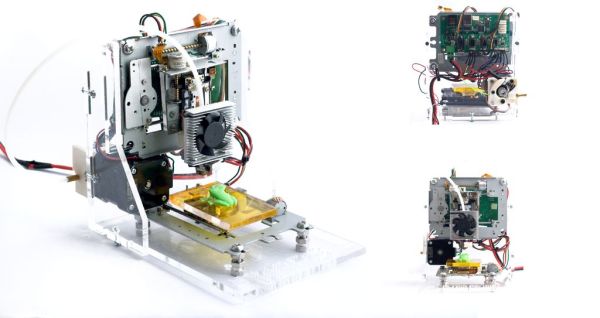
Luckily [mikelllc] has access to a laser cutter. He made the frame from 5mm acrylic sheet stock. All of the pieces have slots and tabs to ease assembly and keep everything straight and square. The motors and frames from the DVD and floppy drives are mounted to the acrylic frame pieces in strategically pre-planned holes. The Y axis is responsible for moving the print bed back and forth. It is mounted on screws so that it can be adjusted to ensure a level bed.

A little DVD drive stepper motor just isn’t powerful enough to be used as an extruder motor so a standard NEMA17 motor was purchased for this task. The motor is part of a MK7/MK8 style direct drive extruder that is made from mostly 3D printed parts. The extruder is mounted on the frame and a bowden tube guides the filament to the hot end mounted to the printer’s moving carriage. Remotely mounting the extruder motor keeps it’s mass off of the axes, which in this case may be too heavy for the small, scavenged drive stepper motors.

The electronics are standard RepRap type and the same with for the hotend. The recycled motors work well with the RepRap electronics. After all that hard work, the printable area is a mere 37mm x 37mm x 18mm, but that’s not the point of this project! [mikelllc] met his goal of building a super cheap printer from recycled parts. He has also made the extruder and laser cut frame files available for download so anyone can follow in his footsteps. If you’re digging this e-waste 3D Printer but want a larger print volume, check out this printer.


HackRF Blue

For anyone getting into the world of Software Defined Radio, the first purchase should be an RTL-SDR TV tuner. With a cheap, $20 USB TV tuner, you can listen to just about anything between 50 and 1750 MHz. You can’t send, the sample rate isn’t that great, but this USB dongle gives you everything you need to begin your explorations of the radio spectrum.

Your second Software Defined Radio purchase is a matter of contention. There are a lot of options out there for expanding a rig, and the HackRF is a serious contender to expand an SDR rig. You get 10 MHz to 6 Gigahertz operating frequency, 20 million samples per second, and the ability to transmit. You have your license, right?

Unfortunately the HackRF is a little expensive and is unavailable everywhere. [Gareth] is leading the charge and producing the HackRF Blue, a cost-reduced version of the HackRF designed by [Michael Ossmann].

The HackRF Blue’s feature set is virtually identical, and the RF performance is basically the same: both the Blue and the HackRF One can get data from 125kHz RFID cards. All software and firmware is interchangeable. If you were waiting on another run of the HackRF, here ‘ya go.

[Gareth] and the HackRF Blue team are doing something rather interesting with their crowdfunding campaign: they’re giving away Blues to underprivileged hackerspaces, with hackerspaces from Togo, Bosnia, Iran, India, and Detroit slated to get a HackRF Blue if the campaign succeeds.

Thanks [Praetorian] and [Brendan] for sending this in.

Continue reading “HackRF Blue”

Hacklet 25 – ESP8266 WiFi Module Projects

Few devices have hit the hacker/maker word with quite as large a bang as the ESP8266. [Brian] first reported a new $5 WiFi module back in August. Since then there have been an explosion of awesome projects utilizing the low-cost serial to WiFi module that is the ESP8266. This week’s Hacklet is all about some of the great ESP8266 projects we’ve found on Hackaday.io!

retroWe start with [TM] and the ESP8266 Retro Browser. [TM] has a great tutorial on combining the ESP8266 with an Arduino Mega2560. [TM’s] goal was a simple one: create a WiFi “browser” to access Hackaday’s Retro Site.  This is a bit more complex than one would first think, as the Arduino Mega2560 is a 5V board, and the ESP8266 are 3.3V parts. Level shifters to the rescue! [TM] was able to bring up the retro site in a terminal, but found that even “simple” websites like google send enough data back to swap the poor ESP8266!

oilmeterNext up is [Thomas] with the Simple Native ESP8266 Smartmeter. [Thomas] has created a device to measure run time on his oil heating system. He implemented this with some native programming on the ESP8266’s onboard Diamond Standard L106 Controller. When he was done, the ‘8266 had two new AT commands, one to start measurement and one to stop. A bit of web magic with some help from openweathermap.org allows [Thomas] to plot oil burner run time against outside temperature.

native[Matt Callow] is also checking out native programming using the EspressIf sdk with his project ESP8266 Native. ExpressIf made a great choice when they released the SDK for the ESP8266 back in October. [Matt] has logged his work on building and extending the demo apps from EspressIf. [Matt] has seven demo programs which do everything from blinking an LED to connecting to thingspeak via WiFi. While the demos aren’t all working yet, [Matt] is making great progress. The best part is he has all his code linked in from his Github repo. Nice work [Matt!]


8266[Michael O’Toole] is working on ESP8266 Development PCBs. The devboards have headers for the ESP8266, an on-board ATmega328 for Arduino Uno compatibility, and a USB to serial converter to make interfacing easy. [Michael] also provides all the important components you need to keep an ESp8266 happy, such as programming buttons, and a 3.3V regulator. We really like that [Michael] has included a header for a graphical LCD based local console.

Want to see more ESP8266 goodness? Check out our curated ESP8266 list on Hackaday.io!

Hackaday.io Update!

Hackaday.io gets better and better every day. We’ve just pushed out a new revision which includes some great updates. Search is now much improved. Try out a search, and you’ll find you can now search by project, project log, hacker, or any combination of 11 different fields. Our text editor has been revamped as well. Update a project log to give the new look a try!
We know everyone on .io is awesome, but just in case a spammer slips in, we’ve added “report as inappropriate” buttons to projects and comments. Once a few people hit those report buttons, projects or comments get sent to the admins for moderation.

That’s all the time we have for this week’s Hacklet! As always, see you next week. Same hack time, same hack channel, bringing you the best of Hackaday.io!

4d Systems IDE

Making Embedded GUI’s Without Code

When the 4D Systems display first arrived in the mail, I assumed it would be like any other touch display – get the library and start coding/debugging and maybe get stuff painted on the screen before dinner. So I installed the IDE and driver, got everything talking and then…it happened. There, on my computer screen, were the words that simply could not exist –  “doesn’t require any coding at all”.

I took a step back, blinked and adjusted my glasses. The words were still there. I tapped the side of the monitor to make sure the words hadn’t somehow jumbled themselves together into such an impossible statement. But the words remained…   doesn’t.require.any.coding.at.all.

Continue reading “Making Embedded GUI’s Without Code”

Fixing A Multimeter’s Serial Interface

[Shane] bought a multimeter with the idea of using its serial output as a source for data logging. A multimeter with a serial port is a blessing, but it’s still RS-232 with bipolar voltage levels. Some modifications to the meter were required to get it working with a microcontroller, and a few bits of Python needed to be written, but [Shane] is getting useful data out of his meter.

The meter in question is a Tenma 72-7735, a lower end model that still somehow has an opto-isolated serial output. Converting the bipolar logic to TTL logic was as easy as desoldering the photodiode from the circuit and tapping the serial data out from that.

With normal logic levels, the only thing left to do was to figure out how to read the data the meter was sending. It’s a poorly documented system, but [Shane] was able to find some documentation for this meter. Having a meter output something sane, like the freaking numbers displayed on the meter would be far too simple for the designers of this tool. Instead, the serial port outputs the segments of the LCD displayed. It’s all described in a hard to read table, but [Shane] was able to whip up a little bit of Python to parse the serial stream.

It’s only a work in progress – [Shane] plans to do data logging with a microcontroller some time in the future, but at least now he has a complete understanding on how this meter works. He can read the data straight off the screen, and all the code to have a tiny micro parse this data.