Even though 3D printers can fabricate complex shapes that would be nearly impossible to mill, they are not well suited to designs requiring bridging or with large empty spaces. To overcome this, [Scorch] has applied an easy plastic welding technique that works with both ABS and PLA. All you need is a rotary tool.
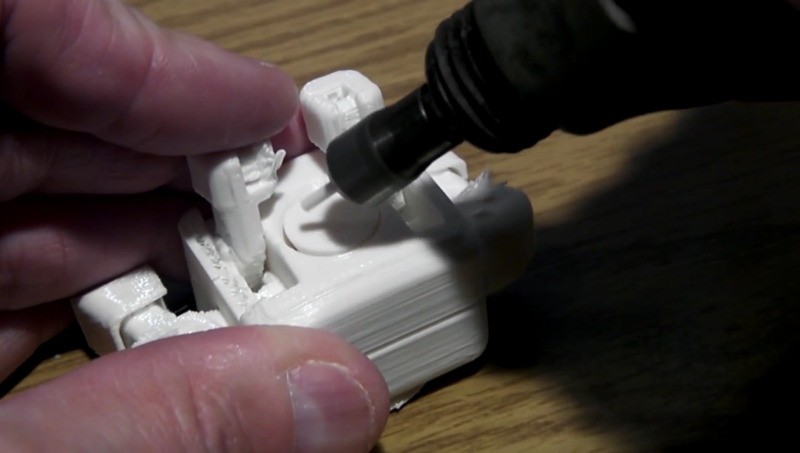
“Friction welding” is the process of rubbing two surfaces together until the friction alone has created enough heat to join them. Industrially, the method is applied to joining large, metal workpieces that would otherwise require a time-consuming weld. In 2012, [Fran] reminded us of a toy from decades ago that allowed children to plastic weld styrene using friction. This modified method is similar to stick welding in that a consumable filler rod is added to the molten joint. Inspired by our coverage of [Fran], [Scorch] experimented and discovered that a stick of filament mounted into a Dremel works just as well for joining 3d prints.
That is all there is to it. Snip off a bit of filament, feed it into your rotary tool, and run a bead to join parts and shapes or do repairs. Friction welded plastic is shockingly strong, vastly superior to glued plastic for some joints. Another tool for the toolbox. See the videos below for [Scorch]’s demo.


That’s fantastic! I’ve learned something useful. I think its time to call it a day and go home. Thanks!
In industry this is called “Friction Stir” welding, and has been used to replace rivets. Cool idea bringing it to other materials.
Actually friction stir welding (FSW) does not consume the tool, or bit, so when the procedure is done, you can usually reuse it on another FSW. It is technically a forging technique, not a welding technique. The tools spins up fast enough to melt and mix the material of the two pieces together which are held against each other at high pressures so they stay where they want them to stay. and the tool is then removed from the weld area. The procedure in the above video is more akin to extrusion without the melting head…the heat is generated instead by the spinning friction, and the melted material is deposited on or in the spaces between the parts more like a hot glue gun….
https://www.youtube.com/watch?v=BQYLdw8W5wE
dafuq happened here??
Fran Blanche also has a video on this subject, though not quite as detailed as these videos I think. Also, the results in these videos look a lot better than what Fran was getting, probably due to the dremels speed vs the purple drill like jobby Fran was using.
Indeed. Fran Blanche’a said video is linked in the middle of this article where I mentioned her by name. According to [Scorch], seeing it on Hackaday from her was what inspired him to apply this to 3d printing.
This will come in handy. I”ll soon have a need for printing brackets that are bigger than the build volume of my printer; using this technique I can print interlocking parts and use welding to strengthen the joints.
Not sure if I would call it new since friction welding has been around pretty much since plastics have been a thing. First time I remember hearing about it was a few years ago from someone who was trying to recreate a friction welding toy from the 70s(? it was somewhere around there)
Definitely useful tho :)
Yep, scroll up. “[Fran] reminded us of a toy from decades ago that allowed children to plastic weld styrene using friction.” Was the inspiration for trying it on 3d printing filament.
Although I wonder if he was first to remind, as this technique is known for a while now (at least a year, but probably much more…)
Plastic friction welding is used all of the time, though it’s usually referred to as “ultrasonic welding” or something similar. The theory is the same, even if the method of getting there is different: plastic is rubbed together until it melts.
I thought ultrasonic welding just heated plastic by vibration (invisible, uberfast, vibration), not rotary with a fill stick. I used one ten years ago but I honestly can’t remember anything about it. Ultrasonic welders are stupid expensive IIRC.
Haven’t seen anyone use it for 3d printers yet.
That’s the difference between ultrasonic friction welding and friction stir welding. The mechanism of operation is the same (rub plastic together until it melts), but the method to get there is different.
At least that’s what I was taught, I could be wrong.
Friction stir welding uses a non-consumable tool bit, ultrasonic does not. Ultrasonic vibrates (rubs) the pieces together, while FSW melts and mixes the pieces together.
Sorry to interfere, but frictionwelding can be done with or without materialfeed in both methods. The main difference is that of use: A friction-stir – welder has to touch (nearly) all the space where the connection will be. That means that for thick connections you have to use a broad head for reasons of stability (you cant make a thick connection that is slim). On the other hand stir-welders are cheap, and the stirred up connection is stronger esp. for connections between different materials. A ultrasonic welder can be set on the surface of materials and connect very thick pieces without destroing its surface. On the cons, they are quite expensive and since they do not stir connections between different materials may be weaker than those that are stirred. As an example I’d give you ‘”Stainless” steel’ and Iron.
Sorry for the bad english (Austria).
Ultrasonic welding is also used to join copper wires in wiring harnesses, the weld is then covered with heat shrink tubing. Yes, crazy expensive welder.
I built some (unrelated) machines for a small factory that made water filters some ten years ago, they friction welded some of their filter containers, a cylindrical tube with an endcap, spin the endcap while pressing them together, a nice watertight weld in a few seconds.
Oh man, you can kill a long time on YouTube watching friction welding videos!
Yeah you can. Pretty amazing stuff!
SO much time.
Nice! I wonder how this would go in ABS rather than PLA, and if it’d be superior to using acetone in terms of strength.
[Scorch] claims it works equally well with both materials. I’d expect it’s superior to acetone if for no other reason than that it typically runs a bead and thus adds some buttressing. But that’s not apples-to-apples.
For thin parts this may very well be, but the chemical weld with acetone gets better with more contact surface, while the bead will only contact along the outline. I suspect the point where acetone is better than this method is the point where the combined contact area of the bead is lower than the touching surfaces, or somewhere in that area.
Then… why not use both? :P
Thumbs up for a nice idea :-D
I would guess for a broad joint/fracture like the robot head, solvent welding would be stronger due to large internal surface area. On smaller joints, friction welding would be stronger since it builds up a bead. No reason the two couldn’t be combined, though.
Joining the hexagons together into the Buckyball shows another aspect, where strength works against you. You would not want lay several hexagons flat, and fully solvent weld their outer faces together; as it wouldn’t be flexible enough to later shape. Instead it looks like [Scorch] is applying a thin friction weld to the inside edge of each face only, forming a flexible “living hinge”. Clever. Then once the ball is fully constructed, you can reinforce with more friction welds on the outside.
“No reason the two couldn’t be combined, though.”
+1
I have been doing this for some on my 3D printed projects during the last 2 years. I saw Frans video and tried it with ABS filament, It works great with acrylic.
This is a handy option. My kids had a toy helicopter years ago that was assembled with a spin welder tool, and special clip on plastic weld sticks. I never thought of using a Dremel and filament like this. A good idea :)
Here, have a picture of Spacex’s circumfrential FSW. :P http://www.spacex.com/files/assets/img/121208_2ndstgassembly.jpg
Here, a picture of SpaceX’s circumferential FSW, it’s a bit larger… similar principle, much more difficult to get right with aluminium. http://www.spacex.com/files/assets/img/121208_2ndstgassembly.jpg
hahah thats funny, cause just last week I made this..
http://www.thingiverse.com/thing:608201
of course I was recalling frans youtube video while I made one.
about 4cm of 3mm filament at a time can be fit in the dremel,
use LOW speed on the dremel, dont get discouraged, its not as easy as you might think it is.
Am I the only person that remembers this?!?!?
https://www.youtube.com/watch?v=PnWpcwnR2YA
strangely enough this technique is used for joining HDPE cylindrical parts used in plumbing from at least one manufacturer that I am aware of.