[Matthew Peverill] is a busy PhD student who loves to make time for a little Kerbal Space Program. He was tired of using such pedestrian controls as a keyboard and mouse for such important work, and wanted something a little more like they have down in Houston.
For this project, he’s focusing on the inputs more than anything else. The intent is not to play solely from this control panel, but to strike a balance between fun inputs and accurate control without screwing up favorite game play modes. It’s based on an Arduino Due, and uses some custom I²C multiplexer boards to wrangle all the various inputs.
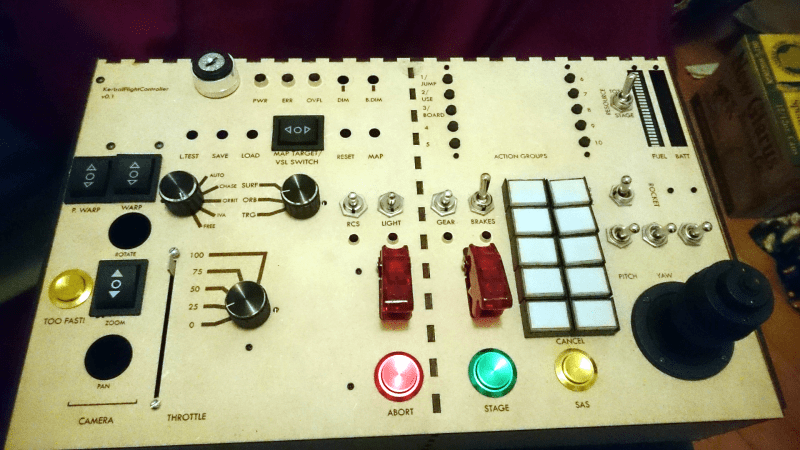
We love the look of this panel, especially the appropriately Futura-fonted labels and all the toggle switches. Matthew took inspiration and guidance for this project from a couple of sources, so he’s definitely following in the Hackaday spirit of standing on the shoulders of giants. He’s moved through two prototypes and is working out the bugs before making the next one. The final version will be made of backlit transparent acrylic, and you know we can’t wait to see that.
What, you don’t have access to a laser cutter? Just build a control panel into an old Heathkit trainer or something.


Lovely! But, oh boy, don’t you wish those HTTM capacitive touch switches were assembled with better precision? You just can’t put them on a grid by soldering the pins because they are assembled with horrible alignment consistency, making your “grid” look all funky.
Spoke too soon, oops. Looked at the full article and high-res images, the “action groups” set of switches is not HTTM modules (but looks like from a distance). My bad!
You quite neatly forgot to mention that KSP2 was announced yesterday ;)
D’oh!
So, in the KSP universe, is there a “standard” for control panel layout?
(Yeah, I’m thinking that goes against the Kerbel way of just getting things done.)
Not really. Officially the only control layout provided would be the default PC keyboard bindings for “flight controls” mode. Probably not what you were hoping for :P
There are numerous plugins to the game however that provide for alternate inputs (and outputs), over a serial port for example. Commands in the serial (or whatever) protocol are akin to key functions that can be bound, but there really is no requirements for layout beyond that. It’s insanely flexible.
A web image search for “KSP control layout” will really drive that fact home. Beyond a joystick often used for axis input, you’ll be hard pressed to find duplicates for any other aspect.
I’ll do something like this for flight simulators
I promise I would
Just as I finish understanding USB stack with HID and other intricacies
One day…
One day for sure…
You probably don’t want to hear this, but there are libraries and (at least from Atmel/Microchip) plenty of applications notes that will show you exactly how to implement USB HID with microcontrollers.
I realize that in order to do anything from scratch, you first must invent the Universe, but that tends to get in the way of getting things done.
Can somebody suggest a good joystick for this? I’ve been working on my own controller but the analog sticks I got don’t give me the precision I need to play KSP.
One option is to make your own from scratch. Personally, I would base it on Hall Effect sensors (Google “DIY hall effect sensor joystick”) Here is a *serious* joystick that uses the famous Leo Bodnar BU0836A USB interface boards. (8 12-bit analog axes, 32 buttons, hat switch–he has 32 & 64 button boards, as well, that support encoders as well as buttons) https://youtu.be/-JNjoF49p5o
You don’t need to go that deep, though. Here is the basic idea behind using hall effect sensors instead of pots. You can even retrofit them into regular joysticks, if you want. Here is an abandoned project to create a completely customized handgrip, though you’ll need to figure out the OpenSCAD code to be able to print it: https://youtu.be/kMCk5j63dAI?list=PLC66292176B625E2A
Try this one:
https://vkbcontrollers.com/?product=vkb-sim-gladiator
Shameless plug for my own panel that was previously featured on hackaday. Maybe this weekend I’ll dust it off!
https://hackaday.com/2016/08/23/commanding-kerbals-with-a-physical-interface/
I might as well jump in with Jeff and do a shameless plug as well. My initial plan was to convert the space under my stairs in my basement into a full blown capsule, but figured I better start with just the controller. The idea morphed now into building an inflatable ship/station that the kid and I can use that interfaces to the game. The KRPC library is pretty sweet.
https://hackaday.io/project/166536-kerbal-space-program-controller
Nice.