Engineering creativity comes to life when you have to design around a set of constraints. We can do just about anything with enough time, talent, and treasure, but what can you do when shackled with limitations? Some of the most creative electronic manufacturing tricks spring to life when designing conference badges, as the ability to built multiples, to come in under budget, and most importantly to have the production finished in time are all in play.
This happens at conferences throughout the year and all over the globe, but the highest concentration I’ve seen for these unique pieces of art is at DEF CON every year. I loved seeing dozens of interesting projects this year, and have picked a handful of the coolest features on a badge to show off in this article. I still love all the rest, and have a badge supercut article on the way, but until then let’s take a look at an RC car badge, a different kind of blinky bling, and a few other flourishes of brilliance.
Oh No They Didn’t: Car Hacking Village Badge
![]()
Far and away the craziest badge at DEF CON 27 was the Car Hacking Village badge. It’s a functional car that you can connect to via Bluetooth and drive around to the delight of the child in each of us.
It’s a toy car, so what? The difference here is the economy of scale. If you’re going to ship 10,000 of them it’s no problem to build an injection molded enclosure and house the electronics to control it wirelessly. But this project set the production run for just 350 SUV-shaped badges. At this scale, injection molding is prohibitively expensive, nonetheless they forged ahead.
The enclosure itself is laser-cut and laser-etched acrylic that fits together to house everything. There is a DC motor to drive the rear wheels using a worm gear. You can just catch a glimpse of this in the video below. Steering for the front two wheels is taken care of by a very small hobby servo that uses an acrylic lever.
Feats of mechanical design aside, the electronics themselves are really clever. There is a main PCB carrying the huge NXP processor at the front of the vehicle, and another for battery management near the back. The two are connected by a pair of long, narrow PCBs mounted at 90 degrees to the other boards which carry the RGB LEDs that illuminate the badge. Where the boards meet at right angles, pads on each line up so that the circuit boards can be soldered together, carrying the signals necessary for everything to work. There is a spare tire on the back (also acrylic) that doubles as a rotary encoder with a button next to it. This is the user input, with feedback shown on the OLED screen that makes up the windshield.
There seem to be pain points everywhere in what must have been a grueling assembly process. I’m told that hand assembly ended up netting about 4 hours per badge! Thus is the legacy of #Badgelife, and I’d say it paid off that they started this the day after DC26 as the hardware was ready on time, to the delight of everyone who laid eyes on them.
Doing More With Less: Space Force
At first glance you may wonder why I’ve included the Space Force badge in the Badgies this year. It does what a badge should — hangs around your neck, blinking and acting as a name tag. But there are so many brilliant details that had this design turning heads in a major way. That’s not surprising as badges from the Whiskey Pirate Crew have a legacy going back several years.
The face of this badge has one purpose: to look stunning. [True] went to great lengths to ensure there were no traces on the top layer; it only took one jumper wire, and this is just a two layer board! The backlit letters are FR4 without copper or solder mask and use normal LEDs mounted backwards. I soldered this one and it’s tricky to bridge the ~3mm gap between pad and part. I managed to fry at least four of them in the process.
The OLED module mounting method is really neat. The 4-pin header was removed and those traces soldered directly to the pads on the badge. On the other side, a mis-used right-angle surface mount header is acting as a mechanical fastener. The hole cut in the badge fits the glass screen perfectly as a bezel. Look closely and you’ll see there is also an IR transceiver mounted in a board cut out. There are also three capacitive touch pads on the front, mostly invisible to the eye.
Turn the badge upside-down (a natural gesture if you’re wearing it around your neck) and the accelerometer detects it, putting it into WiFi AP mode via the ESP32 so that you can customize the name on your badge. I’m a big fan of the Lithium 18650 which can be recharged with the badge, but also removed an used in another project. Contrast this to pouch batteries which never see another use.
Let There Be Light… And Depth: SecKC Badge
![]()
Here’s proof that you don’t need multi-colored LEDs to achieve the ultimate in bling effects. This SecKC DC27 badge does it with a combination of green LEDs and negative space. The group produced a total of 150 badges after having reached a presale of around 90. Each badge contains 645 (!) LEDs. Yield was an issue with every badge having one or two that needed rework (placed backwards, etc) and about 50% needing more attention than that.
What makes this badge look so amazing is the use of a second board mounted on top of three connectors. Here you can see the larger LED with that silhouette-shaped board removed. This does two things: gives your eye some depth which adds a lot more interest than you might think, and provides a place between the boards to hide the battery. These badges are driven by an ATmega328 programmed via the Arduino IDE, and uses an EEPROM to store animation patterns.
Careful Where You Touch It: Frankenstein Badge
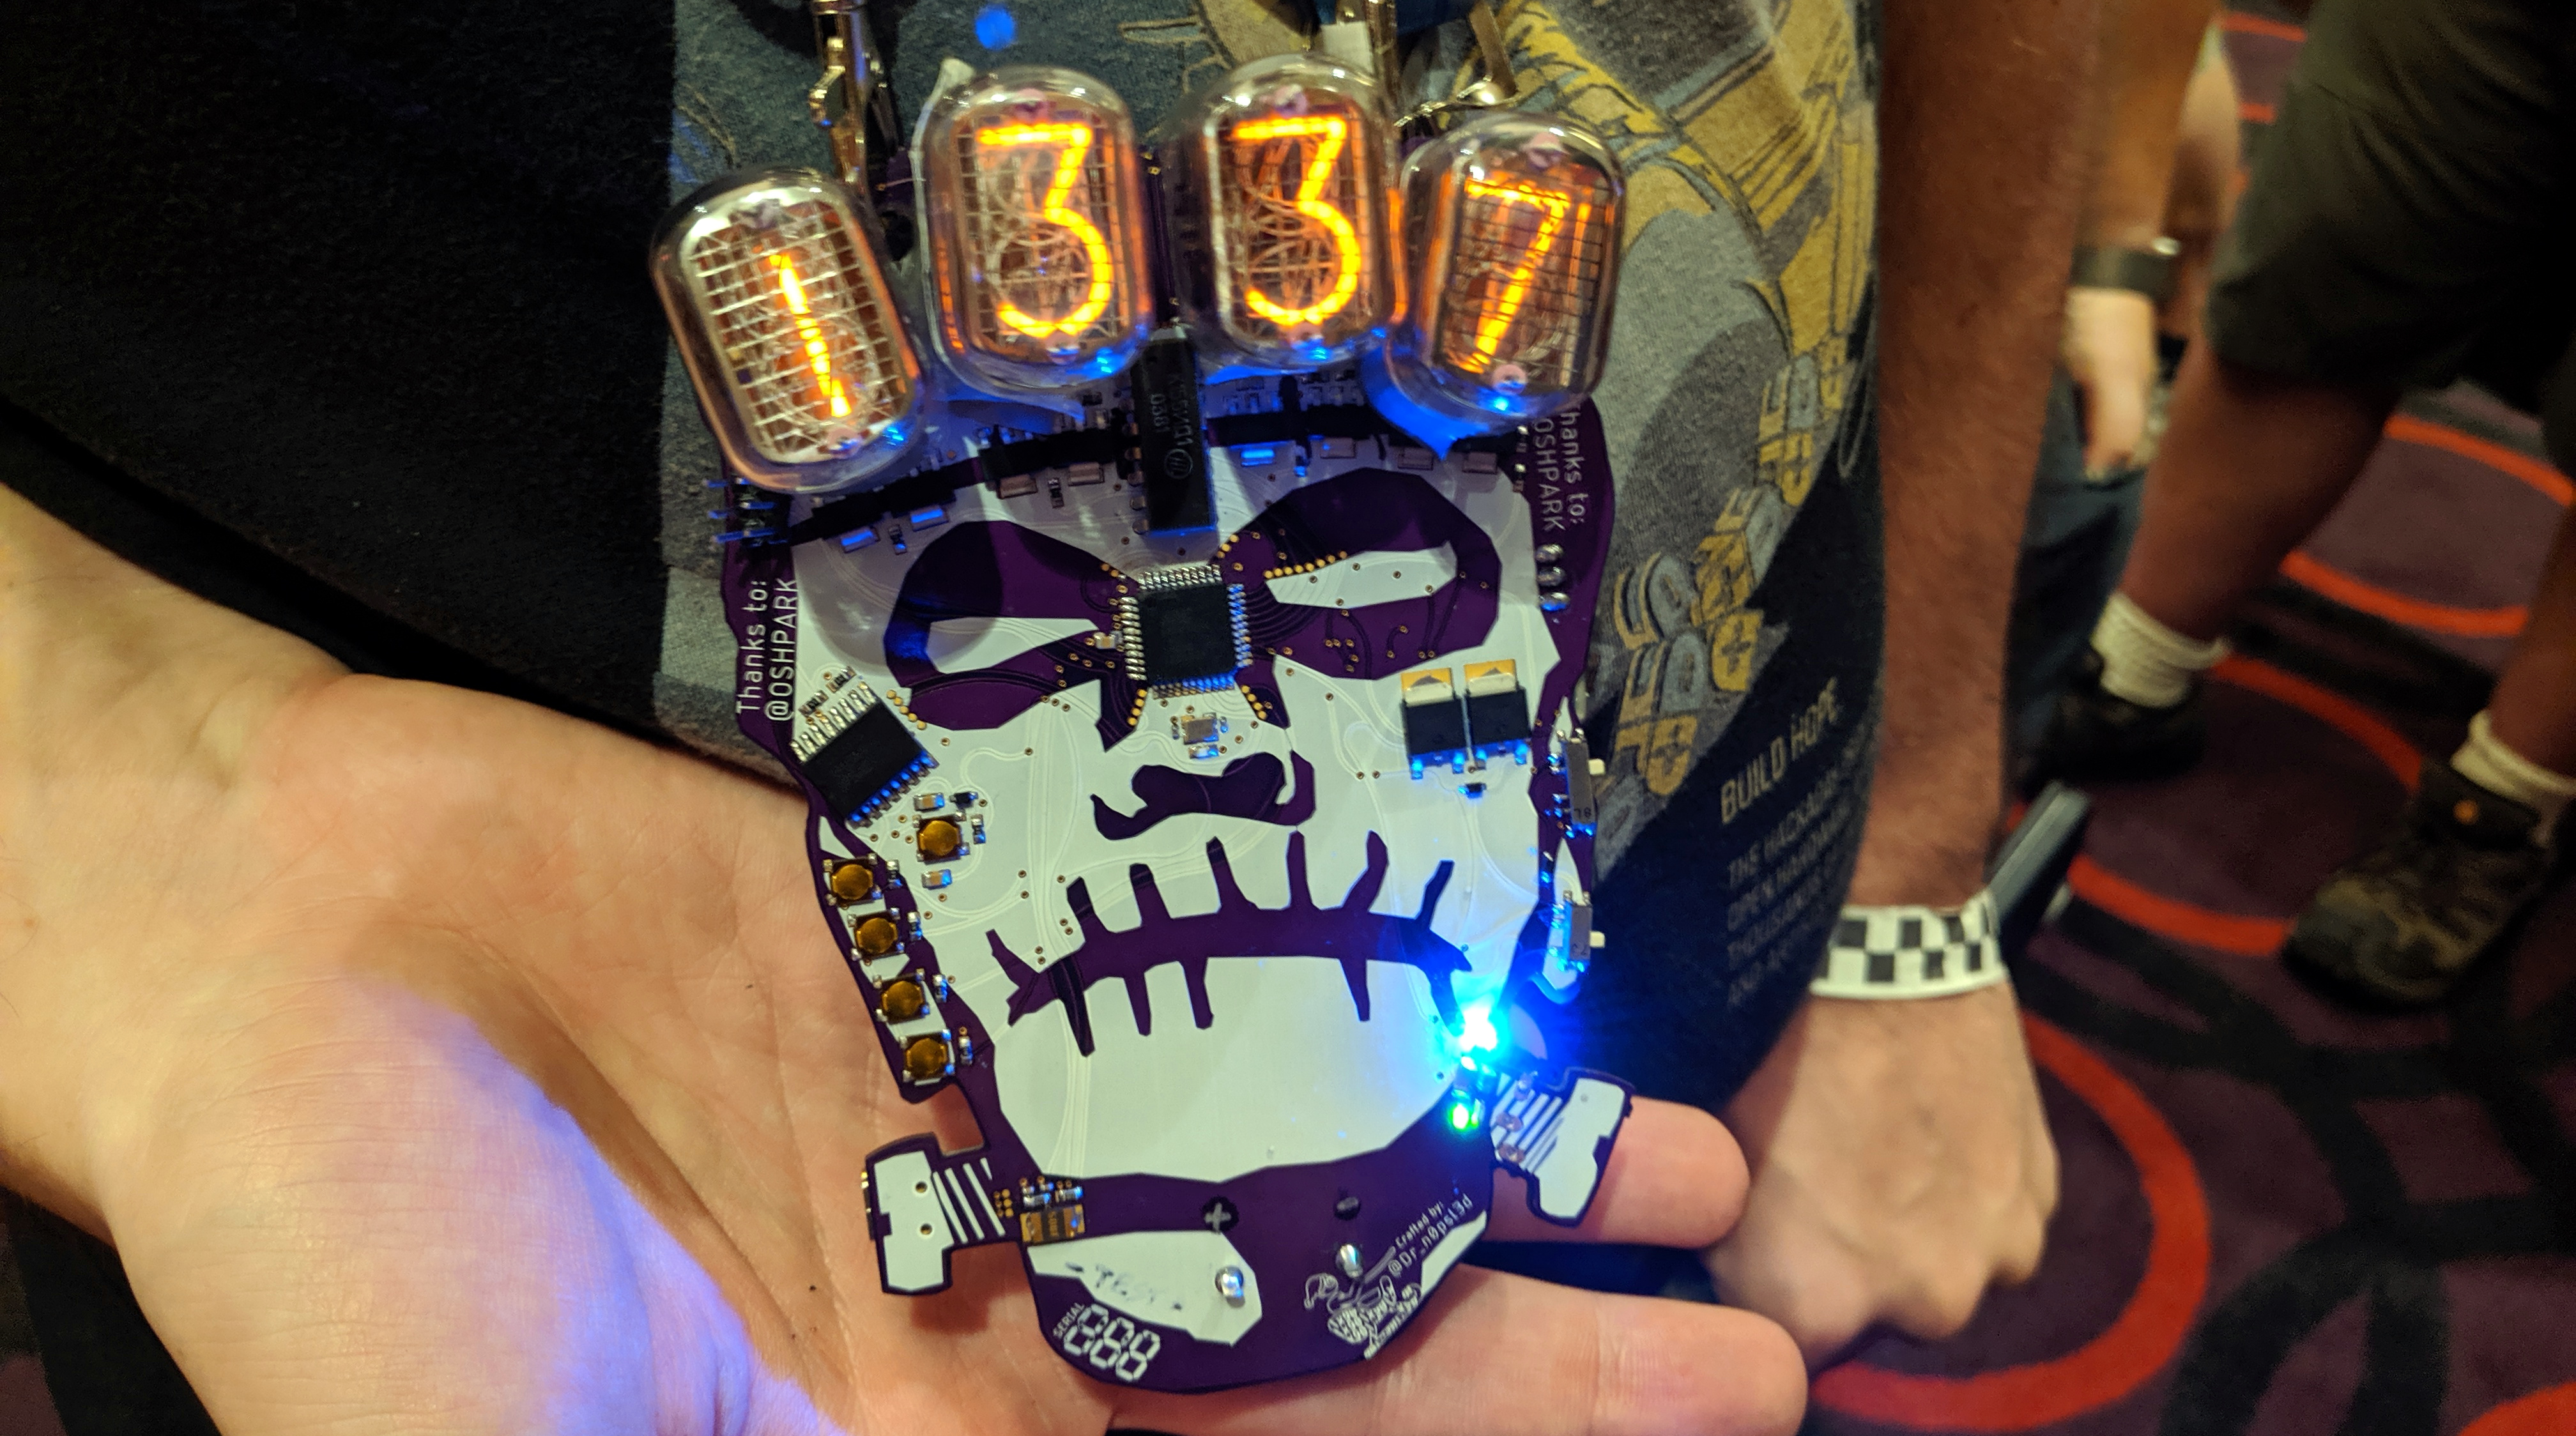
Nixie Tubes, they become rarer by the day, they’re fragile, and you need high voltage to light them up. But they look spectacular so why not build a badge around them! The Frankenbadge is the creation of Dr.n0psl3d who took the concept of a Nixie tube clock and brought it to life.


The high voltage bits on the back are somewhat safely sealed inside of a 3D-printed case, or covered by copious amounts of hot glue, complete with a warning on the silk screen to stay out. The serial number technique for the badge is a fun one. Three 7-segment digits have been printed in white on the silk screen; just paint the segments you don’t need black.
Surprisingly, this was n0psl3d’s first Nixie build and he chose to go with IN-12B tubes. He brought enough parts for 50 badges to the con, but this is a DIY badge and assembly is up to you. My only concern on this one is that the tube might fall out. Dropping ice cream out of your cone makes for a sad day, but dropping a Nixie out of your badge is sure to ruin your Hacker Summer Camp.
We Don’t Need to Build a Badge: DC503
Badge building is hard, especially one with a lot of something, like including enough buttons for a full keyboard. (We order something like 20,000 momentary switches for last year’s Supercon badge, also see the SecKC badge yields mentioned above.) This ups the complexity and every bump along the way raises the threat that you won’t have the production run finished in time for the con. The DC503 group side-stepped all of the manufacturing challenges this year by simply purchasing a consumer good and making it their own.
We’ve featured the SMART Response XE a couple of times over the past year on Hackaday. Originally retailing at $100 for use by every student in classrooms, you can grab one of these on the secondary market for a handful of bones. It uses an ATmega186rf and communicates on the 802.54 MHz band. The team repurposed the badges to act as one big chat room. What I like most is that they were able to drill through a part of the case that is normally hidden by the battery cover to get at the pads used to reflash the microcontroller.
More to Come
Last year I spent all of my time at DEF CON trying to find every badge maker for an inside look at what they’d been up to. Although I made it to more of the talks this year, I still managed to find 50 or so original creations. The Badgies is just of small set whose creative take on the art form caught my eye. But the rest are equally worth a look. Stay tuned to Hackaday for rest in an upcoming article!


A few minor corrections on Space Force:
– “no traces on the top layer” to “few, carefully placed traces on the top layer” – they are more obvious on the common red and blue badges
– The “mis-used right angle surface mount header” is really a “mis-used 0.1″ header, bent 45 degrees”
– There are 4 capacitive touch sensors on the front – look a little closer! =)
And you did fine soldering the LEDs. It’s one of those things where you get better and faster with practice.
Thanks for featuring the project. Hope to do even better next year.