
Over the last year we’ve seen a wave of portable computer builds that center around the Raspberry Pi taking up residence inside a commercial heavy-duty storage case. It’s not hard to see why; whether you spring for the Pelican case or get a cheaper alternative, these water-tight cases are far stronger than anything you’re going to 3D print or otherwise cobble together in the home shop. Especially if you can avoid popping any holes in the side.
Inspired by these builds but looking to make it even easier and cheaper to roll your own version, [Dmitry] recently took the wraps off of what he calls the Militarish Pi. You don’t need a CNC to cut out any face plates or a 3D printer to create an internal framework for all your components. You could even do it without soldering anything, if you really wanted to. Short of just buying one of these rigs pre-built from somebody, it’s hard to imagine it could get much easier than this.
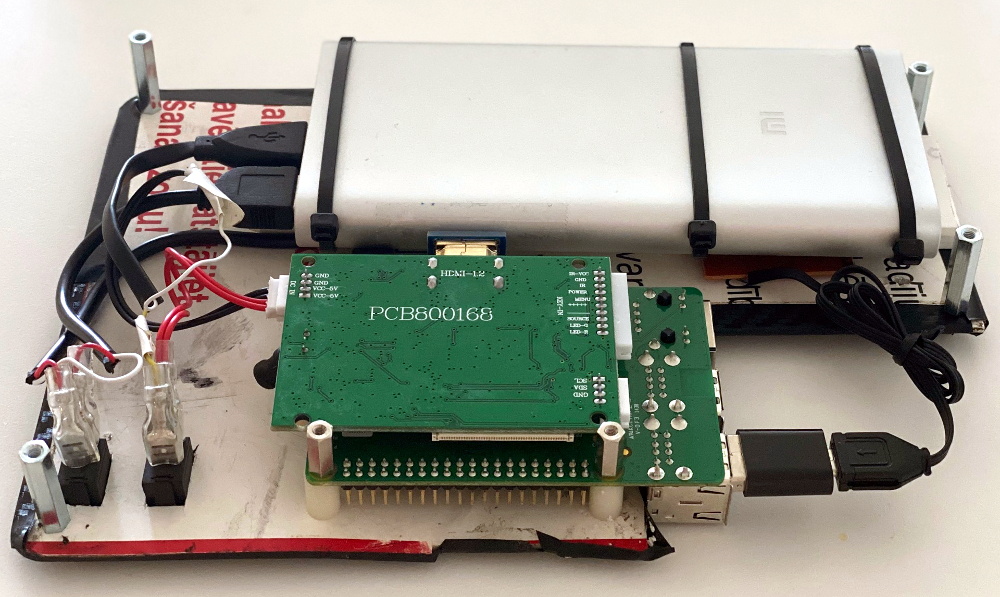 Most of the effort involves cutting the PVC foam sheet that holds the Raspberry Pi, battery pack, and the driver board for the LCD in the bottom of the $15 USD case [Dmitry] managed to track down on AliExpress. The “carbon fiber” sticker he put on the PVC sheet won’t do much for the structural integrity of the build, but it sure looks nice. Of course if you have access to the appropriate tools, you could certainly cut the plate out of something stouter. As for the display, the nine inch LCD is perfectly sized to press fit into the lid.
Rounding out the build, [Dmitry] found a cheap Android phone case that included a tiny USB keyboard which plugs right into the Pi and he’s looking to add a BlackBerry trackball to the setup down the line. We especially like the large open area that he’s kept around the Raspberry Pi’s ports that allow you to easily hook up to the network or plug in a flash drive. It could also be a nice compartment to keep your RTL-SDR for some mobile radio work.
For those that don’t mind spending name-brand money and have access to a 3D printer, the Raspberry Pi Quick Kit by [Jay Doscher] is another great way to get yourself a rough and tumble Pi without reinventing the wheel.


It evolves again!
also… FIRST!
Don’t really like the ‘Militarish’ theme, however I do like the case and construction.
More compact than many builds and a nice clean finish.
The word “militarish” somehow triggered a Disk World theme in my head!
Militaristic styles will naturally evolve out of rugged and simplified hardware, though. You’re just seeing convergent evolution based on a similar list of goals.
This thing looks a lot better than these pi-in-a-pelicans usually do, kind of like it a lot. Especially that little erector set kickstand for the screen hinge :) that’s brilliant
I mean that and the fact that he specifically calls it militarish, but what I’m trying to say is it seems to me that the concept itself just kind of naturally leads into similar territory so why not make it olive drab
I was trying to get DRS – LXI like aesthetic, so choice of olive drab was deliberate.
The case itself is available in olive drab and black, so it is possible to get a more mainstream look with a black option.
Thanks! Glad that you like kickstand :). It’s even nicer in real life as it does a satisfying click sound every time I open the lid.
I love it!! And a full list of parts too! Awesome! Also, note to editor- as specified, it’s not a touch screen.
I do not understand how the power system is supposed to work. When you connect or disconnect an external supply to that Mi powerbank it turns off the output for ~0.5 seconds.
To simplify the build, reboot on connect/disconnect is the inconvenience right now. As far as I know, all power banks in this price range have the same issue. Boards that solve this are pricey and not very compact.
What I plan to do next is to connect 5v 1F supercap to compensate for short power loss. Will see if it is possible to achieve without complicating the build too much.
This actually looks usable. Easily accessable ports (but what about gpio?), waterproof, and a decent size monitor instead of the official raspi touchscreen. Now, if I could only come up with a reason to why I need one of these… :)
OH! Just go ahead and build one!
You’ll find yourself unable to live without it in a year or so.
> what about gpio
I plan to cut a plate on top of Raspberry to make GPIO accessible. This a is straightforward thing to do, just a next step.
> come up with a reason to why I need one of these
You definitely need one. It’s fun and easy to build and may serve you as a backup or off grid PC for example :)
I want to build one that looks like one of those retro laptops in the movie Hackers.
“Polish Contructor” == Meccano!
Created in 1898 by Frank Hornby in Liverpool, United Kingdom….
So it should be called “Liverpudlian Constructor”!
So in the Soviet Union, these were only available from Poland (at least to us), so as kids we naturally called it The Polish Constructor. Grownups loved this constructor as well because it was very useful in fixing furniture, plumbing, and other stuff. Thanks, I’ll add a footnote to attribute Frank Hornby.
I wonder if the hole spacings are really the same. Or is this a differently sized variation on the theme.
Either way its a neat build and good use for it – though with the screen closing so near it I’d worry it will damage the screen – a little bit of hotglue/foam/pencil rubber/balsa to cover the screen facing side of it would perhaps be a good idea.
Or if the case is thick enough to screw into but not through (thus keeping it watertight) perhaps keep the contruction toy by whatever name on the outside entirely. Could also then be used to secure the machine into the ammobox neatly.
I’s suspect that anything made behind the Iron Curtain is going to be metric while GB and US made will have Imperial…
The Czechoslovak Republic had (It’s still going) a similar set called “Merkur”, and I can tell you from experience it’s not compatible with Mechano in any shape or form, everything is different…hole spacing, hole diameter, plate thickness, screw threads…
Which in the U.S. were sold under the “Erector” trademark. Because, you know, dicks.
In the HaD article there was an interesting phrase
“As for the display, the nine inch LCD is perfectly sized to press fit into the lid.”
Generally the term “Press Fit” and Glass should never be used together. unless it includes information about some sort of rubberised expansion material – Glass and other stuff expands at a different rate, and glass cracks easily.
Yeah, I just saw that. It means that with this “rugged” case, if you drop it on its side, that impact goes directly into the glass.
It might mean that, but you don’t actually know.
Can you suggest any alternative?
The original article doesn’t say. ‘Press fit’ was added by the HaD editor. So, it’s easy for you to jump to your conclusion, but it’s not an actual fact.
To quote Dmitry’s blog about this project,
“Case
210x150mm Is The Perfect Size. 210mm is the exact length of 9″ display.
…
As you can see display fits perfectly in this case, and I don’t even need to fasten it! It reliably holds on ledges inside the case”
So yes, it IS a press-fit.
Again, you are assuming that it’s a press fit, but it might not be very tight. You are further assuming therefore that any impact will be directly transmitted to the glass, without any evidence that that is the case.
People really like to find fault with HaD projects, despite never having seen them in person, or re-created one.
You and Doug Jackson have invented a problem that might not actually exist, and derisively dismissed the project because of it.
At no point have I (nor Doug Jackson) dismissed the project. This is just one single concern about the design. No, I can’t PROVE that one drop and the display is history, but I’ve done enough projects where some similar overlsight has doomed it. If we are not allowed to criticize, then why bother reading the articles? And you are really picking nits, when you say it’s not a “press fit”. Dmitry DOES say that it’s tight enough that he doesn’t have to secure it in any other way. That sounds very much like a “press fit” to me.
Looking at the picture on Dmitry’s site, it looks like the glass itself isn’t in contact with the case at all; just the PCB on which the LCD is mounted. But it’s still not good practice in portable devices, to mount PCBs such that they have no isolation from external shocks. A very tough case can be outdone by such an error.
This is called constructive criticism, and it’s one way that one can benefit from this kind of exposure to their projects. What have you offered that benefits Dmitry in any way?
Good grief. Doug Jackson’s haughty message was not constructive, it was just criticism. Your follow-up including “rugged” in quotes was equally as dismissive.
As to what I have offered that benefits Dmitry in any way? I have already been in touch via email. I’m also going to build one, instead of showcasing my skills by coming up with reasons not to.
If you read all of my comments, again you will see that I did not in any way dismiss this project. I put “rugged” in quotes, because in my opinion, based on experience, failing to isolate the PCB from shocks to the case defeats much of the protection the case offers. If you think that pointing out a design flaw says “nobody should build this”, you are just plain wrong, and don’t understand the function and value of criticism. The way the state of any art progresses is by everybody learning from everybody else’s mistakes, not by just blindly duplicating them. I asked you what contribution you had made, because on this forum, all you did was criticize the critiques, and not in a useful way, ignoring the clarifications I offered.
Let me be clear about this: I AM NOT SAYING “DON’T BUILD THIS”. If you don’t think the flaw we described is a problem and want to build it exactly like Dmitry did, by all means, do, and best of luck. And I mean that – I’m not dismissing you, either.
I like that it’s more compact than Jay Doscher’s back7.co boxes. I didn’t know there were any Pelican cases sized like this.
It is generally difficult to build DIY laptops, because it’s difficult to find thin things, like LCDs and keyboards and Raspberry Pis. So building a “ruggedized” (or “militarish”) laptop is a good way of justifying the overall thickness, and there’s no simpler way to do a rugged build than to start with a rugged case.
hacker: “look at my new laptop.”
normal: “why is it so .. thick?”
hacker: (closes lid, throws it against the nearest wall.) “Because sometimes YouTube comments just piss me off.”
Are you the same Doug Jackson mentioned in this article?
https://hackaday.com/2021/04/14/sv-seeker-is-recycling-batteries/#more-470513
That would explain a lot.
💰💰💰💰💰💰💰💰 $HUT UP AND TAKE MY MONEY 💰💰💰💰💰💰💰💰
Really tho – if you wanna get into production I want a few.
Please give us an update! Questions persist…did you solve the powerbank ~0.5 shutoff inconvenience? Have the screen, cables, and connectors held up? I am keenly interested to see wiring, the trackball, pretty much a thorough break down of construction. I very much would like to build something extremely similar.
Nowadays progress’s slow, me being busy with work and dealing with overall world craziness. On the positive side, a lot of new things (almost) working. I’ve got your questions! Will try to manage a status update in my blog. Next week, if I can.
I’ve published a status update, hope you might find something useful! Link is in the Build Of Materials and in the end of linked blog post.
I was inspired by yours and did my own .. used a smaller screen the 7 inch capacitive touch with HDMI … it doesnt fit as cleanly but i also put in a Radxa Zero 4gb with 64gb mmc , instead of an R PI 4b …
parts list here https://www.aliexpress.com/p/wishlist/shareReflux.html?groupId=vwAV6Cr85NtLq%2B8VUiVTbQ5C98DJ0YkvQ7%2BlLm2xI%2BE%3D
looks like my parts list was deleted but you can have a look if you like. i built a second version https://civilizationsend.com/2022/10/03/off-grid-hackable-laptop/