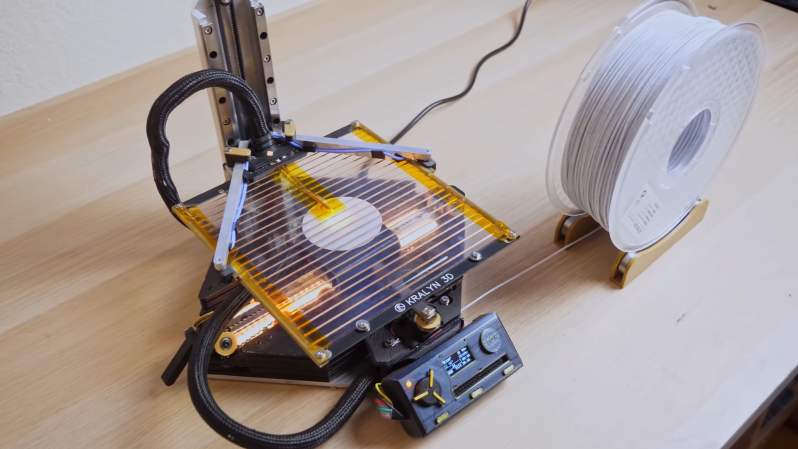
It’s rare these days for a new FDM printer to come along that sparks our interest, but the [Kralyn]’s Positron managed to do it. (Video, embedded below.) It prints upside down and packs down into a filament box while still boasting a print volume of 175 mm x 176 mm x 125 mm.
Unlike most 3D printers, the hotend and XY-gantry is mounted below the build plate, directly onto the base. You might assume that a printer needs to extrude plastic with gravity to work properly, but the real action is in the smooshing of the plastic layers. It appears that it might even improve bridging since the hotend is supporting the plastic as it gets extruded. A clear glass build plate is used, with the same heating strips found on the rear windows of most cars. This also allows the user still see the part, and provides the added advantage of being able to quickly spot bed leveling and adhesion problems.
Another interesting side effect of this arrangement is rigidity. There is no need to suspend the XY gantry with the heavy hotend in the air, so it can be mounted directly on the thick aluminum base plate. It uses an H-bot style gantry, with Synchromesh timing cables instead of belts, which eliminates the concern of belt twist. To get the best possible print volume within the size of a filament box, the gantry axes are arranged diagonally across the base plate. The Z-axis can disconnect and lay flat on top of the printer and uses the linear rails to keep it perfectly straight and perpendicular when mounted.
To reduce the hotend’s height to fit the available space, the filament comes in from the side and the molten plastic makes a 90-degree turn before being extruded. It took [Kralyn] a few revisions to get this to works right, but the large volume of the melt zone allows for increased flow. However, we suspect it might also make hotend maintenance slightly more difficult. The only other concerns we have are the reduced visibility of the printed part and the possibility that bits of plastic might drop into the gantry mechanism and jam it. As far as compact folding printers go, this is probably the best design we’ve seen so far. The design is licensed under CC BY-NC, and all the design files are linked in the video description.
Thanks for the tips [IraqiGeek] and [Jasper Jans]!


Awesome. I want one! Even if I have to build it myself.
Another excellent catch by Hack-a-day.
This is well made, appears to work well and its a concept i have never seen before. Never questioned the print direction until now.
I do hope to be able to get one commercially some time in the future.
Great work!
This is absolutely excellent. Printing upside down probably has a lot of benefits. I want to flip my printer over.
When we tried many (stupid) things at Ultimaker, we never found a significant difference on prints depending on the orientation of the printer. With one major exception, if you have a leadscrew for the bed, the up or down orientation work best as then gravity removes the backlash, while on the side it had some freedom.
Bridging works a bit differently upside down, sometimes better, sometimes worse. But usually the same.
We still remained doing normal orientation for the simple reason that it’s easier to view.
(We did also have an experiment of trying to print on top of a bath of oil to solve the bridging/support issue, didn’t work, and was a huge mess :D )
I work with some S5pro, and i admit that they are the best i’ve worked with, so far. 😁
Well golly that’s a nice bunch of ideas. Hopefully none of it is patented and the community can help develop it.
There are some great minds out there thinking outside the box – very neat – I want one :)
Very cool looking printer, I especially like how they had to overcome the challenges with modifying the hot end and the see through bed is a very nice touch! If they ever come out with either a kit or prebuilt version of this for sale I’ll definitely be in for one.
I’d love to see a lifepo4 version of the power bank. yes it would have to be larger for the same capacity, but lifepo4 can last for a decade of daily use and the fire hazard is much lower than traditional lithium ion batteries
Sweet. If you do an indiegogo/kickstarter, put it somewhere so we can buy it.This looks perfect for a mobile lab.
It would also make for a cute small home 3D printer you can easily put away when not in use (which is most of the time, frankly).
I see great potential in this.
No. My 2 3d printers are running almost non-stop…
Wow, using gravity to our benefit!
I don’t mind portability, would be nice to see it in ender3 size, with no hotend restrictions.
And crank the speed up. It’s like a coreXY upside down.which make a lot of sense.
This is blowing my mind. I think they could go even further with the idea. Put a flat, low-friction “tray” around the hot end, just a plane at the same height as the nozzle with the nozzle coming through a hole in the center, and you could get essentially unlimited bridging; the tray would support the extruded bridge while it was cooling. And if you didn’t have have to set your nozzle temp with bridging in mind, you’d probably get a lot more flexibility to refine other factors of the print.
I think that’s a very interesting concept you mention there. As long as the plateau stays cool enough it will work just fine. Now it is important that the plateau is very parallel to the Y and Y movements because if it would be tilted it could knock of the print. But that should be no a big issue I guess. Cool idea, I hope someone picks it up.
A tuned in ventilator pushing from below could do the trick: cooling down the bridging filament and also supporting it. But it must be tuned according to the extrusion width.
One suggestion: drill the throat hole all the way through, tap the ends (but not into the middle where the nozzle intersects) and thread a flat-ended hex-head plug/stopper into the side opposite the throat. Its purpose would be to give the user a straight path to use to clear jams if they can’t just force the plastic through the nozzle.
I had a terrible experience cleaning out a right angle fuel tap. +1
This, I had a hell of a time clearing a regular nozzle once, don’t even want to think about a right angle one …
Whenever i need to clean my nozzle, i screw it off. Heat it with a heatgun or flame, and put compressed air through the small end, blows everything right out in less than 15 seconds and its ready to go again.
Something that is actually innovative, nice job.
This if a very interesting design. I would like to get one also.
I have two concerns:
How big can it be scaled? It’s great as a small portable printer, but my go to printer has a build volume of 300x300x400mm.
The large melt volume is a problem when changing filament in mid-print. I’m frequently printing white letters on a black base with one print head. It could also contribute to stringing.
It should scale better than the more typical printer since the weight is directly mounted on the rigid base. The limit is going to be due to the beam-bending of a larger glass plate or its weight levering the Z axis. Solving the first might require thicker glass, which would exacerbate the second. That’s fairly easy to solve too though – a thicker Z column and if necessary beefier support. That all might result in less portability than the current size, but should still be significantly more portable than other printers of similar volumes.
The inverted design also lends itself well to multiple hot-ends. The only penalty that the extra weight might bring is additional loading on the cable and steppers, but that is rarely a concern for 3D printers anyway. Again though, easily scaled if necessary.
My guess would be that bed adhesion and part weight would be one contributing factor to scaling limitations…
Since the adhesion scales with contact area and not volume, I’d expect to see a limit at some point. The test would be to print a solid vertical rod of maximum Z height, and if it holds then any sane model should also hold. If not, then it should still be possible to determine the ultimate adhesion force in kg/m^2 (or psi) from the rod dimensions at failure, and use that to validate models pre-print. Software can calculate model mass and contact area.
Also, you could print an extended raft to be trimmed off post-print, assuming you’re not maxing already on XY, and future designs could consider edge-clamping on such a raft.
I built a printer like this about 5 years ago (https://youtu.be/hdju_6XEHZ4) with a 350x350mm bed using what I was calling an “Inside H-Bot configuration”. The two crossed linear rails are attached to a granite slab (a kitchen sink cutout) for extreme vibration isolation. I’ve been using it as main printer since then, and pretty much everything prints as it would on a non-inverted printer. Turns out all of the forces related to viscosity, nozzle pressure, stretching of the semi-molten filament, etc., are all much greater than gravity, so all of the aspects of FDM printing (oozing, bridging, curling, etc.) are virtually unchanged when you print upside-down.
I believe Kralyn3D actually references your printer in his video – specifically your inverted-Hbot setup. Super cool printer.
Congratulations! You certainly had to think out of the box in order to fit the printer in it.
You win the comment prize!
Wow, lots of great innovation here, and a very well put together video to boot, with full project files/BOM too. Awesome.
The 45 degree axis rotation seems such an obvious solution to being able to use the full area of the print plate, yet I’ve not seen that done before. In a similar vein, since the XY axis gains so much rigidity from being on the base, and is lighter than the plate and model, it now seems crazy to me that nearly all other printers are the other way up.
Bed adhesion. How many of us have fought this? If this printer works with some filament, how often does it fail? What filaments work and which dont? I like the creative thinking shown but to what better end?
I get your point, but if adhesion to the bed is poor it will eventually fail anyway. If the bed is upside down it might fail just a few layers earlier but in both cases it will fail in similar ways I guess.
Wouldn’t call it similar ways – as a failure falling into the hotend will be a much bigger mess than just being knocked over on the bed somewhere..
That said I don’t see it as a major problem for such a concept, there are enough fancy bed materials and adhesion aids now with a proven track record – some of even being so impossible to remove if the bed is even remotely warm it pulls chucks out of either the bed or print…. Just pick the right one for the filament(s) of choice.
I think the real downsides to such an orientation come more from how you the human want to deal with the world – its so much easier and more natural to work down onto a surface, and easier to see errors in advanced when the bed isn’t in the way – can’t cancel or help that failing print if you can’t see its failing yet. Its also go the potential to go more messily wrong as noted above and you can’t add anything into prints with the assistance of gravity the way you can the other way up – its something I’ve never done, but I know some folks do. Still as with all engineering its a compromise, and this one seems to be about as good as it can be at the stated goals of portable and printing well.
Forget the portability, the storability factor of this printer is why I’d love to have the ability to purchase one (assuming I could swing it financially). Pack it up, and put it in a box on a shelf in the garage along side the necessary supplies then move the car out of the garage to try printing things later on.
You have a garage! I live in a 67m³ (multiply by ~10 for sq ft) appartment, with a 6m³ room which severs as guest room/workplace/hobby room.
Storability is my main concern, along with ease of setting up – I could completely assembling and disassembling the thing each time but then not use it that much at all.
AFAIK, all resin printers do it this way, lifting the print bed out of the tank of resin.
There is a resin printer design that lowers the part down into a deep vat, with a thin liquid layer forming at the top each time it does so. The Gizmo 3D printer uses this design. The main drawback is that you always need to fill the large vat completely with resin, rather than using “just enough” resin for the part.
Lowering a platform into a vat of resin was how the first 3D printers worked. To start the platform is positioned just below the surface then a LASER is scanned (vector or raster?) over the surface. Lower the platform with a wait time for the resin to flood over the surface then LASER the next layer. Repeat until done.
Powder sintering printers can also work that way by lowering a platform into a chamber then screeding a fresh layer of powder across for each layer.
I would buy it, and enjoy every minute of every print. this is a masterpiece. I just love to see it in action. I dont care what I would print.
All it needs now is a scissor lift style Z axis and it’s a flat pack 3d printer :)
This is a serious “Shut up and take my money!” material.
An amazing job. I love the result and am floored that you accomplished it in only 6 months. Bravo!
Genius level stuff here, definitely “Shut up and take my money” stuff. I would be researching the BOM if I didn’t already have a 3d printer and a project backlog.
The only question left unanswered is , What materials can it print? Assuming that the vid shows PLA, we all know that things like ABS and Nylon tend to warp and peel without a heated build space, and that is going to be tough to make in a foldable form factor, especially if you want to keep your electronics cool.
Why would be it difficult? the electronics is on the bottom and heat goes up, so it’s easy. Attach a foam “skirt” around the build plate, and the hot air will stay inside. If the skirt is kept above the electronics, it will be fine.
Make sure to let me know when this hit’s Indiegogo.. I want to be an early backer.. I just backed your battery, and hope it gets funded..
So here’s something to note…
I tried to contact the person who made the vid about the Positron Upside Down 3DP and every path I took to find a way to contact them directly is a dead end. IOWs the individual does not want any contacts directly. Also, his IndieGogo campaign for his slick charger only made 40% of it’s $70K goal which is seriously sad since it looks totally awesome,
So… this entire thing can easily be a BS fantasy.
only lacks ribbon cables instead of bundles and easy snap in-out hot end.
….and an active public access development program and kit