With 3D printing continually gaining ground, some hackers might not see the need for traditional injection molding. After all, you can tweak the code or the model and print dozens of different iterations with fairly minimal lead time. Things get trickier when you need to print hundreds or thousands of the same thing and that ten-hour print time adds up quickly. [Actionbox] built a tiny injection molder they dubbed INJEKTO to speed up their manufacturing.
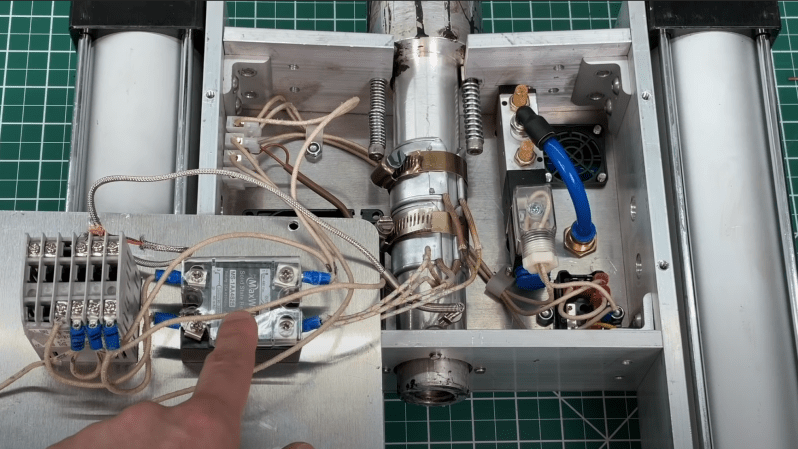
The design was optimized to be accessible as it is held together with brackets and cheap aluminum flat stock. The hardest part to source is the heating chamber, as it is a piece of turned aluminum. A PID controller keeps the temperature relatively stable and heats the plastic pellets you can dump in the top. Next, you’ll need an external air compressor to power the dual 2″ pneumatic pistons. The pistons push the plastic out of the spring-loaded extruder nozzle. [Actionbox] is already planning on a second version with 4″ pistons that provide significantly more force to extrude larger amounts of plastic as the current version tops out at about 27 grams.
Injection molding still needs a heavy-duty mold to inject into, which can be hard to machine. So until we can 3D print an injection mold, this multi-head 3D printer is something in between a 3D printer and an injection molder, as it can print a dozen of the same thing, speeding up that print time.


3D printed injection molds are a thing https://youtu.be/wMRSPXt48CI, as are cheap simple manual injection molders.
As long as I keep my 3D prints cool and dry, they never really mold…
Maybe try a mildew cleaner
As a mold release, so to speak?
Everything old is new again…Vincent Gingery published Secrets of Building a Plastic Injection Molding Machine in 1997.
High school shop class in 1971 had a homebrewed one as well. Aluminum pipe/plunger with a calrod heater wrapped around it and a variable transformer control. Not the most elegant thing but it worked pretty well.
Of course but this is designed for simple construction using cheap component.
It seems to me that a thermal camera would really help in the placement of the thermocouples.
No doubt you’d get far more pressure from a hydraulic system, all be it with a little added complexity. Perhaps some sort of mechanical advantage would be a good pneumatic compromise, a ratcheted lever maybe. But I think the simplest solution might just be to use a couple of automotive bottle jacks and automate the process of actuating them.
The part of the design I can see people having a problem with is the plastic refill. You may say, but why would you press the button with your hand between the ram and the pot of plastic, but the golden rule is, people are stupid. Some sort of guard and interlock is a must, there may also need to be an interlock on the case door too, if this product needs to go to market in come countries.
You would need a good accumulator to dump into the bottle jacks (besides they have a coarse seal, become messy and cant be used in the return stroke, air is ideal in a shop environment because leaks only cost energy), you need to shoot the load quick before it cools.
These guys made it look tidy, but by using the retract stroke to do work they sacrificed the maximum potential of that size cylinder because area of the rod.
oh and common practice is to use 2 spaced buttons so each hand has to be occupied by a button where guards are not practical.
Formlabs demonstrated 3D printed plastic injection molds.
The video https://www.youtube.com/watch?v=iZeu8LAnTvw
Maybe remote the electronics. No point trying to keep them cool while trying to heat the plastic. Correct PID programming should have no problem maintaining temperature. In big commercial machines I have worked with, they have a lot of small heaters in various zones to maintain even heating. The heating controls and heaters are really the most complex par of a production machine. They are key to cycle time as is mold cooling.
The lack of a screw in the barrel will leave them with inconsistent melt temperature. Insufficient stirring/mixing as part of the cycle.
Does their plastic piston open at the top of it’s stroke? In a ‘regular’ injection molding machine there is a slip ring in front of the screw part of the piston that only allows melted plastic through during charge and seals to create pressure during injection.
Also be aware, about half the heat energy in a typical shot is generated by mechanical action of the screw, not the the barrel heaters.
Understanding how a injection molding barrel works would help this project progress.
Older home hacked up drill press based IMMs have screws, slip rings etc and work pretty well considering how hacky they are.
These people seem to be working on reinventing the wheel without a good understanding.
Also ejection pins/sleeves, pull pins, etc. They are missing necessary steps.
Just an aside: Hard anodized aluminum molds work well, for low production just plain aluminum is good enough and dumb easy to machine. Hard anodized molds even work for glass reinforced nylon. Surprisingly well. Anodized layers are harder than fiberglass. But beware the machine operator with a steel screwdriver clearing a jam.
For brits, here are a few extra letters to sprinkle over my post (e, i, u).
I think you miss their main goal – to produce a cheap, desktop machine. If you browse through their channel, they already have built a screw-based machine. This is a further step in simplifying it. I guess they are trying to make as simple machine as possible and find a good compromise for rally small runs.
‘Simple as possible’…
Without stirring the shot volume in some way, this is one step (or more) too far.
Also: Not sure an absolute minimum ‘desktop machine’ is even a good idea. Considering the temperature and pressure IMMs operate at. They are just inherently dangerous.
Molten plastic is a compressible liquid. Compress any volume of that to 5- 10k psi and your dealing with a lot of potential chaos. Makes home aluminum casting look safe.
Cool little machine. I manufacture aluminum injection molds for benchtop style injection molders and have also tried 3d printed molds but they don’t last and are prone to cracking. I have had success with 3d printed inserts for molds.
Nice job!, I have been working with injection molds for 35 years, if you add some draft on your mold, (even 1/2 degree) it will eject easier. Also draw polish the mold in the direction of pull. Have fun!