3D printing is all well and good for prototyping, and it can even produce useful parts. If you want real strenght in plastics, though, or to produce a LOT of parts, you probably want to step up to injection molding. As it turns out, 3D printing can help in that regard, with injection molding company [APSX] has given us a look at how it printed injection molds for its APSX-PIM machine.
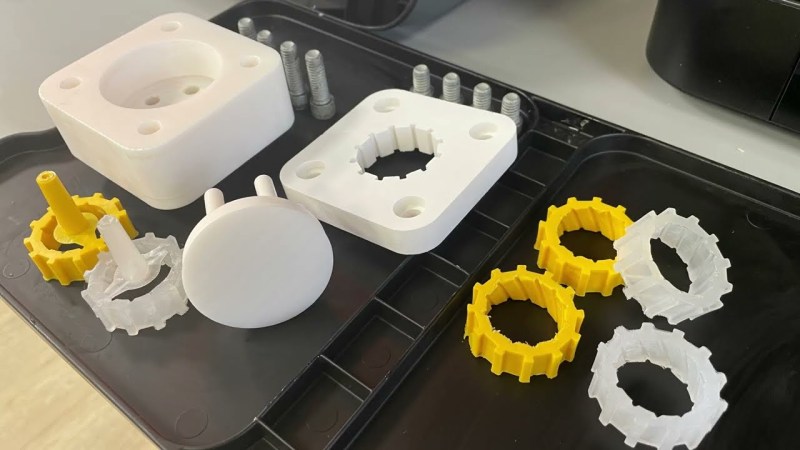
The concept is simple enough—additive manufacturing is great for producing parts with complex geometries, and injection molds fit very much under that banner. To demonstrate, [APSX] shows us a simple injection mold that it printed with a Formlabs Form3+ using Rigid 10K resin. The mold has good surface finish, which is crucial for injection molding nice parts. It’s also fitted with ejection pins for easy part removal after each shot of injection molded plastic. While it’s not able to hold up like a traditional metal injection mold, it’s better than you might think. [APSX] claims it got 500 automatic injection cycles out of the mold while producing real functional parts. The mold was used with the APSX-PIM injection molding machine squirting polypropylene at a cycle time of 65 seconds, producing a round part that appears to be some kind of lid or gear.
This looks great, but it’s worth noting it’s still not cheap to get into this sort of thing. On top of purchasing a Formlabs Form3+, you’ll also need the APSX-PIM V3, which currently retails for $13,500 or so. Still, if you regularly need to make 500 of something, this could be very desirable. You could get your parts quicker and stronger compared to running a farm of many 3D printers turning out the same parts.
We’ve seen similar projects along these lines before. The fact is that injections molds are complicated geometry to machine, so being able to 3D print them is highly desirable. Great minds and all that. Video after the break.


The random full screen flashing in the video was rather unpleasant. Would have been nice to see the design process.
The sound too from none to max. It’s an awfully edited video.
We have had some success with our Form 3 making prototype molds as well. Hopefully other can benefit from this writeup.
We also have a Stratsys Objet 260. I’ve made molds out of it but it was a bit disappointing. It’s awesome for fixtures and prototypes though.
One of the things you might want to look into would be, say, to reverse engineer lost molds from yesteryear:
The original AMT U.S.S. Enterprise model in 1/650 had a better bridge assembly than later re-pops.
A history
https://liftoffworks.com/?p=1147
https://www.britmodeller.com/forums/index.php?/topic/234931067-jay-chladeks-2012-builds-might-as-well-catalog-them/
With tariffs looming, Round2/AMT might be interested in a back-engineered kit
with computer adjustments…nacelle mounts a tad farther back.
You could have a line of different Starships with computer tweaks—maybe for the aftermarket.
Any reason you would need a Form 3 vs any other resin printer?
That’s just what the people in the video used. If you want to stray from their formula you can use other resin printers or even fdm printers with high temp plastics
Durability aside, would a 3D printed plastic mold retain its dimensions over all the parts made in its lifetime? Any heat deformation?
Yes, that’s why the lifetime is limited to a small number of parts.
30+ years ago I saw my first 3D printer at IMTS, where the salesman was selling a resin printer. It was cured by X-Y galvanometers and a UV laser. I was absolutely blown away.
The salesman was saying he had an automotive client who 3D printed a temporary mold, and they could get a few hundred parts from it. A normal metal mold would get tens of thousands of parts before wearing out. They’d normally have plenty of advance notice to order a replacement from the tool and die makers. Which is important because it took about 4-6 weeks to get a new mold made.
But sometimes accidents happen and the molds are damaged or break, and when all the spares have been used, the production line halts. Or in another case, production was halted because testing had discovered a fan shroud would fit during assembly but couldn’t be replaced once the engine was installed, so they came up with a quick modification, printed some test parts, then printed a temporary mold.
Being able to create a temporary mold to produce 400 parts was enough to keep the production line moving while waiting for the replacement die. Or at least enough to keep it moving until the next temporary resin printed die arrived.
They’d do anything to get production back on line faster. Which is why they tried this in the first place. And it’s why the salesman was convinced he’d make millions selling 3D printers to industrial users around the globe.
Could metal molds be formed from a kind of lost wax process? Use a low temp filament.
Possibly but they’d still need final machining as you’d have to make them oversize to account for shrinkage. Much less machining than starting from a billet though, but more work overall due to the mold making and casting process.
This is the most friendly and productive thread I’ve seen on the Internet in a very long time.
You could just skip that step entirely and use a laser sintering printer to make the part directly out of metal.
We are looking at a printer that is almost $300k
You can get a small number of parts from a plastic mold.
But you can get thousands of parts from an aluminum mold insert.
Many, many thousands if you hard anodize it, even shooting glass filled nylon.
Less time and effort and much better results.
Inserts are still somewhat disposable, but they all are.
Keep the mold operations guy on a leash, they like to ruin inserts with pry bars and call it ‘extra effort’.
Also Aluminum is a much better heat conductor.
60 seconds+ cycle times for a small simple part is ridiculously bad.
Only very slightly better then not running at all, economically likely WORSE.
You can cut the aluminum insert in less time than printing the plastic one.
Aluminum cuts like warm butter.
Also complex geometries?
Not really…
Simple two part mold inserts can (almost) always be made with 3 axis CNC, or you wouldn’t be able to eject the parts. (Shallow undercuts for part retention are easy enough.)
Making the blank is a separate step, but you can batch those.
60s cycle time means you can do nearly 500 parts in an 8 hour day… which is the entire lifespan of the mold. With 3d printing you’d be lucky to get 10 parts
I also note the 60 second cycle time is a limit of the toy IMM machine.
Thanks for the quick video. I’m tired of the 22 minute long deep dive to see the 20 interesting seconds.
Working as a mould tool designer this has been coming up regularly for decades. But the reality is that 3D printed moulds have extremely limited uses. Most of the examples are carefully staged parts designed specifically to work. Metal 3D printed mould inserts are really getting interesting with conformal cooling, but are generally more expensive than a traditional machined mould tool.
If you have the skillset about mold making and you make your mold correctly in high resolution printer, your results can be much better. Some people may not prefer to use cnc machining just for 500 parts. The concept is solid. I don’t whine about the little flashings on the part and the machine sound.
I’m guessing if you already had an injection moulding machine you could make a carrier plate that retains the small 3D printed mould and allows for quick change, rather than absolutely needing to buy that specific $13k machine.