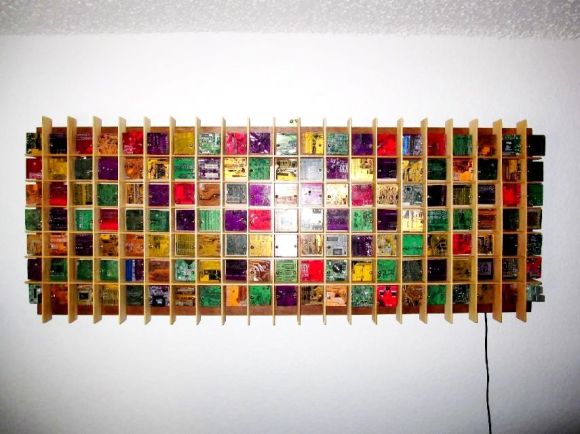
[Jared] is a computer technician so he has no problem getting his hands on broken motherboards. It looks like he tends to save the more interesting colors and has finally found a use for the waste. He built this wall art which also acts as an LED marquee.
He came up with the size and shape — 18″ by 48″ — because it meshes well with a sheet of MDF. The outline allows for a grid made up of 2″ square pixels arranged seven high and twenty-one wide. The top and bottom rows will serve as a frame for the lights, which still leaves the five pixels necessary to display characters. From there he started wiring up the LED array, which is shown in the testing phase in the clip after the break. Each pixel is cordoned off by a frame of basswood which [Jared] fabricated on the table saw. The project is finished up by cutting the motherboards down to size and mounting them with threaded rod and nuts. The board chunks are not transparent but they’re smaller than the grid so the LEDs will make the edges glow.
This reminds us of the motherboards used to mimic stained glass from several years back.


‘hides’ is a good choice.
why would you make an led marquee with something opaque infront of each light?
no pictures of it working either?
probably because it doesn’t?
best part was the instructable starting with a steve jobs quote; this neither looks good nor works well
From the article: “The board chunks are not transparent but they’re smaller than the grid so the LEDs will make the edges glow.”
But yes, I’m also disappointed that there are no photos or videos of the final product.
I cant imagine its easy to read anything written on the board with edge lit pixels with the sizes and dimensions involved.
PCB’s aren’t completely opaque, although the red LED’s would render the light fairly dim after going through the pcbs. He included a short video of the matrix working, but agreed the final working product would have been nice to see.
maybe the resin whatever board isn’t, but the copper traces should be.
I dont imagine much light getting through the (probably around) 9 or so layers in a normal motherboard.
Creator here. I really appreciate all the comments. I’ve since updated the instructable with a video of the final product, in action. Sorry for not posting it in the original.
It certainly does require a lower level of light for text to be legible. I compare it to the level that you comfortably watch TV, but you can definitely easily read the marquee. I did several test out of cardboard before I made the first cut to verify that the pixel size would be acceptable.
Next time, however, I’ll definitely be using brighter LEDs, more reflective material, translucent material, or somehow expose them in order to utilize their full brightness.
Regards!
My only concern is that the leds shown in the demo video are rather dim…
I like the concept a lot – but until I see it in action I’m going to guess that you wouldn’t be able to tell which segments are lit up unless the room was otherwise unlit.
Love this artwork… I suspect it works well when the edges lite up. Regardless, the motherboard sqares are very colorful and interesting.
Well I went over to instructable and viewed the video that was mentioned… The nice red glow around each motherboard square is impressive! Easy to see each sequence lit up. The final product is very nice!