
Sometimes that retro gaming itch strikes, and you just have to source components for a Pentium 4 build, like [Computer Retro Bus] did recently. Unfortunately, along the way he learned that you can actually get counterfeit mainboards. Case in point the purported ‘Asrock P4i45GV’ that was purchased as the core of this Pentium 4 build, which turned out to have many issues that included a fake AGP slot.
The mainboard was bought off Facebook Marketplace, with the first sign of trouble being spotty GPU support for the AGP slot, and an inability to install a driver for a card that seemed to work. Following this, issues with the installed Soundblaster soundcard popped up, with the use of Windows ME as OS being of course a factor, but even ME is generally not this sketchy.
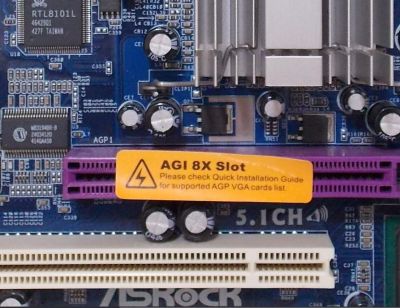
At some point he decided to actually dig into this Socket 478 mainboard that he had purchased, only to find out that there was a reason why there were no real markings on it. After an image search it turned out to be a clone of the aforementioned Asrock mainboard, including the original’s ‘feature’ of connecting the ‘AGP’ slot to the PCI bus. This explained why only the AGP GPUs that are compatible with PCI worked with this mainboard, as it’s actually Asrock’s ‘AGI’ slot.
Effectively just a way to scam buyers into believing that they bought a mainboard with an AGP slot when it was just a regular PCI slot cosplaying as an AGP slot. This doesn’t just mean lower speeds and spotty support with AGP cards, but also also potentially dead GPUs, as this mainboard inherited the same 3.3V-only card support.
Unlike PCI slots that are keyed for 3.3/5V voltage support, AGP slots are keyed for either 3.3V or 1.5V, or no key for universal support. These ‘AGI’ slots are sadly keyed for 1.5V AGP cards and thus will expose 1.5V-only AGP cards to potentially fatal voltages.
On the bright side, these are at least genuinely old mainboards, using the same AGP-less Intel chipsets, made back in the day to sell to unsuspecting buyers. Clearly the pain that these fake boards as well as genuine Asrock boards that these ripped off caused back in the day continues in 2026. Caveat Emptor, as they say.
Continue reading “Counterfeit Retro Mainboards With Fake AGP Slots Are A Thing”


