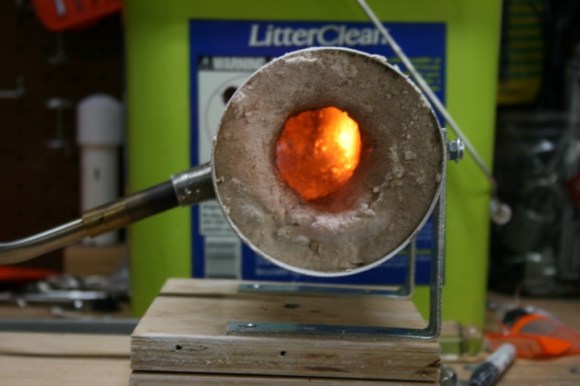
It doesn’t look like much, but this easy to build propane forge is just what you need to try your hand at blacksmithing. [Code Cowboy] took on the build after watching this how-to video which shows the fabrication of a small knife after completing the forge build.
The first step is to eat all of the soup (or beans if you prefer). With an empty can in hand the stand — made of two angle brackets — and inlet are attached. Next comes the heat proofing for the walls of the forge. At first glance we thought that cat litter was one of the ingredients, but that’s just an empty container used to haul playground sand. The sand is mixed with equal parts of plaster of paris before adding water to achieve a clay-like consistency. This is packed into the can, with a small opening to receive the metal to be heated.
The torch itself can be used to cure the heat shield. After letting the mixture harden a 30 minute burn will force the rest of the water out of the heat proofing.
[via Reddit]


While this may work for a few times. If you want something that can be used for a long time you need to make the lining out of refractory cement mix.
http://refwest.com/castable.aspx
been doing this for years
Cement is an awfully expensive thing to ship. What kind of local business would one look for to purchase this stuff in person? I’ve been toying with the idea of building a forge for aluminum lost foam casting for years now. I haven’t tried too seriously yet but I have looked in the local hardware stores. I did not see refactory cement anywhere!
I know Lowe’s carries it.
http://www.lowes.com/pd_15879-138-35515_0__
Do you have a better “instruction” for making refractory cement? A DIY method instead of commercial, I’m very interested in this.
http://www.youtube.com/watch?v=fGpnDoyci34
Try this link (https://ezinearticles.com/?Depression-Refractory-Mix-For-The-Backyard-Foundry.&id=85797). If you are working iron, avoid refractory recipes including portland cement or perlite. “Perlite is used in the manufacture of refractories where the average temperature does not exceed approximately 2000°F” (http://www.schundler.com/foundry.htm). Portland cement does not hold up well at forge welding temperatures.
I think he should make some more remarks about securing that burner, I mean if people fuck that up and it falls (on that wood for starters) you are going to have a bad time.
you mean like a sticker saying don’t touch it might be hot? that is stupid. everyone who’s smart enough to try to build this will be concerned about securing it. imo a couple more L straps will do the trick.
Yeah right, but we do need to be told to wear safety glasses?
And I’ve been with people that did really stupid thoughtless things when dealing with fire, so I speak from personal observation..
Also: it’s a youtube.. with youtube viewers… Try to argue that one.
Also: Ask Boeing and its million dollar engineers about it when you have a chance. See what they say when the blushing subsides.
Maybe we should make a youtube video about home made dynamite or something similar and equally volatile and dangerous. Then post it with no warnings or anything at all.
Improving the gene pool and the human race as a whole by exploiting Darwinism and forcing natural selection might be a good thing? We should do away with all and any warning labels completely IMO.
if you drop a propane torch it’s going to go out, not keep burning. I’m surprised he can keep the torch lit at that angle.
Hot soup commin’ through! This is a great idea but as Boku said DIY refractory cement would be great.
Wonder if you could put a door on there to restrict flow and turn down the torch a bit.
But you need access, it doesn’t work as a container but is for realtime heating.
But if you must, I guess you could make a door using the same technique as the furnace. But then you might have temperature runoff maybe? And you might need some kind of temp monitoring.
I’ve always used Tiger Torches and refractory bricks for forging jobs. I just stack the bricks on a steel cart to suit whatever I’m doing and shaped a couple “tuyere bricks” to snugly fit my torch tips.
I’m curious if there will be spalling problems with this recipe; it hasn’t been an issue with the brick I use. Refractory bricks are soft enough to quickly shape with a hand saw and rasp; a fellow could shape a few of them into a nice lining.
How about this thought about this design stems from the experience of stuffing torches where they weren’t designed to go: I’ve managed to melt two torch tips over the years. My torches have a long steel handle and are fed by a long, low pressure hose; the cylinders are nowhere near the action.
The forge is on a metal cart with a firebrick top in a welding shop. When I melted a torch tip all that happened each time was that the torch ended up 3 inches shorter than when it started and there was a puddle of cast iron in the bottom of the forge. This happening with a small torch on a forge in a poorly chosen location could get too exciting for my liking.
Having said that, it might work just fine; just don’t turn your back on it.
For a DIY refractory, binding the sand with dry clay would be much more durable. Commercial refractories will last longer, but sand and clay can be easier to source for a limited usage build.
David Gingery wrote some great books on building simple, low cost furnaces.
http://gingerybookstore.com/cruciblefurnace.html
http://gingerybookstore.com/charcoalfoundry.html
The “Build a Metal Working Shop from Scrap” series is fantastic.
The downside to using plaster of paris in there is that if you heat it over a certain temperature the reaction by which is sets will be driven backwards, leaving you with a much weaker lining. Some sort of clay, like kaolin or bentonite, would be a better choice.
Probably work OK once.
At those temperatures moisture is a little more hazardous than you would expect. The hydrophilic tendency of the plaster in the mix would make me very spooky. I’ve seen that plaster mixture used for a lost cast mold but wouldn’t want to push it more than
once and wouldn’t want to be there when chunks go flying when the can falls off it’s mount.
Be safe!
One tip for making a hotter, more even flame inside the can would be to insert the torch nozzle at an angle allowing it to form a cyclonic motion. This tip I got from the instructions on building your own mini forge at http://www.makezine.com/projects/make-18/30-micro-forge
I built this and found that the angle was effective at getting the temperature up quickly!
I’ve since made some additions to that original idea and made a slightly larger forge (sans the video/instructions :( ) by adding additional firebricks and using a BBQ propane tank with a longer hose, regulator, and quick disconnects.
I hope this helps!