
Imagine for a second it’s the mid-1980s and you’re looking in to desktop publishing setups. Those new LaserJets and LaserWriters are pretty cool, but imagine the desktop publishing world if you couldn’t create your own documents. Yes, it seems absurd to have a printing press that won’t create unique documents.
Now flash forward 30 years to the world of desktop manufacturing and rapid prototyping. There are dozens of repositories for 3D printable objects, but making something of your own design is apparently a dark art and arcane knowledge to everyone buying 3D printers for plastic octopodes and bottle openers.
This week, by popular demand, we’re going to be making a ‘thing’ in SketchUp Make. It’s free, easy, and surprisingly versatile despite its limited tool set. Common sense and Google algorithms dictate I link to previous tutorials in this series below:
And now on with the show. You’re gonna want to click the ‘read more’ link.
Our Thing
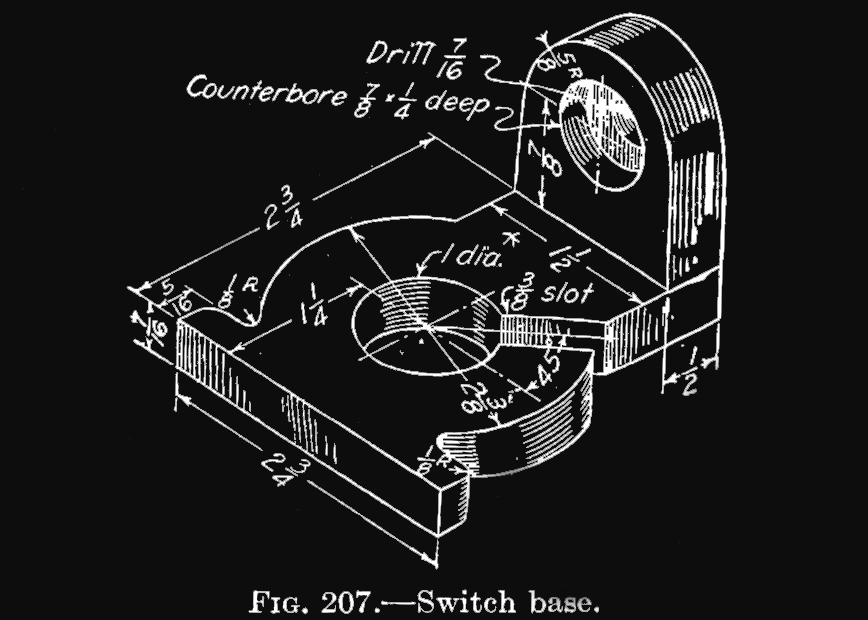
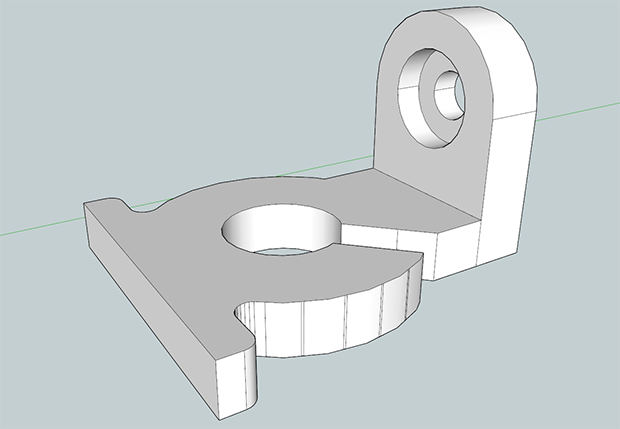
As with all of these Making A Thing tutorials, we’ll be using this switch base to the right. Click to embiggen.
Last week brought some interesting observations of this thing thanks to a few readers. I shan’t bore you with that now, but I have added a few notes regarding this thing at the bottom of this post.
Setting Things Up
There are two version of SketchUp; SketchUp Pro costs about $600. SketchUp Make is freeware and more than capable of building any mechanical part you can imagine.
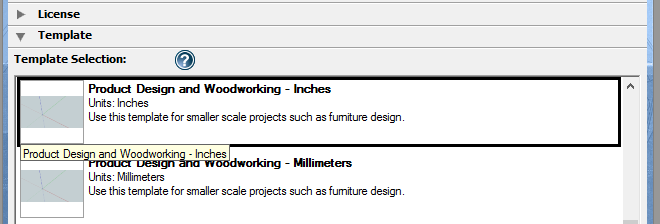
After installing and launching SketchUp Make, you’ll be asked to choose a template. We can use the “Product Design and Woodworking” template. Amazingly, the folks at SketchUp were kind enough to give us an option between using inches and millimeters. Since our ‘thing’ is in inches, select that template and hit ‘Start using SketchUp.’
Beginning Our Thing
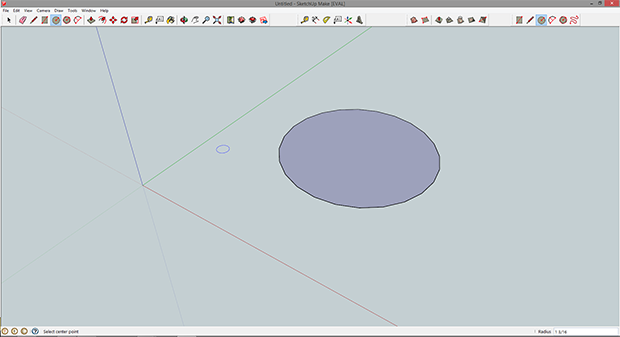 The basic idea behind Sketchup is the ability to draw in two dimensions and use the Push/Pull tool to extrude a shape into the Z axis (or in SketchUp’s case, the blue axis). On the toolbar at the top of the window, select the Circle tool. Click on any point near the intersection of the red, green, and blue lines.
If you followed along with the AutoCAD tutorial, making this circle the required size will seem very familiar. To get a circle with a diameter of 2 3/8″, just enter the radius on your keyboard’s keypad. That’s 1 3/16″ for those of you not in the USA, Liberia, or Myanmar.
Our first order of business is making the 3/8″ slot in the ‘big circley part’ of our thing, and drilling out the center. We’ll start with the slot first.
SketchUp has a great snap-to function that we’re about to try out. On the toolbar, grab the pencil or ‘line’ tool. Wave that around the center of the circle and eventually it will snap on the center. Click the center and draw a 3/16″ long line (remember you can enter the measurement on your numpad) along the red axis. Click the center again and draw another line, same length, in the opposite direction. From the ends of these lines, draw straight down, making the slot in our part. Next, pick up the eraser tool. Erase the little bit of the circle’s perimeter between the slot we just drew.
 Now for the hole. Select the circle tool, hover over what you think is the center of the big circle and wait for it to snap. Draw a circle with a radius of 1/2″. With the eraser tool and judicious use of the delete key on your keyboard, you’ll have something that looks much like our thing. The only thing left to do is rotate it.
From the Tools menu, select Rotate (or just use the ‘Q’ hotkey). pick a point on the purple area of our part and pick a second point along the green or red axes. Depending on where you clicked you’ll need to enter either 45, 135, 225. or 315 degrees on your keypad.
Continuing On…
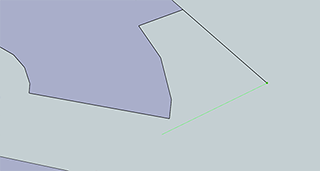
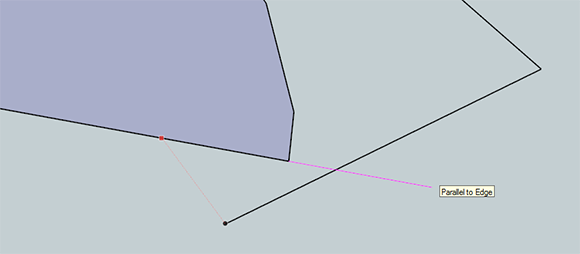
Now that the slot is all lined up properly on a 45 degree angle, we can start work on the two little flanges coming off the round part of our thing. The wider flange – except for the fillets on the corners – are left as an exercise to the reader. The same goes with the other side of the part, except for this one little ‘gotcha’ in the design, seen to the right.
If we extend the side of this flange down, it doesn’t intersect at the end of our slot. No worries, really. Just draw the line how you normally would, click on the inside of our slot, and try to ‘extend the line. SketchUp’s snap to is great, and you’ll easily be able to draw a line where you want it. After that, clean it up with the eraser.
Fillets
We need to round over four corners on our thing, all of them on our big, wide flange thingy sticking out of the bottom of our part. First we’ll do the outside corners.

We need a 1/8″ radius on each of these corners. Start by drawing two 1/4″ lines along the sides of our thing. In the .gif above, I added two hash marks where the lines ended. Draw a line between these two endpoints, then draw a 1/8″ radius circle at the midpoint of the hypotenuse of this triangle. Clean up with the eraser and do the same on the other side.
The inside corner is a bit more tricky. If we were using AutoCAD, we would just use the FILLET command to make a perfect fillet on the inside corner. SketchUp isn’t as advanced as AutoCAD, but we can fake it with what we have.
SketchUp has a tool called Offset (hotkey ‘F’) that allows you to ‘trace around’ any object and specify the distance between lines. If we offset a few lines 1/8″ away from our part, wherever they cross is where the center of our 1/8″ fillet should go. Once we know where the center of our fillet is, we can just draw a circle and get a perfect radius on that inside corner. Pretty slick, huh?
Here’s what we end up with, sans the eraser tool:

Extruding Up
 Now it’s time to work on the ‘tall’ part of our thing. Off the small flange, draw a 1/2″ x 1 1/2″ rectangle. With the Push/Pull tool, extrude this rectangle up to the center of the through hole, or 1 5/16″ (that’s 7/16″ for the thickness of the base, and another 7/8″ beyond that).
Now, use the circle tool and hover over the midpoint on the top front side of our new 3D solid. Create a circle the width of the rectangle and extrude it backwards half an inch.
Using the same process, you can easily create the drill hole and counterbore on the part. It’s very easy, just use the Push/Pull tool and the eraser.
Wow. Such Thing. Much Dimensions.
There you go. A thing made in SketchUp. All that’s left is to send this model over to your 3D printer. SketchUp doesn’t support exporting to .STL files, though, but that’s a post for the end of this ‘Making A Thing’ series.
That’s it for this installment of Making A Thing, but I would like to say a few things about the part we just made.
Just like the other Making A Thing tutorials, our ‘thing’ is taken out of an 85-year-old drafting textbook, Engineering Drawing (French, 1929). This is the fourth edition of this book and last week I asked if anyone had a first edition (from 1919). [Jacob] is awesome and found a first edition, but this part isn’t in it.
Also, for the first time ever, someone noticed these parts I’ve been making have been terribly wrong. Look at the width of the thinner flange. It’s one and a half inches across. Now look at the radius of the ‘dome’ on the tall part. That’s 5/8″ radius, or 10/8″ in diameter. Twelve eighths is not equal to ten eighths. That tall part actually has a taper.
In my defense, I would have found that taper if I did the assignment – making a three view drawing – for this part.
Despite these tutorials being seen by tens of thousands of people, [tarasbot] was the only one to pick up on this. He emailed me and now he’s getting a Hackaday t-shirt, some stickers, and whatever swag I can scoop up after the Hackaday party next week. Gonna need your shirt size, [tarasbot].
That’s it for now, next week is Autodesk 123D, and as always your suggestions for what softwares to build a ‘thing’ in are always welcome.


Sketchup is very capable of exporting to STL, all you need is the extension provided separately via the sketchup extension warehouse.
google search “sketchup to stl” – the first result links to sketchups extensions warehouse.
It doesn’t naively support STLs, it is supported through an add-in (ruby?, third party last i used it).
SketchUp does support STL import and export but you must download the proper plugin from their website.
I was thinking the same thing. That and 90% of the time you need to repair the mesh after the export because sketch-up thinks that for 1 triangle the outside is actually the inside….. if you find that triangle sketch-up will argue with you and fight you and tell you “no you are wrong and i will not let you flip this triangle”.
That’s where CleanUp3 plugin comes in. http://extensions.sketchup.com/en/content/cleanup%C2%B3 Just install it, press cleanup, and your sketchup model is fully printable every time.
There are at least a couple STL exporters and importers out there for the free version of sketchup, a quick google search brought up this one, but I can’t confirm that this is the one I’m using for my 3d printing (since I’m not at home).
https://github.com/SketchUp/sketchup-stl
I can tell you that I’ve built nearly all of my models in sketchup, with the exception of a little work in OpenSCAD http://thingiverse.com/Simonious
I honestly like tinkercad – it’s online, it’s free and it’s powerful. It’s not good for organic shapes, but for most small things like brackets, cases, containers and so on it’s very good :) Was never fond of sketchup.
Best tip I have read for using Sketchup is to turn each new part into a component, then edit it as a component (double click on it) – most useful when you are drawing an assembly of multiple parts. Even when I draw a rectangle, I make it into a component before I extrude it to height.
And then use the “make solid” tool for your component to check that it doesn’t have any weird geometry in it, because the exported model will break up otherwise.
Or you could get a real CAD software like Catia or SolidWorks that does 3D geometry properly.
Why yes, I would *love* to spend $150+ dollars on software with additional capabilities I have no idea how to use!
Pshh. It is simple. You just get a bachelors degree in 3d Design with a minor in mechanical engineering. Then realize you still don’t know how to do anything in SolidWorks or AutoCAD that can’t be done in sketchup and cry yourself to sleep while clutching your student loan late payment notices.
Wait. What were we talking about again?
Yes, the next bubble that bursts will be college education.
I’ve been saying that for years. Now it’s beginning to happen as a masters degree is now what the bachelors degree used to be. Soon, one will need a PhD in order to get a job that requires college education.
I don’t have a problem spending a couple dollars on the lotto for a chance to win the jackpot. But, spending thousands of dollars on education that does not equal a good paying job when your done:… Well, that just scares me.
Don’t forget about FreeCAD (http://www.freecadweb.org/) it is a great alternative to AutoCAD. I use it for all my 3D printing models!
@tarasbot Glad I helped you win a t-shirt by asking what the 5/8″ referred to. I’d like to add this to the tutorial ; Increasing the number of segments in your circles.
There are three ways to get more segments in a circle-polygon:
>
> – The “Before You Draw” method: Immediately after you first select the circle tool, before you start drawing with it, look at the number field in the lower right of the SketchUp window. This “Value Control Box” (VCB) will be titled “Segments” and will show “24”. Just type a new number of segments (don’t click in the box, just type after you click on the Circle tool) and press Enter. The number you enter will become the new default for the Circle tool.
>
> – The “s-units” method: After you draw your circle, the VCB will display the Radius. Type a number (again, don’t click in the box, just type) and follow it with “s” for Segements (e.g., type 6s for a six-sided “circle” or “48s” for 48 sides). The number you enter will become the new default for the Circle tool.
>
> – The “Entity Info” method: After you draw your circle but before you make any changes to it (e.g. drawing a line which crosses it and therefor adds intersections to the circle, or drawing the circle in a way in which it crosses other lines that will form intersections), right-click on the circle and select the Entity Info. If your right-click selects the entire circle, no changes have happened so you can proceed. In the Entity Info window is a field for the number of Segments. You can change the number here. In this case you must click in the Segments field to change the existing value to your new, desired value.
Source: https://groups.google.com/forum/#!topic/sketchuphowto/B7AYR-fBhKE
Can you do a “make a thing” with Autocad Fusion 360? This is similar to Sketchup in that you can use it for cheap or free, but it’s a real solid modeler.
I’m really liking Autodesk Fusion 360 too. I used to be able to import things but now it seems to always say that the file type is not supported, even if it’s one of the files types in the import dialog drop-down list. Oh well.
Other than the importing thing, Autodesk Fusion 360 is really nice to use. I was very happy when I found it. Sure beats the complexity of the big tools (and their price, of you are an upstanding citizen), the user-unfriendliness open source tools, or the limitations of most of the free to use tools. Thanks Autodesk!
It’s free now, but I think it’s going to become a pay-for-use tool when they get it to stop crashing randomly. Enjoy it’s free goodness it while it lasts.
Hey guys! I’m the community manager for Fusion 360. Thanks, mc, for chiming in. Fusion’s actually free for enthusiasts/makers (i.e. if you’re not making money from the work you’re doing in Fusion, you don’t have to pay). Definitely happy to help answer any other questions you guys have about it!
Tango, you can see some of the stuff people are making here:
http://fusion360.autodesk.com/gallery
I like the fact that you are building the same model in all of these tutorials.
That says a lot as many instruction sets show you how to do something with one thing, then use a totally different thing while showing you how to do something else. In most cases, I have found this to be totally confusing and hard to follow.
Again, thanks for the using the same thing as it allows one to more easily see the difference between each of the programs.
+1. definitely good to have the same part. Thanks!
Me and drfting drawing programs never did get along. I can draw a simple pipe antenna mast I have in mind so I can share the drawing with others to ask they see a problem with it that I may be missing. back to graph paper and dtraing, acanning it into jpg file I guess. Thanks for trying to teach me the modern way.
Sketchup is great for a lot of things, but not for designing parts for 3D printing.
If you like Sketchup, you will love DesignSpark Mechanical. It has a similar user interface to Sketchup, but about 10x as powerful (real fillets are one click, for example), and you won’t have to repair the STL file before it can be printed. It is crippleware, but if SketchUp satisfies you, DSM will blow you away.
If you want a professional package, Fusion360 or OnShape. OnShape’s main advantage is that it will work under any OS in a web browser, so it is the best CAD for use in Linux. There are a ton of tutorials on YouTube for both.
I’m in the process of switching from DSM to Fusion360.