A Light-Up Dress For A New Year’s Dance Party

wearableLedress

Don’t let the above picture’s lack of blinking colors fool you, the light-up dress [Sam] fashioned for his girlfriend is rather eye-catching; we’d just rather talk about it than edit the gifs he’s provided. [Sam’s] been a busy guy. His last project was a Raspberry Pi digital photo frame, which we featured just over a week ago, but wearable hacks allow him to combine his favored hobbies of sewing and electronics.

If you’re looking to get started with wearable electronics, then this project provides a great entry point. The bulk of the build is what you’d expect: some individually-addressable RGB LEDs, the ever-popular FLORA board from Adafruit, and a simple battery holder. [Sam] decided to only use around 40 of the LEDs, but the strips come 60 to a meter, so he simply tucked the extra away inside the dress and set his desired limits in the software, which will allow him to preserve the entire strip for future projects. If you’ve ever attempted a wearable hack, you’re probably familiar with how delicate the connections can be and how easily the slightest bend in the wiring can leave you stranded. Most opt for a conductive thread solution, but [Sam] tried something different and used 30 AWG wire, which was thin enough to be sewn into the fabric. As an added bonus, the 30 AWG wire is insulated, which permits him to run the wires close to (or perhaps over) each other while avoiding shorts. [Sam’s] guide is detailed and approachable, so head over to his project page if you think you’ve caught wearables fever, and check out his GitHub for the source code.

Miniscule Line-Follower

miniscule-line-follower

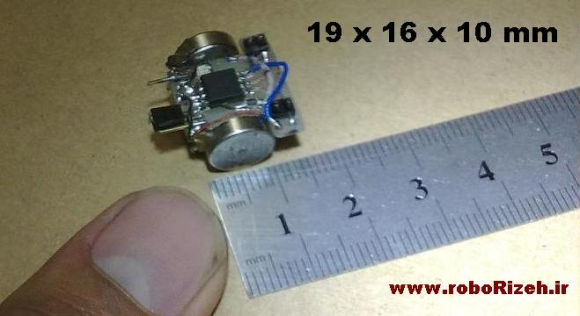
Building line following robots is fun and easy. Building a line-follower that is this tiny is a different story. The surprising thing for us is that despite how it looks, this robot whose name is Rizeh doesn’t use wheels to get around. [Naghi Sotoudeh] built the line-follower using two vibrating motors, with needles (not shown above) making three points of contact with the ground.

His website is a little sparse, but hit the downloads page to get a PDF file that serves as the build log. We also downloaded the 32 second demo video which is worth it. The magic-marker track that the bot is circumnavigating isn’t any bigger than the palm of your hand!

Onboard the diy PCB you’ll find two GP2S04 IR reflectance sensors which detect the black line on a white paper. The power-up sequence spends a few seconds calibrating these sensors. Speaking of power, [Naghi] went with a lithium polymer cell from a Bluetooth headset. At the heart of it all is an ATtiny45 which uses its hardware PWM capabilities to drive the two motors.

Of course line-followers rank up there with self-balancers as our favorite robot projects. But by far the ones we love the most are the speed-run maze solvers.

MBox: A Child’s MP3 Player

mobx

For young children, music is a wonderful and exciting thing — but do you really want them playing with your phone, or worse yet, an iPod? [Arons] decided to make the MBox, an Arduino powered MP3 player.

He was inspired by hörbert, a very similar wooden MP3 player for children. Apparently it’s a great product, but it also costs 239€. We don’t blame him for wanting to make his own.

The MBox follows the same exterior design as hörbert — though we must admit, he could have spiced it up a bit! It uses an Arduino Uno at its core with a Freaduino MP3 music shield, capable of playing all the typical formats like MP3, MIDI, WAV, and even Ogg Vorbis. To amplify the sound he’s using a Mono Audio Amp Breakout board from SparkFun which drives an 8Ω loudspeaker. A mini USB power brick provides the juice, and a 12-digit keypad provides the ability to select music — each number plays from a different directory on the SD card.

[Arons’] daughter loves it, and he probably only spent a fifth of what the real hörbert costs!

[Thanks for the tip Renzo!]

Lux: A 100% Open Source Camera

luxCamera

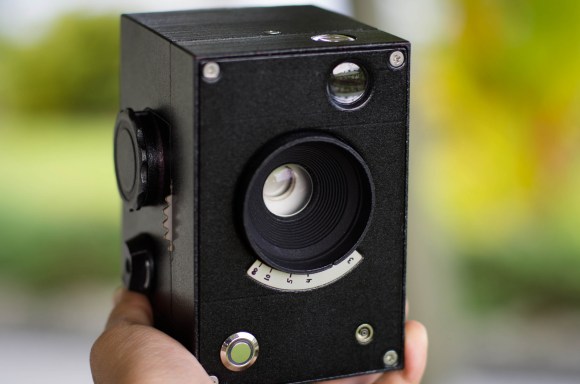
[Kevin Kadooka] recently finished his open source camera. The Lux Camera is 100% open source. Lux uses no parts from other cameras – not even a lens! To date we’ve only seen this with achieved with pinhole cameras. [Kevin] isn’t new to camera hacking. He was the man behind the Duo camera, which had a successful Kickstarter campaign in February of 2013. Duo is a DIY camera, but it still required lenses from Mamiya-Sekor, and a shutter from Seiko. Lux is a different animal. It has a manual focus 65mm f/5.6 Single Element lens. The shutter is [Kevin’s] own solenoid based leaf shutter design. Just as in the original shutter, an Arduino controls shutter operation and timing.

The main camera body and many of its parts are 3D printed. [Kevin] got some very nice quality parts from Shapeways 3D printing service. We have to say that some of the assemblies look a bit complex for desktop printers. However since everything is open source, anyone willing to put the time in could adapt them for the average RepRap or Ultimaker. [Kevin] has posted detailed build photos, as well as some photos taken with the Lux on his flickr stream. The pictures have  a decidedly holga-esque look to them, due in part to the single element lens. Even with this limitation, we love the idea of having a brownie style camera built completely from scratch.

3D Printering: Making A Thing With SketchUp

printering

Imagine for a second it’s the mid-1980s and you’re looking in to desktop publishing setups. Those new LaserJets and LaserWriters are pretty cool, but imagine the desktop publishing world if you couldn’t create your own documents. Yes, it seems absurd to have a printing press that won’t create unique documents.

Now flash forward 30 years to the world of desktop manufacturing and rapid prototyping. There are dozens of repositories for 3D printable objects, but making something of your own design is apparently a dark art and arcane knowledge to everyone buying 3D printers for plastic octopodes and bottle openers.

This week, by popular demand, we’re going to be making a ‘thing’ in SketchUp Make. It’s free, easy, and surprisingly versatile despite its limited tool set. Common sense and Google algorithms dictate I link to previous tutorials in this series below:

And now on with the show. You’re gonna want to click the ‘read more’ link.

Continue reading “3D Printering: Making A Thing With SketchUp”

Android+Arduino – Face Following RC Car

androidRCcar_01_14

To some of us, hacking an RC Car to simply follow a black line or avoid obstacles is too easy, and we’re sure [Shazin] would agree with that, since he created an RC Car that follows your face!

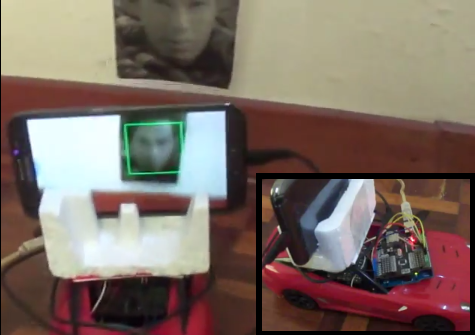
The first step to this project was to take control of the RC Car, but instead of hijacking the transmitter, [Shazin] decided to control the car directly. This isn’t any high-end RC Car though, so forget about PWM control. Instead, a single IC (RX-2) was found to handle both the RF Receiver and H-Bridges. After a bit of probing, the 4 control lines (forward/back and left/right) were identified and connected to an Arduino.

[Shazin] paired the Arduino with a USB Host Shield and connected it up with his Android phone through the ADB (Android Debug Bridge). He then made some modifications to the OpenCV Android Face Detection app to send commands to the Arduino based on ‘where’ the Face is detected; if the face is in the right half of the screen, turn right, if not, turn left and go forward.

This is a really interesting project with a lot of potential; we’re just hoping [Shazin] doesn’t have any evil plans for this device like strapping it to a Tank Drone that locks on to targets!

Continue reading “Android+Arduino – Face Following RC Car”

[Ben Krasnow] Did It All For The (Perfect) Cookie

[Ben Krasnow] is on a mission. He’s looking for the perfect chocolate chip cookie. To aid him in this noble endeavor, he’s created the cookie perfection machine. From cleaning with plasma, to a DIY CT scanner, to ruby lasers, to LED contact lenses, [Ben] has to be one of the most prolific and versatile hackers out there today. What better way to relax after a hard day of hacking than to enjoy a glass of milk and a perfect chocolate chip cookie?

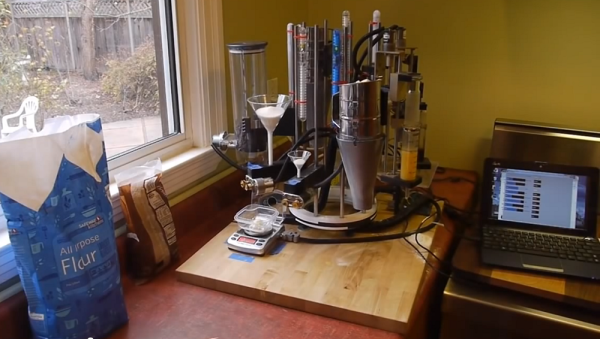
This is actually an update to the machine we first saw back in 2012. [Ben] has loaded his machine up with ingredients, and has everything under computer control. The machine will now dispense the exact amount of ingredients specified by the computer, measured by a scale. Everything happens one cookie at a time. The only downside is that the machine doesn’t have a mixer yet. [Ben] has to mix a single cookie’s worth of dough for every data point. His experiments have returned some surprising results. Too little flour actually results in a crisper cookie, as the wetter dough spreads out to a thinner layer. [Ben] also found that adding extra brown sugar also doesn’t result in a more chewy cookie. Even though he’s still in the early experimentation phases, [Ben] mentions that since it’s hard to make a bad chocolate cookie, even his failures taste pretty good.

Continue reading “[Ben Krasnow] Did It All For The (Perfect) Cookie”