The team over at [2PrintBeta] found they needed some unique plastic profiles for their 3D printer the Printupy. Unable to find a supplier with what they needed, they decided to try building their own inexpensive bending station, using stuff they already had.
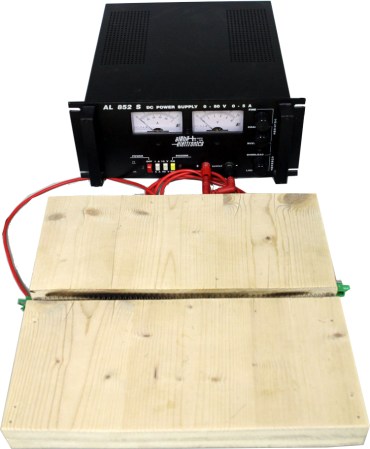
Not too concerned with the longevity of the system (or perhaps the flammability?) they’ve taken a wooden board and routed a straight groove through the center of it. Using a power supply and some Nichrome wire — it’s done.
They admit it’s really not the most durable and that it requires constant supervision in case of flames — but it cost next to nothing to make, and actually works quite well! What we like about the following video is they also show us the design process, the laser cutting, and bending to create the final product.
A simple way to upgrade this unit is to add a metal U-channel in the groove to reduce the fire hazard — like this acrylic bender we featured last year!


They had to use a laser cutter for that? You can make a plastic cutting hook out of a piece of scrap metal with snips and a file.
Of course they had to use a laser cutter! The question is ‘why’ they had to.
Was it because they couldn’t do it another way? Probably not.
Maybe they thought “I’m lazy and this uses a LASER!!”? Probably, yes..
Well, they also engraved their logo and such.
Ultimately, that’s kinda the point – use the laser cutter for the accurate flat cuts needed, use the bender (or something like it) to add the more complex shaping.
I could even see using the engraving ability of the cutter (vector engraving, likely) – or even a reduced power “cut” (so it doesn’t go all the way through the material) to add a “score line” to help with the bending process.
I thought I saw in the video score lines on the card holder along with their logo. Yup, from the article:
“For exact bending at the needed position, we additionally engraved a small slot, which has the depth of about half the thickness of the material itself. This greatly helps to get reproducable results.”
Oh…that’s what they meant! I had read the article (that part a few times, too!), and I thought they had meant they had made some kind of “bender slot” in the wood board (like a bending jig area). The sentence makes sense, now – had they merely included the words “with the laser cutter”, it would have been clear from the beginning. Oh well.
You can make your own foldable toilet seat on a makerbot or something.
Even a few layers of Kapton tape with some tin-foil in between would help with the fire hazard. Or even just suspending the nichrome wire off the wood a bit with eye hooks since heat rises and they are manually bending anyway.
Cause everyone has laser cutters just lying around at home.
Well, yes. I’ve got two (a spare is always handy).
Ok just two thoughts, first they cut dead straight lines halfway through a piece of plastic with a laser cutter? Did they buy the laser cutter by selling every xacto knife and ruler they had? Secondly, about fire, well I assume they know (or could look up) the ignition temperatures of wood and acrylic so they could use a thermometer to cut the power when the temperature gets to close to the lowest ignition point (I assume the acrylic) until it drops a few degrees the more power.
I did one just the other day. The spring is important, the coil much less so. I run straight nichrome and use slotted screws as centring guides. Foil duct tape works fine for the edges and bottom of the heat area. I’ve hinged my front plate and just use a speed square for 90 and 45 bends. Scoring keeps your lines straight but if you are working with a lot of 1/2 inch you really want to taper the inside of the bend. I go about 42 degrees which gives a good inside finish.
Whenever I start doing stuff like this I start with the TAP Plastics videos.
Find an old heater (the radiant type) and pull the quartz glass tube thingy out of it.
I got mine from an old toaster oven. 2 elements one on top and one on bottom and some scrap metal to hold the 2 elements about 1 inch apart. looks scary and will burn or electrocute you but works, and cost nothing.
P.S. a bender from Tap plastics cost $80, but much safer if your into that kind of thing.
Use a piece of metal shelf rail *IN* the trough with the wire to protect the wood.
http://www.wickes.co.uk/content/ebiz/wickes/invt/530509/Twin-Slot-Upright_large.jpg
That or whatever.
Thanks for all the comments.
We just improved the acrylic bender by inserting some metal u-profile into the slot and covered it in Kaptontape. So fire hazard is now much less.
For all the comments about the lasercutter: We used it, because we have it. Of course there are other ways to cut and score acrylics..
the 2PrintBeta Team
I suppose next you’ll tell use you purchased the lasercutter so you could use it. This logic feels so circular.
This reminds me of a post on instructables some time ago.
No offense, but you guys worked *way too hard* to fabricate this. And your design isn’t even that flexible. Don’t get me wrong; I bet it makes beautiful bends — but I think you could have accomplished that on way less hardware and saved that rack supply for other tasks.
And the fact that HAD is worried about the ‘fire hazard’ kinda irks me. You’re going to see discoloration for hours before anything erupts into flames. As long as you’re actively using it and not just jerking off while it stays hot, this will never constitute a fire hazard.
I have almost two decades’ experience building hot tools for plastics. I have made every possible mistake and had many possible successes. It’s a good start.
Try modifying it into a hand machine, and use something of a protractor to measure angles on one side. And if possible, craft an adapter that will allow you to increase the overall length — I had to do some crazy stuff to fold a sheet of acrylic to cover my shed (8′ x 10′), which was leaking and I was tired of constantly sealing the roof only to find out I couldn’t seal the right spot.
The glued-down sheet of acrylic, though, fits perfectly and is perfect at holding out the rain as it’s exactly one piece.
You should also make an old soldering iron into a hot hand clamp with flat and right-angle tangs, and complement that with a hot comb for decorative work :D
Those are the first two additional hot tools I’d recommend. You can buy hot staplers so cheap now that you may as well not bother building your own. But I have used my hot clamp a zillion times for everything — the right-angle allows small bends and scores, while the flat tang allows good shifts, twists, or stretches of the material.
what is the fastest way to bend plexiglass is it with light bulbs as your heating element