THP Hacker Bio: John Costik

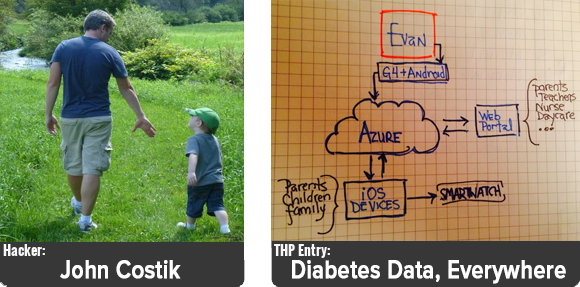
A surprising amount of entries for The Hackaday Prize are medical devices, and the regulatory problems associated with that domain. [John Costik]’s Diabetes Data, Everywhere is one of the few projects that is perfect for a world where the words ‘hack’ and ‘FDA’ simply cannot be found in the same sentence.

[John]’s son was diagnosed with Type 1 diabetes at a very young age, and very early [John], his family, and the school nurse have had to deal with the nearly innumerable tasks that type 1 diabetes management entails. A Dexcom continuous glucose monitor is a big help, providing a wealth of glucose logging in a small, wearable device.

This monitor, however, is relatively locked down; the stock device is unable to push data to the Internet. [John] reverse engineered the protocol for this glucose monitor, enabling [John] to monitor his son’s blood glucose levels from anywhere on the planet.

There’s a huge community of people waiting for the technological advancements of the last thirty years, like the Internet and portable, networked devices, to make it into medical devices. [John]’s project has already gotten a bit of local news coverage, and is a perfect example of expanding the capabilities of existing devices to make his and his family’s life more convenient.

Bio/interview below.

Continue reading “THP Hacker Bio: John Costik”

PiMagic RaspPi to Arduino Shield Interface

Adding I/O To The Rasberry Pi Models A & B

The Raspberry Pi has been the basis for many cool projects. Even so, Models A and B have been criticized for having only a handful of GPIO pins available. Sure, the new Model B+ has a 40-pin GPIO header but what if you want to use your old RaspPi with a bunch of in and outputs? [Steve] is one of those guys and has done something about it by creating a pretty neat solution he calls the PiMagic. It’s a Pi Plate that has an on board ATMEGA328 running an Arduino bootloader. The RaspPi and the Arduino communicate via UART as [Steve] felt it was a bit simpler than going the SPI or I2C route.

The RaspPi GPIO’s run on 3.3v and the ATMEGA328’s like 5v. To solve this, the PiMagic has a Level Shifter that keeps the I/O of the two boards happy. Older Pi’s had a problem burning out PCB traces when supplying too much current on the 5v supply line. [Steve] threw in a fuse that will burn out before the Pi does to ensure that no Pi’s were harmed in the making of this project.

Now that a bunch of I/O are available, how do you physically access them? Well, the PiMagic has female headers in the typical Arduino layout. This way any Arduino Shield will plug right in. [Steve] made all his source files available for those who want to make one themselves. Find an assembly video after the break.

Continue reading “Adding I/O To The Rasberry Pi Models A & B”