Hackerspace Monitor

HackerSpace Monitor Monitors Hackerspace Environment

What’s going on at the Hackerspace? If you can’t answer that, maybe your ‘space needs a HackerSpace Monitor. [Tayken] over at the Tokyo Hackerspace has come up with a way to remotely monitor all the stuff you’d want to know about the ‘space.

His project is based on a Raspberry Pi with a webcam connected to the Pi’s USB port by way of a hub. The webcam is set up to stream 2 frames per second, which is plenty to be able to judge the activity at the ‘space. A WiFi dongle is also plugged into the USB hub in order to gain internet access, send out the video and allow the ability to SSH into the Pi.

What if you’re on the fence about heading over to work on your favorite project but the current weather leaves you wondering what the temperature is going to be like at the hackerspace? Well, this project has that covered too. An off the shelf temperature and humidity sensor plugs directly into the Pi’s GPIO pins. [Tayken] used the Python-based package, RPi.GPIO, to manage the temperature and humidity sensor readings as well as a toggle switch that monitors if the main door is open or closed.

To get everything all the above information to be displayed on a webpage, [Tayken] had to do some fancy programming. Luckily for us, he has made all his code available for download. Not only is this a great convenience for members, but it can also show non-members when it is or isn’t a good time to show up to check the ‘space out.

DIY Powder Coating Oven Gets Things Cooking

[Bob] needed an oven for powder coating metal parts. Commercial ovens can cost thousands of dollars, which [Bob] didn’t have. He did have an rusty old file cabinet though.  And thus, a plan was born. The file cabinet’s steel shell would make a perfect oven body. He just had to remove all the drawers, sliders, and anything combustible. A few minutes with an angle grinder made quick work of the sheet metal. The drawer fronts we re-attached with hinges, allowing the newly fashioned door to swing out-of-the-way while parts are loaded into the oven.

The oven’s heating elements are two converted electric space heaters. The heating elements can be individually switched off to vary power to the oven. When all the elements are running, the oven pulls around 2000 watts, though full power is only used for pre-heating.

[Bob] used a lot of pop rivets in while building this oven, and plenty of them went into attaching sheet metal guards to protect the outside of the heating units. To complete the electrical equipment, a small fan was placed on top of the oven to circulate the air inside.

The most important part of the build was insulation. The entire inside of the oven was coated with aluminum foil and sealed with heat proof aluminum tape. On top of that went two layers of fiberglass matting. Metal strips kept the fiberglass in place, and the stays were held down with rivets. One last layer of aluminum foil was laid down on top of the fiberglass. Curing powder coating produces some nasty gasses, so [Bob] sealed the gaps of the oven with rolled fiberglass matting covered by aluminum foil and tape.

[Bob] was a bit worried about the outside of the oven getting hot enough to start a fire. There were no such problems though. The fiberglass matting makes for an extremely good insulator. So good that the oven goes from room temperature to 400 °F in just 5 minutes. After an hour of operation, the oven skin is just warm to the touch.

If you need to find [Bob], he’ll be out in his workshop – cooking up some fresh powder coated parts.


Mood Lighting With LEDs And An Arduino

Regular candles can be awfully boring at times. They can only produce one color and the flicker is so… predictable. They can’t even be controlled by an infrared remote control, not to mention the obvious fire hazard. Now, however, [Jose] has come up with an LED candle that solves all of these problems. (Original link to the project in Spanish.)

The heart of the project is an Arduino Pro Mini, which is especially suited for this project because of its size. [Jose] put the small form-factor microcontroller in the base of a homemade wax enclosure and wired it to a Neopixel WS2812b LED strip. The strip can produce any color, and has some programmed patterns including flicker, fade, rainbow, and fire.

The artificial candle is controlled with an infrared remote control, and all of the code for the project is available on the project site if you want to build your own. [Jose] has been featured here before for his innovative Arduino-driven RGB lighting projects, and this is another great project which builds on that theme!


Retrotechtacular: There’s More Than One Way To Escape A Submarine

And this 1953 United States Navy training film describes two ways to do so: collective escape via rescue chamber, and individual escape using SEAs.

The film first follows a fellow named [Baxter] and his men in the aft torpedo room.  His sub has failed to surface as scheduled. There are no officers present at the time of distress, so [Baxter, Torpedoman First] is in charge. His first directive is that [Johnson] extinguish his Chesterfield. There’ll be time enough for smoking on the rescue ship, [Johnson].

[Baxter] releases a marker buoy because it is daytime and the weather is fair. Had other conditions prevailed, [Baxter] would send up flares and bang on the hull to provide a sonic beacon for rescuers. Next, he checks the forward compartments. If they are clear, he leaves the hatches open to give his men more air. He checks the air purity and engages [Brooklyn] to pull down some COabsorbent.

[Baxter] and his men will be okay for a while. They have plenty of drinking water, food, juice, supplemental oxygen, and COabsorbent. Their best move is to take it easy and wait for the rescue chamber. That way, they’ll avoid drowning, exposure, and COpoisoning.

Elsewhere in the forward torpedo chamber, there’s a chlorine leak and it can’t be stopped. These nameless sailors have to work quickly to escape the noxious gas. First, they pass around the SEAs and turn them into respirators. Soda lime will filter out the chlorine gas from their lungs and eyes. They too will release a marker buoy, but the first order of business is to move to the escape trunk.

Communicating through gestures, the lead man assigns three men to break out the life raft. The men move to the trunk with the buoy, raft, ascending line, and a divers’ knife. They also take a battle lantern, hand tools, and spare SEAs, but leave their shoes behind. After equalizing the pressure in the trunk, they can get going on their escape. They open the hatch, float the buoy, and tie it off. Now the raft can be floated up the buoy line. Since they are 100 feet down, they send a man every ten seconds up the buoy line and he is to move approximately one foot per second. First man to surface inflates the raft, and Bob’s your uncle. Now, they just have to prevent sunburn and tell stories until the rescue ship finds them.

Continue reading “Retrotechtacular: There’s More Than One Way To Escape A Submarine”

A T-Shirt At Amalthea

Personnel Transfer Vehicle HM-6YK was thirty two hours out of Ganymede station en route to Amalthea when the alarm went off. Captain Peter Cole was awake in a bunk, staring at his tablet, waiting for the alarm when Bill Friars, the rookie pilot came down. ‘Hey, cap! We got a problem here.”Wha?’ Pete feigned he was just awoken. ‘What’s up?’

‘Our terminal guidance radar is out, and we’re less than three hours from approach. I reset the system, and it’s looking like a hardware problem.’

‘That’s impossible. We were just checked out on Callisto a month ago.’ Pete headed up to the flight deck and minutes later the subordinate’s assessment proved correct.

‘Coulda been a meteor.’ Bill sheepishly suggested, displaying the requisite amount of self-doubt required of his rank.

‘If it was that we’d have more problems on our hand than a broken radar. We’re gonna need this fixed quick. Suit up; I’ll go dig the spare out of the locker.’

6YK was a small ship, barely three hundred tons. Her nuclear drives propelled her around the Jovian system, usually transporting cargo between the far-flung outposts around the inner moons. This trip, she was carrying twenty three researchers to the Lyctos base, retrieving 5 tons of cargo, six pax, then heading off again to Ganymede station. The entire trip would take 52 hours. This was Bill’s first run.

‘Just get out there and replace this module.’ Pete had eight thousand hours logged in the system, and three thousand on this run alone. Bill had done his EVA training at Deimos station, but for both men the sight of the swirling ivory, reds, and subtle blues of the crescent Jupiter invoked the fear of an ancient and angry god. For Bill, knowing he was only protected from the radiation by his hard suit and the improbably thin beryllium glass visor, this god became even more frightening.

The stubby, box-like ship glistened with octathiocane picked up around Io’s orbit. The radio crackled ‘Lotta dust out here, Pete.’ Bill slowly made his way to the radar assembly, latching carabineers from handgrip to handgrip. ‘Looks like it’s just gone’ Bill looked at the familiar antenna mount. ‘Metal fatigue or something.’

‘I don’t care what happened.’ The insertion burn was just two hours away, and their target was approaching at seventy kilometers per second. ‘Just get it fixed.’

Bill removed the remaining sliver of metal from the base and tossed it aside. The new feed horn fit comfortably in its socket. If nothing else, these ships were easily repairable. ‘We have guidance.’ The radio cackled. ‘Why don’t you get back in here?’ Bill reversed his steps around the ship.

As the airlock repressurized, the engines started their long burn for capture. ‘Good work, kid.’ This was the first indication of approval the captain had given since leaving the station. Helmet and gloves off, Bill struggled to unlatch the polycarb hard suit.

Bill reached into the locker and pulled out the t shirt he’d been wearing on the bridge just an hour ago. The gold logo was nearly the same color as the octathiocane dusty dirtying the airlock.

Intel Releases Edison, A Computer Slightly Larger Than An SD Card

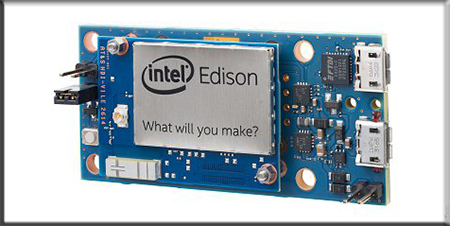
Announced at the beginning of this year, Intel’s Edison is the chipmakers latest foray into the world of low power, high performance computing. Originally envisioned to be an x86 computer stuffed into an SD card form factor, this tiny platform for wearables, consumer electronic designers, and the Internet of Things has apparently been redesigned a few times over the last few months. Now, Intel has finally unleashed it to the world. It’s still tiny, it’s still based on the x86 architecture, and it’s turning out to be a very interesting platform.

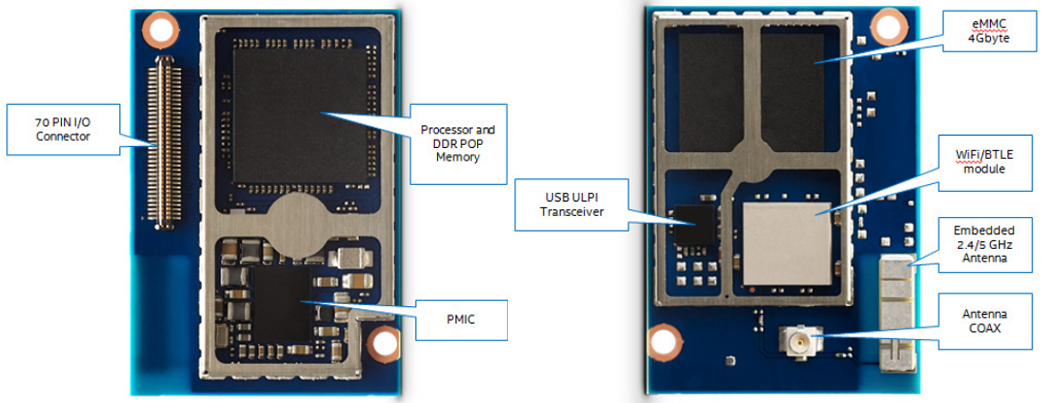
The key feature of the Edison is, of course, the Intel CPU. It’s a 22nm SoC with dual cores running at 500 MHz. Unlike so many other IoT and micro-sized devices out there, the chip in this device, an Atom Z34XX, has an x86 architecture. Also on board is 4GB of eMMC Flash and 1 GB of DDR3.  Also included in this tiny module is an Intel Quark microcontroller – the same as found in the Intel Galileo – running at 100 MHz. The best part? Edison will retail for about $50. That’s a dual core x86 platform in a tiny footprint for just a few bucks more than a Raspberry Pi.

When the Intel Edison was first announced, speculation ran rampant that is would take on the form factor of an SD card. This is not the case. Instead, the Edison has a footprint of 35.5mm x 25.0 mm; just barely larger than an SD card. Dumping this form factor idea is a great idea – instead of being limited to the nine pins present on SD cards and platforms such as the Electric Imp, Intel is using a 70-pin connector to break out a bunch of pins, including an SD card interface, two UARTs, two I²C busses, SPI with two chip selects, I²S, twelve GPIOs with four capable of PWM, and a USB 2.0 OTG controller. There are also a pair of radio modules on this tiny board, making it capable of 802.11 a/b/g/n and Bluetooth 4.0.

Edison

The Edison will support Yocto Linux 1.6 out of the box, but because this is an x86 architecture, there is an entire universe of Linux distributions that will also run on this tiny board. It might be theoretically possible to run a version of Windows natively on this module, but this raises the question of why anyone would want to.

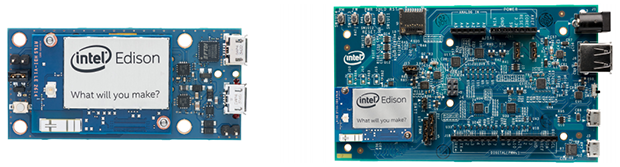
The first round of Edison modules will be used with either a small breakout board that provides basic functionality, solder points, a battery charger power input, and two USB ports (one OTG port), or a larger board Edison board for Arduino that includes the familiar Arduino pin header arrangement and breakouts for everything. The folks at Intel are a generous bunch, and in an effort to put these modules in the next generation of Things for Internet, have included Mouser and Digikey part numbers for the 70-pin header (about $0.70 for quantity one). If you want to create your own breakout board or include Edison in a product design, Edison makes that easy.

edisonbreakout

There is no word of where or when the Edison will be available. Someone from Intel will be presenting at Maker Faire NYC in less than two weeks, though, and we already have our media credentials. We’ll be sure to get a hands on then. I did grab a quick peek at the Edison while I was in Vegas for Defcon, but I have very little to write about that experience except for the fact that it existed in August.

Update: You can grab an Edison dev kit at Make ($107, with the Arduino breakout) and Sparkfun (link down as of this update never mind, Sparkfun has a ton of boards made for the Edison. It’s pretty cool)

Welcome To The Old School: Restoring Antique Radios

Before the second world war Radio was a revolution in mass-communication much like the internet today. Fortunes were made and lost, empires built, epic patent battles ensued, all of which resulted in the world being more connected than ever before, which makes for a really great story (and a great Ken Burns documentary).

Last month we showed you how to modify a vintage radio to play your own audio source through it while re-using the existing electronics and maintaining its functionality. In this post we will show you how to restore any vacuum tube radio. You will learn basic repair/restoration procedures from a different era when it was actually worth repairing consumer electronics. Plug into history and get your hands on the most influential technology of the first-half of the 20th century!

Continue reading “Welcome To The Old School: Restoring Antique Radios”