Most people have heard of sand blasting, a process used for cleaning parts by spraying a high pressure air and sand mixture. At this speed, the sand becomes abrasive and will remove paint, rust and general gunk leaving a clean surface behind. There is one downside to the process, breathing the silica dust created by the sand blasting process can lead to a lung disease called silicosis, which is not curable and can even lead to death.
[Roger] wanted to clean his motorcycle parts and decided to build a wet media blasting cabinet. Unlike sand blasting, wet media blasting mixes the cleaning media with water instead of air. The media and water slurry is sprayed at the part needing cleaning and has the same effect as sand blasting without creating any dust.
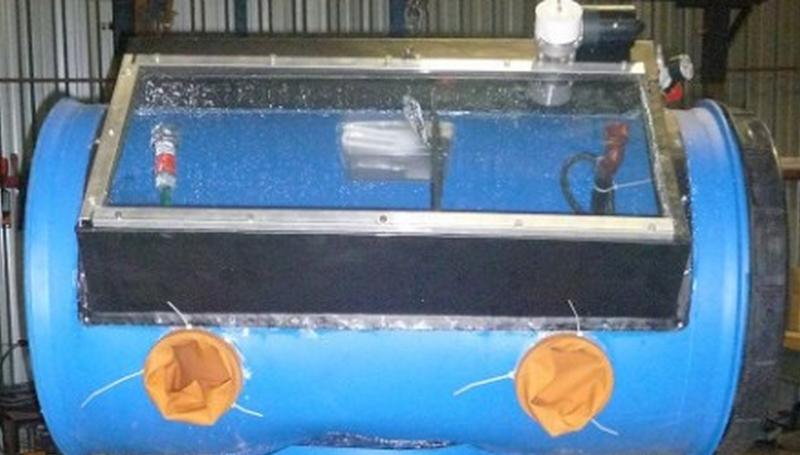
 As you can clearly see from the image, the main blasting chamber is made from a 55 gallon plastic drum. It even has a removable lid on one side to make loading in parts easy. A large hole was cut into the drum in order to install a window. Look close – there is even a wind shield wiper from a car installed on the inside of the window to aid in seeing the part being cleaned!
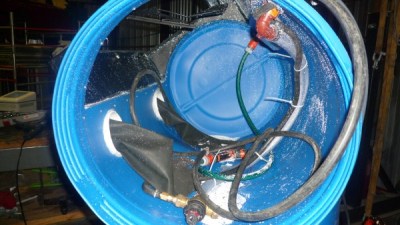
Underneath the blasting chamber is another plastic drum cut in half. This serves as a slurry tank. A regular pool pump is used to both agitate the slurry mixture and power the spray nozzle. Overall, [Roger] is happy with his blast cabinet made from found parts and says it has become his all-time favorite cleaning device. He says that the part surface finish obtained was well worth the effort building the blast cabinet.


Just wondering here but couldn’t you avoid silicosis by wearing, oh I don’t know, a mask? Sure it’s a wild idea but it could work. Good hack though and I’m sure it cost a hell of a lot less than a pro rig.
Or by, you know, not blasting with silica containing media?
That’s how my company went: I blast using dry Ice pellets instead of sand. Just have to have the vent turned on to evacuate the CO2. The pellets explode via sublimation and impact, blowing all the junk and gunk off of parts without disturbing the finish at all.
Rules
1.) don’t use “sand” (SiO2) to blast parts – the word sand blasting is a bit missleading! –
In normal sand blasting operation of metal parts it’s forbidden to use pure sand! – yes it’s cheap but you also pay for your health.
– you will have dust contamination that you will inhale when taking off the mask and cleaning up
– Example: wives of miners have also developed dust lungs (by carbon instead of SiO2) when they washed the clothes of their husbands
– there are some applications to blast with SiO2 but only allowed with additional gear and safety, not advised for the common tinkerer
2.) Use real certified sand blasting compound
– yes this includes SiO2 in a different form along with “corrund”
– use a blasting chamber when applicable
– wear a dust mask
I don’t see dust so it’s ok:
What you don’t see might be still there! – the problem is that the SiO2 is broken into sharp and small pieces so small that these can enter the smallest parts of the lung where the normal lung cleaning (coughing) cannot expell them.
The body will enclose the small parts with tissue and more tissue .. till no lung dissue is left – it’s very similar to COP.
This is very similar to dust lungs of historic or not protected coal miners but most similar to asbest.
A good vacuum and filter setup basically eliminates the dust issue in a blasting cabinet. They are not meant to be used without one.
you could use it as a parts cleaner too without the sand I figure
Cool…Media blasting is great but, whenever I can get away with it, I prefer a vibratory media tumbler…drop the parts in and go do something else…..
Wet blasting, Dry blasting and vibratory tumbling produce different finishes.
Dry blasting is in my experience the roughest and messiest. Yes a vacuum is needed but the stuff is everywhere anyway.
Wet blasting produces a nice matte finish, we use fine glass ball blasting media, the bonus it the part just needs a rinse and blow and its clean.
Tumbling with wet plastic pellets produces almost polish finish but it takes considerably longer.
This is a mighty fine project.
Great project.
Theres two major downsides to media blasting motorcycle and other engine parts. One is the mess, but different blast media and filtration avoids this but a slurry is a good helper too.
The second major downside is removal of the media from where it embeds into the part after blasting, and if you miss tiny particles out of sight, they get dislodged and get into the oil, then proceed to destroy all the bearing surfaces in the engine during running.
Seriously I have personally seen rebuilt restored engines 20 miles old after a meticulous rebuild with post blast cleaning to the same standards with lunched cams and crank bearing surfaces. We had a company who operates a commercial high pressure wet blaster pitch for work from us, and they tried to convince us the process was safe but we sent a sample off to be prepped and it was the same result. Media embedded into the walls of the part where not all of it could be extracted reliably when we checked it under magnification. If anyone has any independant studies that are contrary to this experience, I would gladly change my viewpoint as the results sure do look pretty for a lot less work.
All the engineers I use will only hot tank and jetwash parts for the reasons you describe, I die a little inside when i see engine parts even near a blasting cabinet lol
Have you considered sodablasting? Some engine builders I know recommend it as the media is water soluble.
I’ve soda blasted a handful of carburetors with good success, but it’s not a very abrasive medium. Even on zinc it doesn’t cut into the surface and some harder residue is left behind. The biggest challenge is just getting the soda out of tight spots such as the idle circuit and throttle shafts.
I’ve used a cheap harbor freight soda blaster for rust and paint removal. Works great, but does make a mess. On the upside, it’s not too hard to sweep up. I just made sure to do it outside.
I had a turbo I refused to rebuild for a friend because he sand blasted the center housing. I at least had a spare housing, but now have a nice dull gray paper weight!
Isn’t anybody worried that this will promote theft of 55 gallon barrels in Texas?
No. No one cares.
Texas legislature is on it. These could be used as a bong, clearly must be outlawed as drug paraphernalia.
Without reading the whole article, it looks as though the slurry in a swimming pool pump would wear it out in short order. Wouldn’t a better method be something more like a regular media blasting setup with a air/siphon hose?
Also wouldn’t the water start to allow rust to happen even quicker?
Not after immediate post treatment with a rust inhibitor or the like. And I do mean immediate. I removed a buch of old wax from a joiner and delayed applying the rust inhibitor for about four hours. My cat had walked across the surface and left behind paw shaped rust prints. I had to redo the entire process to remove the rust then apply the inhibitor as soon as I was done.
Silicosis is why sand is never used for regular ‘sand’-blasting these days… The most common media is aluminium oxide. Heck, I learned that from an episode of Modern Marvels… I’d like to think that in doing research for a project, similar rather pertinent information would turn up… :S
Ta! A good vacuum and filter setup basically eliminates the dust issue in a blasting cabinet. They are not meant to be used without one.
I restored an old Villiers engine a few years back, My “Wet blasting” was nothing more than a tall bucket, a VERY thick rubber glove, a pressure washer (cheap small one) and some very fine sand (the stuff you use for mono block paving I think).
a few inches of sand in the bottom, hold the part in there ( I advise THICK rubber gloves or preferably not holding it yourself) the shortest lance possible and, away you go! the spray of the pressure washer agitates up the sand while also forcing said sand and water mixture at the part.
Paint, Carbon, Oxidization it all came off lovely, I was really please with the finish too!
Facial PPE is recommended as you will get splash back.
I had to improvise as my compressor at the time was just about good enough to inflate car tyres.
You can buy wet blasting attachments for any pressure washer that use the siphon technique and any ordinary pressure washer then becomes a wet media blaster. But I do admire your improvised method. I am going to build a wet/dry blasting cabinet out of an IBC plastic tote. I’ll make it so it can work ether wet or dry.
What are you using for the media? I am building a DIY Vapor Blaster myself but I am having a hard time figuring out what is the best media to use. Currently I am using Glass Bead #13 but it doesnt really give me the finish I am looking for. Any help on what you are using for a mixture would save me a ton of money because right now I am buying 50lbs bags and doing trial and error. Love your setup by the way so creative,
Cheers
Use 170-325 glass beads
Here is how it comes out:
https://youtu.be/mUfgjK5q_Mc
Matt
I have converted my Harbor Freight blast cabinet into a vapor blaster for about $1300. Here is the video:
https://youtu.be/mUfgjK5q_Mc
Matt