An Introduction To Individually Addressable LED Matrices

The most fascinating project you can build is something with a bunch of blinky hypnotic LEDs, and the easiest way to build this is with a bunch of individually addressable RGB LEDs. [Ole] has a great introduction to driving RGB LED matrices using only five data pins on a microcontroller.

The one thing that is most often forgotten in a project involving gigantic matrices of RGB LEDs is how to mount them. The enclosure for these LEDs should probably be light and non-conductive. If you’re really clever, each individual LED should be in a light-proof box with a translucent cover on it. [Ole] isn’t doing that here; this matrix is just a bit of wood with some WS2812s glued down to it.

To drive the LEDs, [Ole] is using an Arduino. Even though the WS2812s are individually addressable and only one data pin is needed, [Ole] is using five individual data lines for this matrix. It works okay, and the entire setup can be changed at some point in the future. It’s still a great introduction to individually addressable LED matrices.

If you’d like to see what can be done with a whole bunch of individually addressable LEDs, here’s the FLED that will probably be at our LA meetup in two weeks. There are some crazy engineering challenges and several pounds of solder in the FLED. For the writeup on that, here you go.

diy wet media blast cabinet

DIY Wet Media Blast Cabinet

Most people have heard of sand blasting, a process used for cleaning parts by spraying a high pressure air and sand mixture. At this speed, the sand becomes abrasive and will remove paint, rust and general gunk leaving a clean surface behind. There is one downside to the process, breathing the silica dust created by the sand blasting process can lead to a lung disease called silicosis, which is not curable and can even lead to death.

[Roger] wanted to clean his motorcycle parts and decided to build a wet media blasting cabinet. Unlike sand blasting, wet media blasting mixes the cleaning media with water instead of air. The media and water slurry is sprayed at the part needing cleaning and has the same effect as sand blasting without creating any dust.

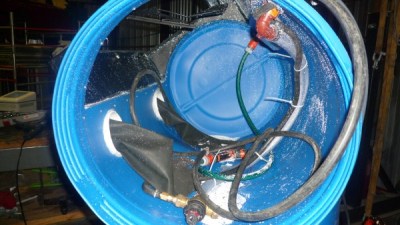
diy wet media blast cabinetAs you can clearly see from the image, the main blasting chamber is made from a 55 gallon plastic drum. It even has a removable lid on one side to make loading in parts easy. A large hole was cut into the drum in order to install a window. Look close – there is even a wind shield wiper from a car installed on the inside of the window to aid in seeing the part being cleaned!


Underneath the blasting chamber is another plastic drum cut in half. This serves as a slurry tank. A regular pool pump is used to both agitate the slurry mixture and power the spray nozzle. Overall, [Roger] is happy with his blast cabinet made from found parts and says it has become his all-time favorite cleaning device. He says that the part surface finish obtained was well worth the effort building the blast cabinet.

Hackaday Links Column Banner

Hackaday Links: April 26, 2015

In case you haven’t heard, we’re giving away a trip to space. We have $50,000 to promote giving away a trip to space too, and this week we’re giving away some OSH Park gift cards. If you have a project that’s held together with hot glue on a 40-year-old piece of perf board, add a project log describing how you need some free PCBs.

A few months ago, some guy in Texas found the original molds for the Commodore 64C, the Plus/4 and the 128. That discovery turned into one of the best examples of what Kickstarter can do. Now, new keycaps are being manufactured with an Indiegogo campaign. If you’re waiting on your C64c case to be pressed out of a mold, this is not the time to think about the sunk cost fallacy. They’re not Cherry MX compatible, but they will work with just about every version of the C64. Not bad for under €20.

The UK has a fabulously rich history of ancient melee weapons, ranging from the flail to the mace and a bunch of odd bladed weapons used by the Scots. This tradition was passed down to the UK mains plug, the single most painful plug to step on. Apple just released a USB charger with a folding UK mains plug and [oliver] did a teardown on it.

For St. George’s Day in Catalonia, there’s a tradition of giving roses to women, and books to men. [Nixieguy] has all the books he could want, and would prefer to receive a rose. Bucking tradition, he made himself a rose from a punch card. It’s the closest he’s going to get to ‘@}-\—’. A few years ago, he carved a rose out of a 10mm LED.

Finally, a decent tutorial on how to grow your own SMD components.

Need to take apart a cellphone? Use acetone! Need the phone to work after you take it apart? Ummmm….

The Dayton Hamvention is just three weeks away! Yes, the same weekend as the Bay Area Maker’s Faire, which means most of the Hackaday crew will be elsewhere, but I hear [Chris Gammell] will be there putting Parts.io stickers on everything. By the way, I’m looking for a Tek PM203 Personality Module for a 68000 64-pin PDIP.

rf detector circuit

Using An LED As A Simple RF Detector

When [b.kainka] set out to make the world’s simplest RF detector, he probably didn’t realize it would be as easy as it was. Consisting of only a handful of components and thirty eight lines of code, he was able to make an RF detector that works reasonably well.

The microcontroller running the code is an ATtiny13 on a Sparrow board. He’s using an everyday LED as a detector diode and an internal pull-up resistor in the ATtiny13 for the bias voltage. The antenna runs off the LED’s anode. To make it sensitive enough, he switches on the pull-up resistor for a tiny fraction of time. Because an LED can act like a small capacitor, this charges it to a few volts. He then switches the pullup off, and the voltage across the LED will start to discharge. If there is an RF signal present, the discharge voltage will be less than the discharge voltage with no signal present.  Neat stuff.

Be sure to check out his Hackaday.io page linked at the top for full source, schematics and some videos demonstrating his project.

Continue reading “Using An LED As A Simple RF Detector”

Senior Design Project Serves Infinite Drinks

If you’re creative, you can make your passion projects count for college credit. Somehow [InfinityTable] managed to use this infinity bartender build called BarT as a senior design project.

There’s a lot going on here, starting with the cabinet which is 30″x30″ and has some custom mirrored glass necessary because of a square cut-out in the middle of the front pane. The two mirrors face each other, with a strip of LEDs in between which accounts for the “infinity” part of the build. This is popular but usually it’s usually just the mirror and lights. In this case that special cut-out is a cubby for a glass. Place it in there and the rest of the build will mix you up a tasty beverage.

There is a second chamber in the enclosure behind the rear mirror. This houses the components that mix up the drinks. Raw materials are dispensed from 1.25L plastic bottles. The extra special part of the build is that since it is a senior project, all the driving circuitry uses roll-your-own boards.

Continue reading “Senior Design Project Serves Infinite Drinks”

A Deadbugged GPS/GLONASS/Geiger Counter

So you think you’re pretty good at soldering really tiny parts onto a PCB? You’re probably not as good as [Shibata] who made a GPS/GLONASS and Geiger counter mashup deadbug-style with tiny 0402-sized parts.

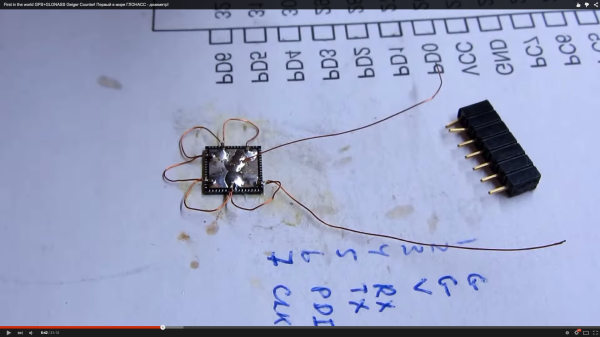
The device uses an extremely small GPS/GLONASS receiver, an AVR ATxmega128D3 microcontroller, a standard Nokia phone display and an interesting Geiger tube with a mica window to track its location and the current level of radiation. The idea behind this project isn’t really that remarkable; the astonishing thing is the way this project is put together. It’s held together with either skill or prayer, with tiny bits of magnet wire replacing what would normally be PCB traces, and individual components making up the entire circuit.

While there isn’t much detail on what’s actually going on in this mess of solder, hot glue, and wire, the circuit is certainly interesting. Somehow, [Shibata] is generating the high voltage for the Geiger tube and has come up with a really great way of displaying all the relevant information on the display. It’s a great project that approaches masterpiece territory with some crazy soldering skills.

Thanks [Danny] for sending this one in.

Continue reading “A Deadbugged GPS/GLONASS/Geiger Counter”

Dust Separator

DIY Dust Cyclone A Traffic Cop Would Be Proud Of

Sure, having a wood shop is super handy but it also can get real dusty. Hooking up a shop vac to suck up dust coming off a wood-cutting machine works for all of 3 minutes before the vacuum’s filter gets clogged with dust. There is a solution, though, and it is called a dust separator.

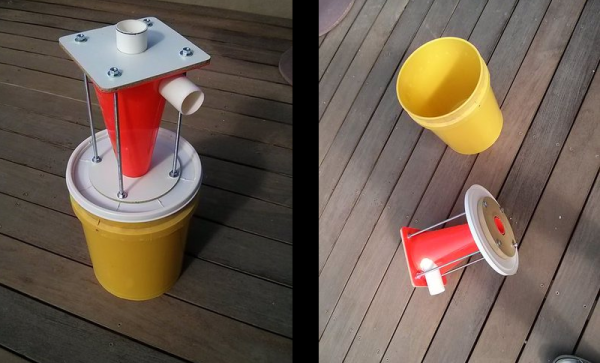
A dust separator does just as its name suggests, it separates dust from air. There is a common type of dust separator made in the DIY community, it has a cone-shaped body and is generally referred to as a cyclone-style. [Dror] built his own cyclonic dust collector out of an odd object… a traffic cone. Looking at it now, we wonder why this isn’t much more common!

The dusty air enters the PVC pipe and ends up spinning around the inside of the cone. Since the dust particles have mass, they are thrown to the outside of this chamber as they spin. They lose speed and drop down into the 5 gallon bucket below. The dust-free air then outlets through the top of the dust separator which is connected to a shop vac.

You’ll notice that [Dror] decided to use threaded rod to hold his separator pieces together. While this may seem like overkill, he had tried several glues and could not get any to stick to the traffic cone!

If you’d like to get in on the dust separator action but don’t have a traffic cone, they can also be 3D printed or made from metal.