About four decades ago, many European truck drivers started placing electronic LED badges in their windshields. Most of them were simple; nothing more than an animated heart pierced by an arrow. It became a common distraction in the highway night panorama of that time, at least until it became illegal. Most motorists became accustomed to seeing them, and the idea of the truck drivers making a statement with electronics always stuck with me. Now I have the chance to help people make a similar statement. Conference badges are not just a way to identify those who have registered, but a fashion statement and a mark of pride for conference organizers. They’ve become an art form, and engineers always want to stretch the limits of what is possible.
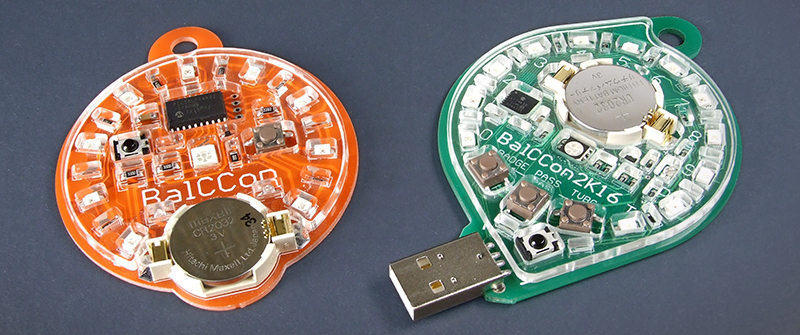
Every September, we have BalCCon, an international hacker’s conference at Novi Sad, Serbia. I was asked to design a badge for the 2016 event, and this is the first (well, the second) release. It is based on the PIC18LF24K50 and consists of a circle of LEDs which randomly displays pre-defined patterns. Every badge has its own infrared transceiver (LED-receiver pair), so the fun begins when two or more badges spot each other: they go from Adagio to full on Rondo, losing their default, dull visual pattern for a more dynamic, attention grabbing one, but most importantly – they synchronize. This means that, in a group of people, all badges will play the same pattern in unison. Every badge can spread the pattern code, so the whole group, however large, soon becomes synchronized. But if one of them “gets lost” somehow, it will try to learn it back from a neighbor or it might even launch into its own, randomly generated one. Sometimes it manages to spread it further and you get to witness a battle for light show domination.
This isn’t merely a story of designing badges, but of design choices that come in on budget while achieving a look that will delight those who end up wearing the hardware.
Up to the point at which this video was filmed, only eight prototypes were built and previewed at BalCCon 2K15, which was held on September 11th-13th. The reception was very positive! The algorithm is quite simple: every badge plays its own pattern, while keeping its infrared eye open for someone else’s code. If it receives it and verifies the checksum, it stops the current pattern, transmits the special acknowledge code via infrared LED and starts playing the received pattern. If nothing was received, it randomly generates a new pattern code, transmits it, looks if someone acknowledged it and then runs the pattern. If there was an acknowledge, it switches to the “fast” mode. That’s it.
More Features
The beauty of microcontroller designs is that you can always add new features later, without affecting the cost. In this case, the infrared transmitter support was implemented in hardware, so the badge got upgraded with [Mitch Altman’s] TV-B-Gone function. I took Mitch’s database for switch-off codes for several hundred different models of TV sets, and wrote a PIC driver routine to transmit them.
The first badge was released about two months ago – it’s the red one in the photo. I decided to give it another feature which would require only the addition of a USB connector to the Bill Of Material. So, the Badge now functions as a Hardware Password Manager, at almost the same cost. It also improves on the visual interest of the badge. It looks like something purposeful, and not merely a fob for hanging around your neck.
There’s plenty of time to brainstorm some more features before next September is upon us. One of the things I will certainly be adding is contact information swapping — a steadfast of conference hardware badges like the Parallax’ badge. Of course this feature will not affect the cost, as both infrared transceiver and USB interface are already present. My son has also suggested adding some form of a Rock-Paper-Scissors game. It will play automatically when two players are connected.
Every badge will have its unique serial number, which will be transmitted by request. It has yet to be defined how this feature will be used, and which kind of external units will be built, as we don’t want to disturb anyone’s privacy.
Low Budget as an Inspiration
![]() I’m always open, and grateful for any new idea thrown my way . The only restriction is the cost, as the project has already reached the budget limit. Only features that do not require any new hardware are acceptable. You can see that there are no displays, no large batteries and no radio or audio units.
I’m always open, and grateful for any new idea thrown my way . The only restriction is the cost, as the project has already reached the budget limit. Only features that do not require any new hardware are acceptable. You can see that there are no displays, no large batteries and no radio or audio units.
Such a simple design has certain advantages which have contributed to comfort. There is enough space to spread the components on the PCB with some breathing room between them, making room for the 3 mm thick acrylic bezel to be glued in place, with laser cut holes for every single part on the PCB. You can comfortably hold the badge in your hands, keep it in your pocket, or even let it drop on the floor without the fear of it getting damaged. Also, all the components are on the upper layer, leaving the back of the badge flat and clean. All the electronic parts amount to an attractive look so there is no need to hide them. There are only a few pads for an in-circuit programming connector on the back side, if someone wants to play around with firmware (which is open, of course).
 Originally, the hardware was not meant to be expandable, but I will probably use the bottom PCB layer, which is currently blank, to add traces and footprints for SMD peripherals. Then again, I wonder how many users really hack or expand the hardware of their badges?
I enjoy designing gadgets like these on a limited budget. With a lot of money, any designer can be tempted into overpowering the system and bloating the design with every feature imaginable. But who knows, maybe I will change my attitude some day when we get rich and I get to design a badge for BalCCon 3K45… or so.
How Can You Design a Badge with a Budget of 2€ Per Unit
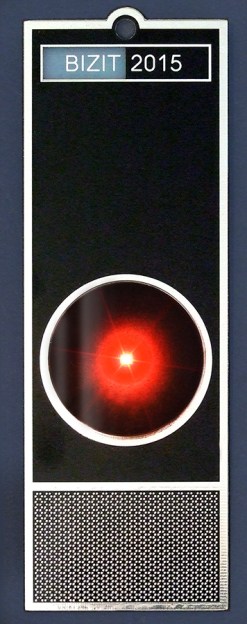
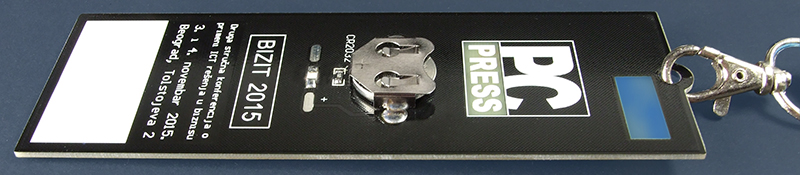
Designing a badge for another conference, BIZIT 2015, was even more challenging. It is being organized by PC Press, our computer magazine publisher, on November the 3rd and 4th. It is not a hacker meeting but a business conference, but it is based on Information and Communications Technologies. The budget for the badge was as tight as 2€/unit (about $2.25 USD), based on 500 units.
I had to tap into a more common type of love for technology, since I couldn’t count on a passion for DIY or playing around with microcontrollers. I turned to science fiction, or more precisely – I ripped off Kubrick’s 2001: A Space Odyssey , which I assume most people will have seen. I made the badge resemble the iconic image of HAL 9000’s terminal. Very importantly, its elegant design was something which could be mimicked with just a few components.
To stay within the budget, I simplified the badge as much as possible. Luckily, almost all of the physical aspects of the design can be achieved through currently available PCBs. The front surface should be black, so I ordered a black 2-layer PCB. The shiny metal surface on HAL 9000’s terminal is simulated by HAL PCB (don’t be confused – it does not stand for HAL 9000, it is an abbreviation for Hot Air Levelling). The white letters (BIZIT 2015 instead of HAL 9000) are printed as the Top Overlay layer, and the lower grilled area consists of a lot of small PCB pads with no holes. The “HAL” text is originally on a light blue background, which is in this case a PCB base with copper layers and solder mask layers removed, so that it is semi-transparent. When you paint the back side with a blue marker, you get the exact blue tone that you need!
All of that is achieved with just the PCB. There are a few items left which have to be improvised, and some compromises have to be made. The price for one 5×15 cm 2-layer PCB, based on 500 pieces, is 1.5€, so I had only 0.5€ left to spend.
Kubrick originally used Nikkor Fisheye 8mm lens for HAL 9000’s eye. At the moment it costs several thousand dollars, which is significantly more than 0.5€, so I had to make a different choice. I used the laser cut acrylic bezel again, and glued it on the PCB. As simple as that! It is flat, so it doesn’t look as good as the original Nikkor lens, but it fits the budget. I also wanted to achieve the red fuzzy aura effect around the red dot, for which I sprayed some red paint through a 15 mm hole on a piece of cardboard held at about 10 mm distance from the PCB. It looks quite passable.
The one thing that I had to do right was to make HAL “alive”, which means to put the red LED in the center. I used an SMD LED in a 3528 case, placed halfway through the square hole on the PCB and soldered it on the bottom layer. It is powered by a CR2032 Lithium coin battery at the back, with an addition of SMD resistor for current limiting, bringing the expected battery life to several weeks, with no ON-OFF switch. It acts similarly to an LED throwie.
In the end, I broke the budget only by a few eurocents and everyone was happy. There was not enough money to make it talk, play chess or sing Daisy, but yet I’ll take good care not to leave it alone and unattended on my spaceship.
 Voja Antonic works as a freelance microcontroller engineer in Belgrade. His first microprocessor projects, based on Z80, date back to 1977, just a few years after the appearance of the first Intel’s 4004. He assembled the firmware manually, by pen and paper. In 1983, he published his original DIY microcomputer project called Galaksija, which was built by around 8000 enthusiasts in the former Yugoslavia. To date he has published more than 50 projects, mostly based on microcontrollers, and released all of them in the public domain.


Why not use the PCB to make a USB connector?
http://www.instructables.com/id/USB-PCB-Business-Card/
I’ve found those to be pretty flaky as-is; a normal 64-mil PCB is a tiny bit thin so the contacts bounce around unless you hold it just so. Adding a little square of electrical tape on the back is just enough to make good contact.
It’s more expensive. Adding 15 mm to this PCB (based on 500 pcs) costs 19 eurocents, the connector only 14. Plus reliability, plus appearance.
Gotcha, the panelization probably wastes a bunch of area that you have to pay for anyway. What a time we live in when a connector costs less than the same area of fiberglass!
Nice. We did this two years ago: http://inventorartist.com/firefly/
Nice, what EDA did you use to get the curved traces on those boards?
looks like eagle to me
or Protel?
Not only traces, the whole design (including logo) is very elegant with those curved forms.
don’t think it’s altium, images are the default colours for eagle, and i feel like i recognise the curves and the way it snaps the wires to the pads., . i spend a lot of time doing curved traces in eagle, but maybe i’m just crazy ! time will tell :)
I [krazatchu] did the layout, it is eagle, I curve most of my board layouts: http://krazatchu.ca/2014/01/23/ur-beating/
Impressive! You could sell these easily!
for a limited budget badge that is cool, take a look at arclight@23b’s sparklecon 2 badge.
https://www.youtube.com/watch?v=Zh9PGT0dxK0
How is the acrylic glued to PCB? It looks nice.
I used 2-component Bison Epoxy, it sticks to the acrylic surface very good, but if you want to detach it, you can take the knife and apply some force. The old glue layer can’t be removed from the PCB, but nothing will be damaged. You can glue the same bezel over it.
Love the design, but I’m not sure I’d like all my passwords stored in a blinking device around my neck :P
I think the chaos communication camp badge this year is one of the coolest I’ve seen so far, having a screen, being programmable and all. The fact that everyone with a badge has access to SDR is super cool
I am impressed. Would you be able to sell some (Tindie? HaD Store?)
The last time I looked there hadn’t been an update to the Hadge page on HackaDay.io for 21 days…
Talking about conferences… Does anyone know where to find a list of upcoming events of this kind held in Europe?
Self-answered: http://www.meetup.com
I absolutely love curving traces .. I get really disappointed if I have accidentally left one or two angled turns on my boards.
A travel insurance policy would provide you with compensation if you do happen to lose your passport.
There are a number of incredible travel destinations that
offer wonderful travel tours. If you want to capture big fish then season 1 is your best bet.
To know more, visit the website at travel to cleveland.
I absolutely love curving traces .. I get really disappointed if I have accidentally left one or two angled turns on my boards.