A few weekends ago, [Chris] was in the mood for some retrogaming. That meant digging out the old Apple IIgs equipped with a monstrous RAM card with a whole three megabytes of RAM. This particular Apple IIgs had intermittent issues for a long time, and [Chris] was beginning to suspect the RAM was the culprit. Testing this required testing a few dozen individual RAM chips, so why not build something with an Arduino to make [Chris]’ life easier?
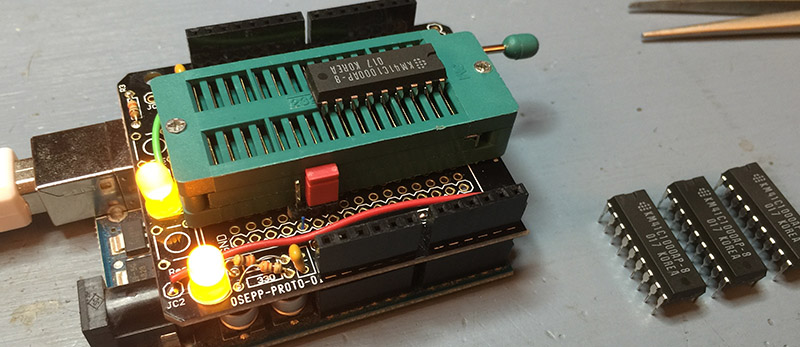
The chips found in [Chris]’ Apple are standard 1 M x 1 DRAM chips, the standard for late-80s computers. To test these chips on an Arduino, he picked up a beautiful ZIF socket, wired up the chip to an Arduino shield, and began the joyous process of figuring out how to interface DRAM to an Arduino.
Unlike static memories, DRAM needs to be refreshed periodically to recharge the capacitors. While this refresh cycle was the bane of designers and engineers throughout time, [Chris] actually doesn’t need to care about refreshing the DRAM. He’s just writing 1024 rows to the memory and reading it straight out – no need to refresh the memory. The trick comes from the multiplexed address bus. For his project, [Chris] needs to write 10 bits of the address, latch it, then write the other half of the address bits.
The DRAM tester was a success, and [Chris] put all the code and schematics up on GitHub. Solving the mystery of the broken Apple IIgs wasn’t as simple, as [Chris] thinks the problem might be in one of the support chips on the gigantic RAM card or the IIgs motherboard. Still, it’s a neat, quick build to test out a few DRAM chips.


Funny, I was just planning to build my own DRAM tester this weekend :) Anyway, I am missing more detailed test – address bit stuck, walking one, perhaps even some sort of butterfly tests… This tester is good to quickly select dead DRAMs, though.
I had a quick look at the code and I expect that it is unlikely to detect the failure mode that DRAM most commonly has because he is using sketch with is far too slow.
The *actual* issue he has in the IIgs could still be the DRAM. Normally DRAM is the most likely failure.
Please share why being too slow would be a problem, except giving false positives?
I’d think testing them without refresh would be the problem in giving false negatives.
“Arduino code” have one advantage over pure c – you don’t have to add any delay after reading from CAS/OE or bother about timings.
hxxps://github.com/jnk0le/AVR-DRAM/blob/master/dram.c#L121
Like many complex chips including CPU’s there are *NOT* different speeds designed and built to be an exact speed rating. Rather – all the different speed come from the same design and manufacturing process and slight variations in quality cause changes to the maximum speed.
An example would be the good ol Pentium. If both banks of cache work to spec then it’s a Pentium with more cache. If one bank isn’t up to speed then that bank if disabled (fused out) and it’s a Pentium with less cache. If neither bank work then it a Celeron.
The above is a good example as it’s most often RAM that has more speed performance variation.
DRAM chips of this era were 100nS, 120nS or 150nS (from memory). Speed was the most critical attribute.
And when they fail they can have several failure modes like bit (address or data) stuck high or low, Bit inoperable and these failure modes can be detected at low speeds.
However the most common failure mode is slow rise time and this is what dictates the specified access time (xxx nS) in the first place.
So you will find that a 120nS chip will no longer work at 120nS but is fine at 150nS.
The easiest way to test for this *without* removing the RAM is as follows –
But first be aware that the following process (in some fault conditions) will damage your *known good* chip.
Take a *known good* chip and tension the pins inwards a little so that it will firmly piggyback onto the “in use” chips (perhaps soldered in).
Now place the known good chip over each other chip in turn until the unit springs into life – you have found your first (and hopefully only) faulty chip – replace it.
NOTE: You must have the power off when you place the piggyback chip on or remove it or you *will* kill it!
He could at least test something like data retention time, with different time between write and read. so he could test if the usual refresh interval isn’t too long for a weak/damaged cell.
I just breadboarded a version with a sanguino to test 2114 sram chips coming from ebay. one of the chips was faulty. Unfortunately the seller did not respond well (china anyone?)
Did you have a bad chip at hand to test your setup?
Oh and btw, Check the aluminium caps o your boards. I just did all of them on a Mac 840av, 700 and IIci. the IIfx and portables are waiting for supplies…
Didn’t those dram chips have bit flip issues? By writing to a couple of bits it could cause another nearby to flip if they were done in just a certain order or something like that. You would have to write many multiple different patterns and verify to properly test the chip I would think.
Yes. A real test is either incredibly time consuming as you write each possible bit pattern to one cell then check the entire chip to see if a bit flipped somewhere else. Then do it for the next cell (hours per chip). Or you use an algorithm that can detect all the possible ways of failure in a more clever way. I have the algorithm for the Apple II DRAM here somewhere but it is written in Forth.
You could always use a MEGA or XMEGA with RAM-interface…
In the post, it says he has spare DRAM chips… why not just try replacing the DRAMs on each of the 3 modules and see if the problem goes away? That would at least help narrow down if it could be the DRAM or the support chips (if the other DRAM is known to be good, which it might not be).
Where’s the fun in that?
Documenting the combinations tried? I mean, there’s 24 chips. That’s a lot of possibilities to keep track of…
Seriously, not sure DRAM is a “fun” topic in general…
Haha, reminds me of being in college and having either a bad stick of ram or a bad motherboard, and no spare hardware to figure out which. I methodically tested everything I had, and nothing worked. “Well…shit.”
Eventually I talked a neighbor into letting me insert a stick in their slot (lol) and determined the failure point was in fact the user, and subsequently both sticks of memory.
/r/retrobattlestations represent
Testing RAMs is not as simple as writing to the cells. RAMs have many defect types with many faulty signatures requiring targeted sequences of writes and reads and delays to catch them all. The most common algorithms used are called March algorithms. Here is a paper that give a good description: http://www.ece.uc.edu/~wjone/Memory.pdf
I get a little nostalgic every time I see 41*** series RAM. My first IBM PC had a whopping 256K of RAM, made up of 4 banks of 4164 chips! I eventually replaced them with 41256 chips for a whopping 640K (the other 384K wasn’t usable by the version of DOS I had at that time, if memory serves).
that ought to be enough ram for anybody!
I wonder how many people remember when Bill Gates declared that no one will ever need more than 640K of RAM?
That wasn’t Bill Gates. It was one of the promotional staff from IBM.
Most likely it’s not a chip, but the socket losing tension on the chip legs due to heat. Seen it many times.
I’ve seen failures like that on all kinds of boards with socketed components, including the APPLE ][‘s (and ][e’s). I even had a 2MB RAM card (w/ 41256 DRAM) for an original IBM PC. If my APPLE ][ (or ][e or RAM CARD) did not functions, the first thing I would do was to give each socketed chip a firm push downward into the socket. Sometimes, you could feel (and hear) a little “pop” and the chip would move a small bit. Most times, this fixed the problem. Over time (and temperature variations), a little resistance builds up between the pin and the spring contact in the socket.
Yup, same here.
I once upgraded the RISC OS chips (28 pin WDILs on my A3000 and was horrified to find that it crashed.
Cue a bit of frantic digging but found one chip had a slightly bent pin and straightening it fixed the problem.
For those who own these, PLEASE FOR THE LOVE OF $DEITY use a chip puller, also change the CMOS NiCad
sooner rather than later or bad things will occur. (leaky leaky)
It’s actually quite difficult to design a DRAM test that can find all the different possible faults effectively. I once heard a story that someone wrote a DRAM test routine for some product that simply wrote a value to a location, then immediately read it back, verified it still matched, and then incremented to the next location. The test would pass with no chips in the board. Turns out there was enough capacitance on the data bus that it would hold the value last written long enough to be immediately read back.
Also, a sequential test like that completely fails to test address lines. It would pass with all the address lines tied to ground, with the routine thinking it’s writing to every location in the chip but actually repeatedly writing to just the first location.
I took a quick skim over Chris’s code and it does look like he’s doing a much better test than that, filling the whole chip then reading it back. Gotta wonder if the problem is somewhere other than the RAM, or is the IIgs using a better test method and finding a problem his tester doesn’t detect.
I also wonder, if the test on the IIgs gives an address of the failure, and it is consistent, how hard would it be to determine which chip that address falls into.
Hello everybody!!
I tried to use this tester with que integrated HM50464P-15 from a sharp PC-7000, but i can’t adapt the pinout to this tester.
i need help to connect correctly this ic to the tester.
Hi, this is wonderful project for testing DRAM, I want to read DDR3 or DDR4 RAM details, is it possible from this circuit you build?, Arduino is capable for reading/writing DDR3 or DDR4 RAM, Arduino uses maximum 16MHz clock but DDR3 is 933MHz and DDR4 is 1600MHz?