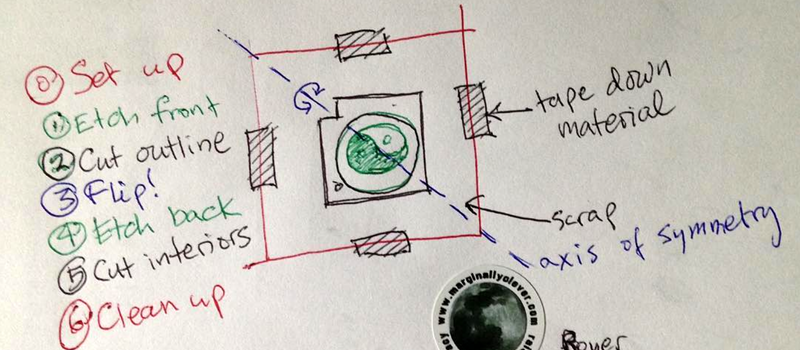
[Dan Royer] explains a simple method to engrave/etch on both sides of a material. This could be useful when you are trying to build enclosures or boxes which might need markings on both sides. There are two hurdles to overcome when doing this. The first is obviously registration. When you flip your job, you want it re-aligned at a known datum/reference point.
The other is your flip axis. If the object is too symmetric, it’s easy to make a mistake here, resulting in mirrored or rotated markings on the other side. Quite simply, [Dan]’s method consists of creating an additional cutting edge around your engraving/cutting job. This outline is such that it provides the required registration and helps flip the job along the desired axis.
You begin by taping down your work piece on the laser bed. Draw a symmetrical shape around the job you want to create in your Laser Cutter software of choice. The shape needs to have just one axis of symmetry – this rules out squares, rectangles or circles – all of which have multiple axes of symmetry. Adding a single small notch in any of these shapes does the trick. Engrave the back side. Then cut the “outside” outline. Lift the job out and flip it over. Engrave the front side. Cut the actual outline of your job and you’re done.
Obviously, doing all this requires some preparation in software. You need the back engrave layer, the front engrave layer, the job cut outline and the registration cut outline. Use color coded pen settings in a drawing to create these layers and the horizontal / vertical mirror or flip commands. These procedures aren’t groundbreaking, but they simplify and nearly automate a common procedure. If you have additional tricks for using laser cutters, chime in with your comments here.


Lol sorry just made me think. The last time I saw or use anything where the laser flip over to the over side was a laserdisc player. Sorry nothing to do with this but just had to share.
to etch two sided you have to flip the part? really? what’s next? how to breath? come on hackdaday. you can do better than this.
Can you suggest an easier and/or less expensive method? We would all love to hear it.
What’s next? How to use a dictionary. How to use the shift key. Stay tuned.
In his defense it is also a way to keep everything aligned while doing so. Its easy to flip a material, its difficult to re-align everything. This method does not require that the part be re-aligned.
The method is actually pretty clever. Other methods I’ve seen have you cut out a jig which is symmetrical and you basically make two sides of the artwork separately. This takes just a little more than half the space (only one hole, not two) by making the aliment fixture’s axis of symmetry along the diagonal.
Oh. How many people working on something forget to make a tick on the front OR back of their stock. Lulz, ensue when you see a person rotating a piece they are working on 3 to 6 times.
Very elementary. No accounting for the kerf of the cut. No accounting for the ANGLED kerf and subsequent overlap of pieces A and B. Probably OK for doodads and whizbobs, not for real engineering.
If you’re not cutting thick stock and your laser path isn’t completely out of whack, this doesn’t matter. Obviously he’s successfully using it, which says more than someone who just sits at their keyboard pissing on other people’s work.
>this doesn’t matter.
Hey, easy. People don’t talk about 1/64 here. It is what it is. Don’t bother. Technically we should be operating at / 25.4 level but most don’t care. Just like the imported blocks. You dig?
Depending on the effective kerf of the material/laser combo, you may want to add layers of thin tape (or little strips of some known thickness = measured kerf material)on the sides of the removed part to ensure complete alignment.
For instance on 1/4″ acrylic, the cutter I normally use ends up with a 0.01″ effective kerf, so with this method, I’d probably cut a few 1/4×1/2 strips of styrene or the like to insert in the first pass cut paths to properly align it for the second pass.
or precut jigged material, so if you have 3 registration holes of perfect size, and a jig you can put into the cutting area that holds it in the agreed upon cutting location you can begin the process.
While this might seem old hat to some, I had a devil of a time picking a method when working with my CNC on double sided work. There’s a whole debate on the best methods, and it’s hit of miss for some who are new to the art.
I teach laser cutting and engraving. This is very close to the method I teach. I couldn’t be easier.