At this point you’ve almost certainly seen one of these low-cost portable soldering irons, perhaps best exemplified by the TS100, a pocket-sized temperature controlled iron that can be had for as little as $50 USD from the usual overseas suppliers. Whether or not you’re personally a fan of the portable irons compared to a soldering station, the fact remains that these small irons are becoming increasingly popular with hackers and makers that are operating on a budget or in a small workspace.
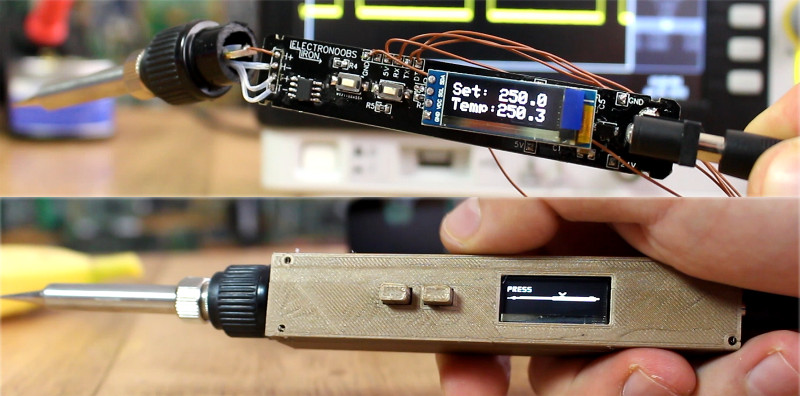
 Believing that imitation is the most sincere form of flattery, [Electronoobs] has come up with a DIY portable soldering iron that the adventurous hacker can build themselves. Powered by an ATMega328p pulled out of an Arduino Nano, if offers the same software customization options of the TS100 but at a considerably lower price. Depending on where you source your components, you should be able to build one of these irons for as little as $15.
The iron features a custom PCB and MAX6675 thermocouple amplifier to measure tip temperature. A basic user interface is provided by two tactile buttons on the PCB as well as an 128×32 I2C OLED display. In a future version, [Electronoobs] says he will look into adding some kind of sensor to detect when the iron is actually being used and put it to sleep when inactive.
The tip is sourced from a cheap soldering station replacement iron, and according to [Electronoobs], is probably the weakest element of the entire build. He’s looking into using replacement TS100 tips, but says he’ll need to redesign his electronics to make it compatible. The case is a simple 3D printed affair, which looks solid enough, but seems likely to be streamlined in later versions.
We’ve seen a number of attempts at DIY soldering irons over the years, but we have to say, this one is probably the most professional we’ve ever seen. It will be interesting to see how future revisions improve on this already strong initial showing.


Slightly related, but something I’ve never really understood with most soldering irons is why the part where you hold the soldering iron is so far from the tip. It’s like half way up from the tip. Wouldn’t gripping it closer toward the tip give better accuracy?
It’s the same reason that pots and pans have long handles
True. I should go ahead and build one as small as my next project. Meanwhile I am pretty satisfied with this one.
https://hackaday.io/project/94905-hakko-revenge
https://www.youtube.com/watch?v=rFmQJBOYTNw
It make me wonder – would it be possible to use aerogel as an insulator to allow a closer grip?
Why does everyone want their fingers so close to the hot parts? I suppose because I’ve been in the repair business for a long time, I’ve found it useful to have an iron that I can stick deep in past other components or case, and not have my hand blocking the view.
because people can’t aim
Yes absolutely. Although in the end I suppose it comes down to a balancing act between giving the tip sufficient thermal mass, having it no longer than necessary, and not burning the user’s fingertips.
You can always hold it closer, if don’t mind burger smell.
https://static.boredpanda.com/blog/wp-content/uploads/2016/03/stock-image-fail-soldering-iron-bob-byron-1.jpg
See… THIS is why we need to teach arts students about how to use soldering irons!
At least the girls, so they will not damage their soft skins.
But at least she’s wearing shooting glasses!
Polyester shirt, and a metal ring! What could possibly go wrong.
ESD mat and grounding strap…
Oh, wait!
At some point as the iron heats up her hand would jerk and she’d throw the iron into her own face, hence the glasses. She’s a pro with experience.
That is awesome. You have to wonder how they managed to get any element of that picture right.
Did they get any element of that picture right?
Rofl … gotta solder those cmos batteries!!!
In the chem lab
Well, someone may have tipped off Shutterstock, they no longer list an image “204001492”.
I like this photo better…
https://www.alamy.com/stock-photo-woman-engraving-on-wood-with-an-electric-soldering-iron-tool-14964727.html?pv=1&stamp=2&imageid=D7692750-E112-4291-A806-9FE3D9F8FFEF&p=275622&n=0&orientation=0&pn=1&searchtype=0&IsFromSearch=1&srch=foo%3dbar%26st%3d0%26pn%3d1%26ps%3d100%26sortby%3d2%26resultview%3dsortbyPopular%26npgs%3d0%26qt%3delectric%2520soldering%2520iron%26qt_raw%3delectric%2520soldering%2520iron%26lic%3d3%26mr%3d0%26pr%3d0%26ot%3d0%26creative%3d%26ag%3d0%26hc%3d0%26pc%3d%26blackwhite%3d%26cutout%3d%26tbar%3d1%26et%3d0x000000000000000000000%26vp%3d0%26loc%3d0%26imgt%3d0%26dtfr%3d%26dtto%3d%26size%3d0xFF%26archive%3d1%26groupid%3d%26pseudoid%3d%26a%3d%26cdid%3d%26cdsrt%3d%26name%3d%26qn%3d%26apalib%3d%26apalic%3d%26lightbox%3d%26gname%3d%26gtype%3d%26xstx%3d0%26simid%3d%26saveQry%3d%26editorial%3d1%26nu%3d%26t%3d%26edoptin%3d%26customgeoip%3d%26cap%3d1%26cbstore%3d1%26vd%3d0%26lb%3d%26fi%3d2%26edrf%3d%26ispremium%3d1%26flip%3d0
Pace, Metcal, JBC and Hakko all have models with short cartridges.
and cost 5x more
The Hakko T12 doesn’t seem that long, not the part that sticks out of the handle. Not that expensive, either. Lots of aftermarket electronics that you can just plug a Hakko T12 handle into.
Personally, I don’t want my fingers that close to what I’m soldering. Gets in the way of my view, and puts my fingers close to the hot stuff. Maybe I just have steady hands. I’ve been soldering since before I was a teen, with some pretty crappy, long soldering irons.
They’re worth it though. Got a used JBC lately and it is by far the best soldering iron I’ve ever used.
Which exact model?
https://goo.gl/images/HoJiDS
Oops. Ninja’d.
I wonder if a “shroud” (similar to Rifle shrouds) enable you to do that. Probably an internal fan, or a double-layer shroud would keep it from getting hot.
It totally beats me, these people must be trained at drawing chinese characters with a brush or something. I suspect some people get used to shit soldering irons and stick to them even when they can afford something better just for the nostalgic value. I personally got totally spoiled using JBC and thermaltronics soldering irons that feel like a precision pen and can deliver a lot of juice for both SMD and thick through-hole soldering jobs. I’d rather to stick to those or even to one of the shit sub-$10 USB irons from Ebay than to a Hakko or a Weller soldering iron. #blasphemy
Ditch my butane powered one, and get one of these.
TBH, I could do with a magnesium alloy shell replacement kit for a TS100 as my TS100 has formed cracks in the plastic.
Does anyone know of any?
…or even if it has to be made out of some cheaper heavier stuff, then as long as it is intrinsically stronger than plastic.
Also, any pointers to any custom firmware that disables or staggers the sleep mode?**
This is because my power bank has a tendency to shut down whilst I prepare a wire or few hundred (Battery bank goes sleep also)
Other than those minor quirks, the TS100 is a very handy portable soldering iron (I’ve ever owned)*!
* Seriously, my butane iron, whilst slightly more portable (case is bigger than TS100+battery) has a tendency to obliterate wires and PCB traces… or just weld itself cold to a board (i.e. gas pressure not constant)
**I’ll look about, though it is low down on the priority at the moment (Until, suddenly I’m out somewhere dark with a broken torch and no internet… becoming impatient wishing I sorted this sooner, LOL)
Get one of those little USB lights off of Aliexpress and put it in the other USB slot of your power bank to keep it from switching off. It’s an ugly fix, but it works.
I tried this in hopes the uC would keep everything on. But it seems to shut down the 12/16/19V inverter and only powers the USB… also I found the USB goes off if only the inverter is used.
Extended info (for the curious):
It is one of those AUKEY aluminium bricks that I can’t seem to find anywhere online but kept finding at boot sales.
I had 5x of these and burnt out 3 (lifted tracks and shorted fets/diodes and two unsalvageably stuck in safety mode Li-ion battery packs), fried the coil of the 4th and the 5th is dedicated to my TS100. They’re rated at 3.2A 19V (4A 12v) and I plugged it into something requiring 4.5A at 19v: I forgot to remove the laptop battery to lower the load, though the bricks happily supplied the current until the magic smoke thickened.
I’m fixing the 4th one as only the boost inductor needs winding (also I’m replacing the electrolytics with 35v ceramics: it currently has ceramic whine I need to solve… unless that is due to my test inductor from a PSU)
I thought I’d seen some aluminum handles, but it seems they are all ABS.
Personally, I think I want a clear case:
https://www.banggood.com/Original-Colorful-Case-Shell-for-TS100-Programmable-Digital-Electric-Soldering-Iron-Station-p-1130292.html?rmmds=search&cur_warehouse=CN
Same here… unless they were some limited edition case-mod stuff or something. But there surely is a market for such cases… even if they were the same price of a new TS100 (still worth it if it means the kit lasts at least twice longer than a stock TS100)
Especially if the case is a bit different in shape. Maybe ridges for a better grip,maybe an extended shroud over the base of the tip for people who want to get their fingers closer to the tip. Not sure why anyone would want that, this is already MUCH shorter than every soldering iron I’ve used with the exception of some battery powered and butane powered soldering irons.
https://github.com/Ralim/ts100 has worked well for me, at least it allows increasing the sleep time to up to 30 minutes and set the sleep temperature.
Thanks,
also your link had a link within the GIT to a video that led to another video… where I’ve just found out the TS100 can short it’s FET on a bad tip… so I’m gonna make a 3.2A current limiter and add a 3A fuse to protect the power-pack from overload and hopefully save the TS100 if I have the same problem occur.
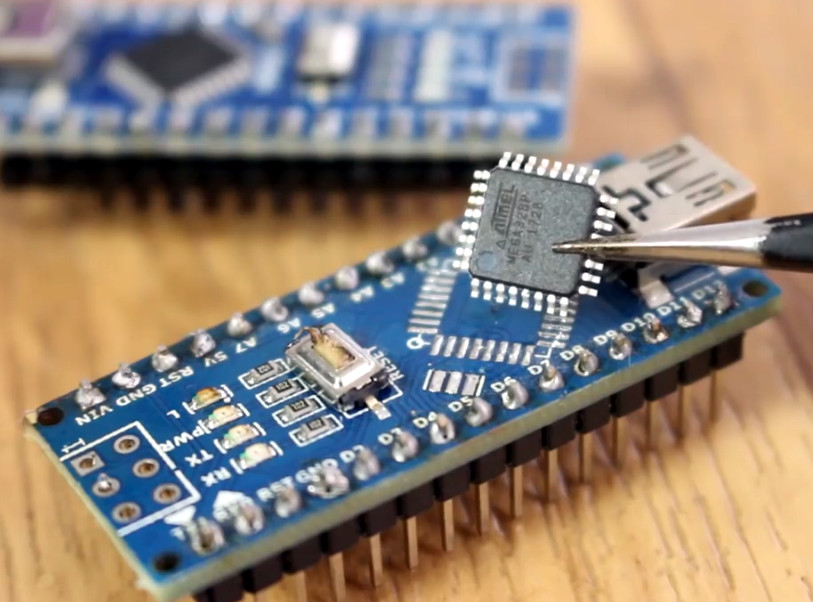
Why not just buy a 328p? 6 pin header and ICSP.
I thought the same. When he solderd the atmega328, I just scanned the area for ICSP header.
Apparently to save the time/effort of putting a bootloader on the bare chip. He mentions that buying Arduino Nanos (clones, anyway) costs about as much as bare 328p, so the only thing it costs you is the time to pop it off the Arduino board with the hot air.
“If your only tool is a hammer…”
( B^)
I would make a variant of this with t12 tip.
For the last couple of years, I’ve been using a combination of butane soldering iron,
and a t12 handle with temp control, for field work.
Something like this :
https://www.aliexpress.com/item/T12-DC-12-24V-75W-Mini-Electric-Soldering-Iron-with-regulator-Adjustable-Temperature-200-40-Degrees/32768382700.html
This is powered with 6s(i made a 4s variant as well) bms, 18650’s from old laptop batteries,
small led voltage meter ,couple of aluminum led strip segments and a 5v usb charger circuit with the plug.
All bodged-up together, in a self-made soldering station, phone charger, led lamp bundle.
It fits in my tool case with ease.
When I return to the workshop, I can plug it in to the 24V charger, and use it as a bench soldering iron as well…