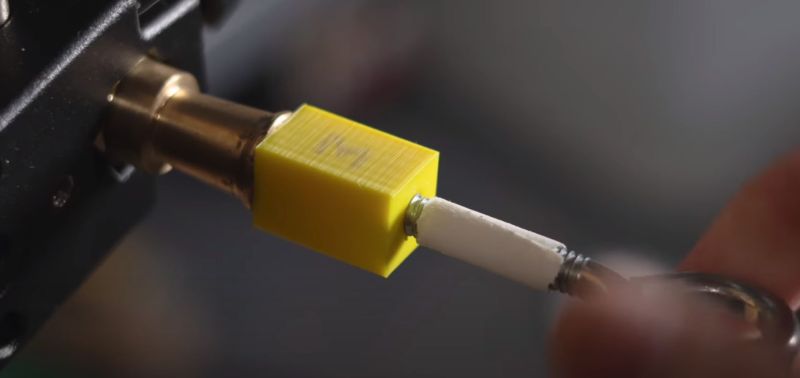
One of the challenges with 3D printing is seeing how far designs can be pushed before they break. This includes aspects like flexible hinges and structural components, but also smaller details such as screw threads. Often metal inserts with threads are added to FDM 3D prints by melting them into the plastic, but might 3D printed threads be sufficient for many cases? This is a question which [Adam Harig] sought to investigate in a recent video while working on parts that would connect to a rather expensive camera.

Rather than risking the camera, a few stand-in cubes printed in PLA+ (AnkerMake brand) were used, with these and their internal thread being exposed to destructive testing. For the measuring equipment only a luggage/fishing scale was used. The difference between the test parts was the amount of infill, ranging from 10 to 100% infill, with 0.2 mm layer height. After this the test involved pulling on the metal hook screwed into the plastic test item with the scale, up to the point of failure or the human element giving up.
The results are rather interesting, with the 100% infill version scoring better than than the 50% infill version (the next step down), with [Adam] giving up on trying to pull the test unit apart and with the scale maxed out. This gave him enough confidence to use this design to lift his entire camera off the table. What’s perhaps most interesting here is that the way the test items were printed, the layers experienced a peeling force, which as the final clips in the video show seemed to often result in the bottom layers giving away, which was the part not being held together by the metal screw inside the item. What the effect of dynamic loads are is something that should possibly also be investigated, but it does show that FDM printing screw threads is perhaps not that silly.
(Thanks to [Pidog] for the tip)


Not going to click the video. Any chance we can get a recap of the results?
Did he try printing holes and let the screw self tap the threads because that’s what I found works best?
in freedom units (lbs force for 1/4″-20 thread):
percentage infill, avg (min-max)
10% infill 48.38 (44.28 – 50.77)
25% infill 67.54 (48.61 – 80.51)
50% infill 89.54 (80.12 – 98.24)
100% infill >110 (instrument limit)
imo 10 and 25% are junk, as 25% is unreliable for single screw connections.
I also don’t like that he didn’t compare it to heat-set inserts to get an idea.
So the usual diminishing returns then.
What’s wrong with 10% (or 25%)? Going from 10% to 50% didn’t even get double the strength.
I’ve been rather surprised as to how well you can print fine threads in PLA and actually have them work.
Dumb infill.
I was hoping gradient infill (or even FEM-informed iterative infill density adjustment) would happen at some point, but we’re not there yet.
So in the 10 and 25% infill cases, the infill shatters and the shells break.
I think you’d get away with 25% average infill when generating it in an axisymmetric pattern, but yeah..
So if the infill algorithm was improved nothing would actually change (diminishing returns as % goes up) but 10% would be even stronger.
Did you have a point or is it still a bit early in the morning for you?
A better infill doesn’t change anything, diminishing returns still apply. 10% gets stronger, and doubling the strength needs over 5 times the infill.
>A better infill doesn’t change anything
please elaborate
How much stronger will your “better” infill algo be? A few percent? Why bother when you can just up the %?
And if you breaking stuff at 10% then you’ve done it wrong, you’ve under-specced things. More walls or more infill fixes your problem now rather than waiting for some magic to happen..
Asimoz (Clarke?) heard muttering something about better is the enemy of good enough in the background)
One thing to remember with heat set inserts is they need a much wider block of material to fit in than the screw, which means if you really want to use the same thread for convience you are limited in your design.
Also worth pointing out there are so many styles of insert and the testing I’ve seen done on them shows them to be wildly erratic and usually not great in pullout resistance compared to the raw plastic. Good for wear prevention on stuff you open and close often more than mechanical gains it seems – though of course tests done at something like M3 may not be very applicable at larger scales and there are far to many variables that you really want to test your intended usecase yourself (or design around an already well documented thread/filament combo’s limits).
What I found works best is exactly this. Depending on the printer tolerance make a hole between 0.05mm – 0.2mm smaller than the diameter of the screw and self tap with machine screws. As you force the screw in it will actually heat the plastic a little and create the thread.
This method produces excellent strength even with 15-20% infill. In my experience it exceeds heat press inserts which, tend to deform the pastic too much and then pop out under load, especially with PLA and ABS which tend to shrink more than PETG when reheated.
Do not use wood screws. the threads are too pronounced and they create microfissures in the plastic which will break over time.
This is how I do it. I use M3 socket heads and size my holes down to 2.8mm. Then a little elbow grease, 3x walls, and 25% infill and I have never ripped a screw. The print often fails before the screw does.
I’ve even printed extrusion nuts with this method. Not the best method, but more than good enough in a pinch.
When I turn the screws in, they get uncomfortably hot, so I know they’re forming threads. I also find that if the socket head gets in contact with the face of the part, it’s almost impossible to overtighten the screw unless you’re intentionally trying to destroy threads.
Print the threads at 45° and they should be stronger.
This is interesting testing. I print threads all the time and a good way to maximize strength and minimize infill is to change wall thickness. A heavy wall around the threads and the shell will carry and transfer the load, then you can lower infill in the rest of the part to save time and material.
I’ve also broken parts by printing threads that were too small and hoping the bolt would cut them to size. As the required turning force increases, the longitudinal forces up and down the threads increases. Eventually a layer will delaminate somewhere. I try to error a little on the high side and sometimes run a tap through it to clean them up.
I don’t think threads are the best way to fasten printed parts. But if you did, it helps to learn something about threaded fasteners. I’d have gone for 1/4-28 the higher thread count increases surface area
The problem here is that 1/4-20 is standard for attachments in the camera world. He’s not free to choose his own thread specifications.
Over time the metal bolts will slowly wear away the soft plastic threads and lower the holding strength. In addition, the soft plastic will be more prone to cross threading which will further weaken the plastic threads. Use captive nuts
Completely agree on all points. And for a light duty one time application (like a permanent lid on a box), I agree with others there that it makes far more sense to print a smooth hole and let the screw cut the threads. I see almost no advantage to 3D printing threads in plastic unless it’s for large threads that are mostly a novelty.
Printing the threads does have one potential advantage to a smooth hole – with a thread to follow already the screw is much more likely to go in straight into a very snug fitting hole.
I’ve done smooth holes myself for the most part, and for extra fine threads you can’t really print them anyway, but when you are cutting that larger thread as you drive in the metal screw to a thermosoftening plastic it will probably get warm enough quite quickly that the tip of the screw will create its own path, even when you are just driving it in by hand.
Self tapping screws are probably ok for one-time use for permanent fastening if the plastic isn’t brittle so it doesn’t fracture from the pressure.
I’ve used smooth holes with machine screws and it works fine. You just have to be precise when you size the holes … which isn’t difficult since the dimensions of screws is well documented.
3D printed threads can be useful but they do need to be large enough to print well. I used some when I made an adjustable soldering fume extractor, the threads (both the bolt and nut were printed with threads modelled in) were used to lock the position of the fan, both height and angle. So they are plenty strong enough for things like that, but I wouldn’t use them for anything important and structural.
Every different application has its place. One thing where using threads in directly in plastic 3D printed is for example lids to a box typically things you would buy might be made with styrene with molded holes and they always break, or strip out. I’ve had better luck with 3D printed objects. Print tho hole smooth then tap it later. Printing threads makes the print take much longer.
The problem with plastic(noun) is that it is plastic(adjective). It doesn’t matter how heavily you construct it, it will deform over time. Only use it for a temporary solution, or unimportant, disposable items, like automobiles, apparently. Nylon oil pump drive gears are one of my pet peeves. As well as all manner of wire harness connectors that will break there latches the first time you look at them sideways. Interior ABS panels will spontaneously crack their mounting bosses and rattle shamelessly after hitting a few potholes. And my favorite, 12V power outlets (cigar lighter type). Who would have thought that holding two contacts in compression with a plastic structure on a 10 amp or more circuit would be a bad idea?
We pat ourselves on the back after we 3D print a replacement coat hook, shelf bracket, or other sundry broken items around the house, but all we are really doing is perpetuating the landfill-environment plasticization process. Don’t get me wrong, you’ll have to pry my printers from my cold, dead fingers, but I dream of an easy, metal, glass, stone or other more permanent, additive solution.
Quantum replicator, that builds from a zero G, zero point coordinate, anyone?
> It doesn’t matter how heavily you construct it, it will deform over time.
Not true at all – there has to be a sufficient sustained load or thermal condition to reduce the required load for it to permanently deform, even for the worst offending plastics. For instance I have speaker bracket for my surround sound tweeter that were printed I would think well over 10 years ago now (damn do I feel old thinking that), been in nearly constant use holding those speakers up all that time and not even the slightest hint of deformation – they are if memory serves also one of the only things I’ve ever printed in PLA, which is a bad plastic for deforming and not all that overbuilt either, if anything pushing to be as minimal in material as they could be and still do the job. They are just well designed and contour matched to the speaker so the load is well distributed across the plastic and straight onto the wall. (the solvent welding of ABS made it my preferred filament almost immediately).
I don’t disagree in the principle that plastics tend to be plastic though even that isn’t entirely true – more than a few plastics are actually very brittle.
So you can perfectly well use a plastic or metal and plastic screw for a very long time – the wear if you are operating it much or heat if you operate it quickly are far more likely to be your cause of failure than it deforming on its own when you build the thread chunky enough and don’t leave it in a hot car (etc).
A threaded coupler really isn’t the right part for this task anyway. He ought to print some sort of “figure 8” shape in two halves, divided along a vertical plane. Each half comes in from the side, has the lifting chain looped in the half’s the upper ring (no need for eye bolt) and the camera handle looped in the half’s lower ring (this “ring” can be sized so as to give a tight fit around the handle’s cross section). The second half comes in from the other sde, and via horizontally bored holes screws (with nuts inserted from the opposite side) are used to secure the halves together sideways. The screws are under no stresses except for preventing the two sides of 8 from separating, which no force present in the system is trying to cause anyway. All stress is between the bottom of the lower ring and the top of the upper ring, printed the right way round this can happen entirely within the layers (force perpendicular to what was z axis during printing).
It’s fascinating and anything at the same time how much people argue over specs and theory when it comes to 3d printed parts.
It all comes down to what works for you. If you do something the “wrong” way, it might only last 50 iterations vs. 100,000 iterations when correctly.
But I’m only going to unscrew this part max 10 times over it’s lifespan so I’m going to half ass it the wrong way and still exceed my safety margin by 150%
Not only that. When it comes to 3d printing, it’s like re-inventing the wheel every time. Look at the video. 8 mins of video for 4 lines of text information about a topic which has been covered multiple times each year for over a decade now.
I’ve been printing threads for years, with good results. It takes a bit of tuning to get the CAD model and the slicer to agree about hole tolerances, but once that’s done, yes they can fit and work quite well. They’re not good for continuously wearing joints; embed a nut for that, but for something that just needs to go together once and maybe come apart a few times for service, printed threads do a great job.
All sorts of brackets and gizmos benefit from having a place to put a screw. Here’s an easy example: https://www.printables.com/model/496320-sim-eject-pin-holder/
One other trick I’ve used, is to leave a long threaded hole in a part (with a pretty loose tolerance), and then shove a piece of all-thread in there after printing as reinforcement. It’s not exactly using the threads as a fastener, per se, and it has more in common with adhesive-bonding a reinforcement rod into the part. The metal takes the load while the plastic holds a useful shape.