
Scanning a film negative is as simple as holding it up against a light source and photographing the result. But should you try such a straightforward method with color negatives it’s possible your results may leave a little to be desired. White LEDs have a spectrum which looks white to our eyes, but which doesn’t quite match that of the photographic emulsions.
[JackW01] is here with a negative scanning light that uses instead a trio of red, green, and blue LEDs whose wavelengths have been chosen for that crucial match. With it, it’s possible to make a good quality scan with far less post-processing.
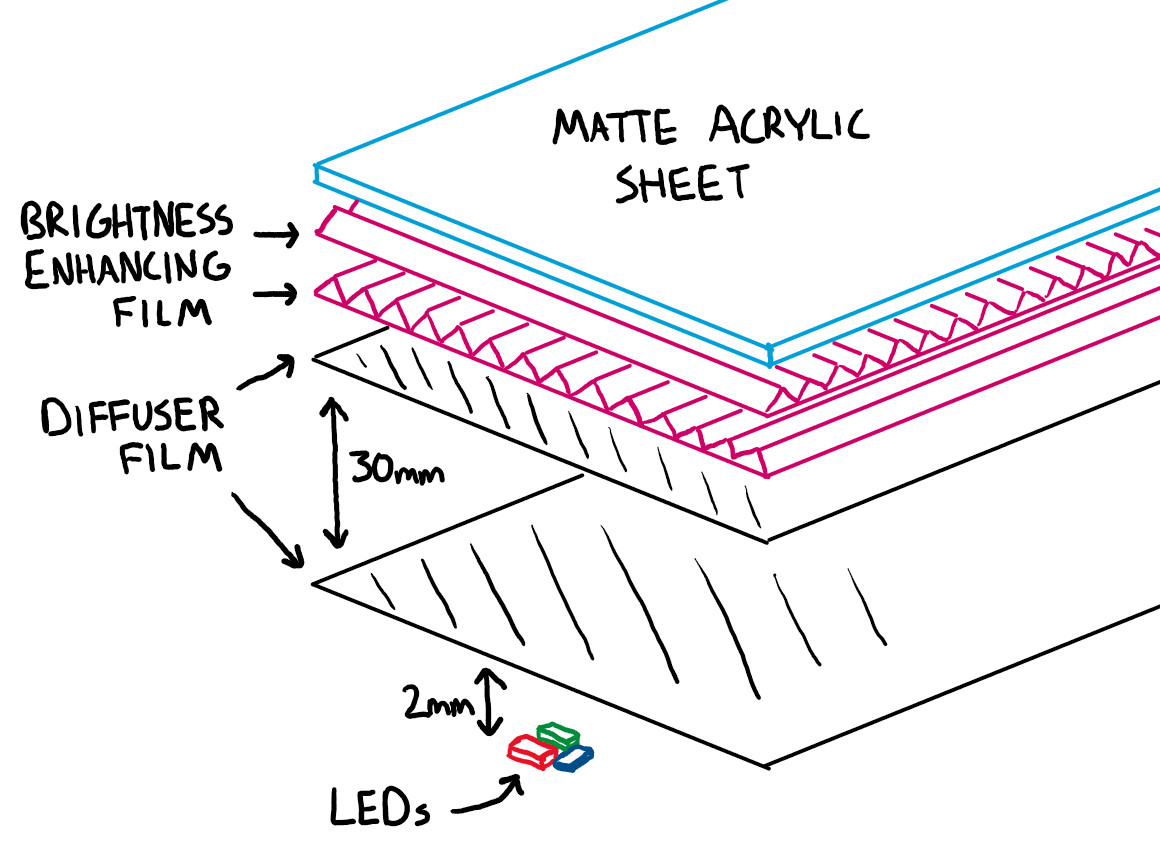 The light itself uses 665 nm for red, 525 nm for green, and 450 nm blue diodes mounted in a grid behind a carefully designed diffuser. The write-up goes into great detail about the spectra in question, showing the shortcomings of the various alternatives.
We can immediately see the value here at Hackaday, because like many a photographer working with analogue and digital media, we’ve grappled with color matching ourselves.
This isn’t the first time we’ve considered film scanning but it may be the first project we’ve seen go into such detail with the light source. We have looked at the resolution of the film though.


It’s a great idea, and simple to change around for different film stock if you need different wavelengths. Could go whole-hog and make the LEDs individually addressable to take a set of single color scans and combine/adjust at the end.
makes one wonder about the color sensitivity of the image sensor.
This seems very sound to me. How well will the design handle Fuji 4 emulsion film? If I remember correctly, some Canoscans used 3 groups of LEDs to the same effect (which is to say that they did interleaved monochrome scans with red then green and then blue illumination)
Ideally you would use a monochrome sensor without filters and take three pictures to capture each color separately. The response to each color can be normalized by shooting a blank frame and adjusting intensity according to that. The same should work for a color camera, but the bayer filter means you lose resolution because you have to average pixels to get the proper color information.
there isn’t really such a thing as a monochrome sensor, just as there is no such thing as a monochrome atomic spectra. semiconductors have specific band gaps.
Yet they’re called monochrome sensors to say they have no color filters.
It is a difficult problem. It could be a solution to use a white source like a iode filament bulb and some dichroic filters and diaphrams ?
Some commercial film scanners did use an incandescent lamp with dichroic filters and color sequential capture such as the Oxberry scanners.
Wouldn’t the parallel, full-spectrum rays of the sun be better than a diffuse combination of three discrete spectra?
Putting aside the fact that it can be very difficult to get the sun to shine reliably the thing to remember here is that color film emulsions aren’t full spectrum either. The grains of the film will be specific colors that are combined in the exposure. So JackW01 is trying to match those colors.
I was commenting more on the parallel rays leading to less blurring due to parallax effects, than on the wider spectrum aspect. However, I think your argument vis-a-vis grains is a bit moot. Since sunlight (during most of the day, at most latitudes, yada yada) has -all- of the important wavelengths for photographs, which should cover all possible emulsion chemistries, I should think.
The intermittency of the sun is actually another opportunity for a hack involving a light sensor triggering the scan automatically with the correct light intensity, not to mention a way to track the sun and pipe the light into the scanner correctly.
The OP’s method is more convenient, though; I’ll grant him that.
The sun is a really really bad reference source for light on all accounts. Colour, brightness, angle, diffusion, all of it. Your $1 bulb in any light fixture in your house is waaay better.
The lens on the camera takes care of putting diverging photons in the right spot on the image sensor. One only needs parallel rays if there is no intervening system to guide photons like with taking an x-ray.
There’s a second lens in front of the light source behind the film, that converges the backlight and concentrates it on the camera’s lens. Otherwise most of the light would miss the lens.
It is way more complex than that. Slide projectors purposefully don’t include a diffuser. You get a very different looking picture with or without a diffused source. Like you , it seemed counter intuitive to me, but there is plenty of literature about it and it’s easy to try out, just use a flash, bounced off wall vs shining directly at the negative or slide.
With any light projection system, you’d normally have a fresnel lens in between the light source and the film to turn the light rays in towards the frame – or more to the point, direct the light cone at the camera’s lens so you don’t get vignetting.
That’s not strictly true either. Each emulsion layer will respond to a spectrum of light determined by its filtering – and then after development, the spectrum of light that passes that emulsion layer may also be different to the one it responded to when exposed!
Aerochrome is an extreme example of this: it is a false-colour infra-red film, where the emulsion layers are sensitised to different nIR bands, but after development the layers modulate visible light bands (so a viewer can see an image). For other films the effect is not so extreme, but there is no guarantee that the spectra that creates the latent image is the same (or even a basic inverse, for non-reversal stocks) as the spectra of the developed image.
I’m not saying the spectrum of light that originally exposed the film is being recaptured. In fact that’s all but impossible. But that data is essentially already lost. My point was that the developed image, the thing being scanned, is going to contain individual grains of a limited set of colors. So capturing all the information stored in the film does not require full spectrum light.
It’s actually best to take individual red, green, and blue shots. This eliminates the effect of the camera’s CFA/spectral sensitivity/crosstalk between channels.
High end dedicated negative scanners such as Blackmagic’s Cintel do this.
I scan my negatives using a Neewer Bluetooth controllable RGB light and combine the three shots into a composite RAW that has red-backlight-only for red sites, blue-only for blue, and green-only for green. My red wavelength is nowhere near ideal but I still get really great results.
I can basically eliminate the scanning setup’s spectral sensitivities like this and use a color profile derived exclusively from the film’s published spectral response: https://github.com/Entropy512/rgb_led_filmscan along with https://github.com/Entropy512/RawTherapee/tree/filmneg_tcoeff
Fascinating process. I’d love to see some examples!
Yes, collimated light does produce a sharper image. However the film surfaces aren’t perfectly flat thereby refracting the light which passes through them. However, this tends to amplify scratches and grain. This can be dealt with by using a “wet gate”. This places the film between two parallel optically flat pieces of glass with the space filled in by perchloroethylene. The percholoroehtylene nearly matches the refractive index of the film.
Please enlighten us then.
Thanks Sulio. Insightful as always.
That is pretty much how the professional motion picture film scanners work, e.g. ARRIScan. Flash R, G, B and sometimes also IR LEDs to capture images with a monochrome CMOS image sensor. The monochrome sensor has the benefit that you get full resolution without the bayer pattern filter and avoid demosaicing artefacts. The IR pass can help locate dust particles on the film for easier automatic retouching, but beware of the Kodak DICE patents.
Haven’t the Kodak DICE patents expired by now?
Report comment
Reply
haha i think that’s a pretty good description of hacking
huh i guess Sulio’s comment was deleted while i was typing my reply? they said this is an amateur with an imperfect understanding, sharing their flawed understanding with the rest of us. which i thought was really right on the money and not derogatory at all hah
Sulio always has something insightful to say. If you Google his name on this site you will no doubt agree.
“Scanning Film The Way It Was Meant To Be” Film negatives aren’t meant to be scanned. They’re meant to be printed.
Completely agree, color negatives exist only for that reason : RA 4 prints…
and then, you can scan the print, and have a quite good (enormous) resolution, with acurate colors.
Slides are ment to be scanned, but they hardly exist anymore (seen last year some 8 x 10 inches Fujichrome Velvia slides, it looks nice !)
No their ‘meant’ to store images so they can be reproduced in another medium. Thats it.
The company I work for recently developed a different way of achieving fantastic results in our new camera stand for film scanning. I would be curious to see if this approach is even better than ours.
To expand on the suggestions of monochrome camera and addressable RGB.
It might be interesting to try adding the trick used for getting better quality microscope images posted about a little while back.
Instead of using single images of each color, use single LEDs of each color and take pictures for each part of the array. Then use software to stitch them together into a higher quality image than you could normally get.
I’d love to see this getting worked on more by the community. I know of a few film preservation projects that have had to shell out a lot of money to get film scanned or rent equipment to do it. It’d be cool to see a significantly cheaper option that matches the quality of current professional tools.
I’ve been doing this with my RGB light. There is actually a RGB light released by a company called Cutenew which is designed for film scanning (460, 540, 660nm). Analogue Toolbox has a trichromatic scanning mode which merges the RGB triplets together.
That’s a start but not entirely what I meant. There was a recent post about a video by Applied Science (IIRC) where there was discussion about using an LED array to increase microscope resolution.
Basically by using photos with individual LEDs lit it’s like moving the light source and it provides more spatial information. So of done properly you can get resolutions and clarity that would be beyond what is normally possible for the optics involved. I’m this case, I was thinking it could help eliminate surface imperfections since it can give 3D information and provide a boost in scanned resolution.
I like very much the project described here, the care for the right wavelenght of the LED is very important, the optical difusion and light enhancing layers, very nice…
But, sunlight, with a near perfect CRI, that fits in a pocket ? Why not use a strobe ?
I have an old Bowens slide duplicating thing, and it works with a flashlight (plus an hallogen bulb to focus).
I also make a lot of film reproduction (with films), and always use a stobe for that (but that’s not a hack ;o).
It’s a nice project but in my opinion it is probably unnecessary. We already got a nice balanced white light source when electronic flash was invented. I just use that, either bounced off a white wall or shining directly through the negative or transparency.
A white light source causes more crosstalk between color channels than a light source with a peak for each of the dyes in the negative.
It gets complicated. The orange color of negative film is there to compensate for spectral flaws of the dyes in color negative film. Whether the use of LEDs for scanning results in excessive color saturation due to overcompensation is beyond my knowledge.