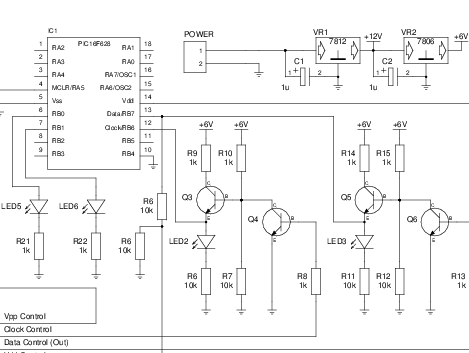
Here’s another offering when it comes to PIC programming from the Raspberry Pi. The design seeks to adapt the GPIO header so that it may be used for programming PIC microcontrollers, but this does involve a bit more than just physically connecting pins to the target chip. Most of the PIC family require a 12V programming level, and this setup makes that possible.
The sets of NPN transistors shown in the schematic fragment above are arranged in darlington pairs. They’re actually switching voltage from the 6V linear regulator built into the system using the Pi’s 3.3V pins. There’s also a 12V regulator, so you’re going to need a power supply that is capable of sourcing more than that.
We’ve seen a similar concept before but this design carries it a step further. There are several status LEDs built into the programmer, and it includes support for detecting which chip is being programmed. So far this covers just four different chips, but we’re sure that it could be adapted to fit your own needs.
[via Reddit]


Those transistors are *not* arranged in a Darlington pair (where two transistors’ collectors are tied together, and the emitter of one is tied to the base of the other to improve gain).
Rather, they’re arranged to form non-inverting buffers.
A much better/faster/lower-power/cheaper/smaller way of doing that would be to just use a quad-channel level converter IC.
Eh, this is cool, but just throwing it out there that a pickit2 is like 35$, does most chips debugs, has a serial monitor, and other tools. A pickit3 does ALL chips and debugs. This is one of those things that is cool to do just to say you can but in the end, is not saving you any money or gaining features, or reducing aggravation.
Neat voltage regulator symbol
I ordered my Raspi on July 7th. What is the new expected delivery date? Sometime in November.
I also ordered mine in july, but recently cancelled my order, ordered at Tandy and got it within a week
1. Get a PICKit 3, it’s cheap!
2. Problem solved.
I’ve always said, if you’re going to be writing code for a PIC, get a PICKit and don’t mess around with anything else. They’re a fantastic tool, with indispensable features, for the price.
But last time this came up, someone made a good point. If you’re just going to be loading someone else’s finished and debugged code to one of the supported PICs, and otherwise have no further interest in PICs, then something like this can be considered a valid option.
This circuit will kill a lot of the current pics. Pics that are common now do not use 12V programming , the limit is 9V for a lot of them and if you have an L in your pic number you really need to check the limits on the data sheet.
cgmark: it will, but not the ones suggested. If you want to program those, then you need to replace the 12 V voltage regulator with a lower voltage one.
get a PICKit and don’t mess around with anything else – less fun:p
Nice if you just want to program a simple PIC with your RaspBerry Pi, without any other computer; and good to gain experience with building simple hardware connected to your RaspBerry
Hi!
PICPgm is now running on the Raspberry Pi. It supports more than 650 different PIC microcontrollers.
More details can be found at their web page: http://picpgm.picprojects.net/index.html
For those who just want to program a PIC once it might be a good solution. But I agree, for professional PIC development it is better to get a PICKit.