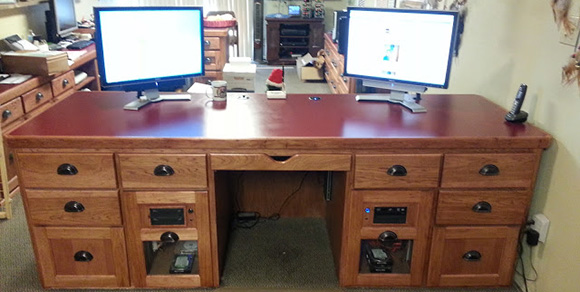
[Paul] had been kicking around his idea of a perfect computer desk for some time, and when given the opportunity to remodel his office decided it was time to build his dream computer case.
The desk itself is made of hickory with a formica top to match the other workbenches in [Paul]’s workspace, The two largest drawers house an ATX motherboard, power supply, disk drives, and a pair of CD drives. On top of the desk are two 24″ monitors – one for each computer – and a built-in powered USB hub that allows [Paul] to charge his phone or use an external drive.
As a computer tech, [Paul] needed a way to connect customer’s drives. He did this by putting two Startech UniDock2U USB to SATA and IDE converters in the top right drawer. It’s one of his most used features and very handy for duplicating bare drives.
Also included in [Paul]’s desk is a large UPC, and a pair of 120mm case fans venting to the front of the desk. It’s a wonderful piece of workmanship, and the removable computer cases make cleaning and upgrading a breeze.


That’s very nice.
Whenever I hear of pc’s in a desk I always think about what this guy http://www.dont-panic.co.uk/stunning-custom-built-computer-desk-mod/ accomplished.
Note that the link above carries banner ads that are NSFW !
Unless you have Adblock Plus installed.
WARNING do not check while at work or in school, it has a few 18+ ads
WARNING NUMBER 2 Don’t click that link the first time I did I was redirected to a suspicious page with a java applet in it. Second time I clicked I didnt.
Terribly sorry about the nsfw adds – they were blocked in my browser so I didn’t notice them.
Nice! Hickory is such amazing wood.
On the subject of desk projects..
I have found I can no longer tolerate sitting at a desk that traps my legs within a narrow box. I need to be able to sit in different positions, etc, to give my back variety. My desk needs to have lots of leg space.
I have gorgeous 40’s era Cherry desk, and don’t really like it due to the leg trapping.
It also has a sprung typewriter drawer. Unfortunatly, that drawer dooms the desk. The local resale shop said typewriter door desks do not sell and they do not accept them. I couldn’t believe it! The typewriter drawer does have the modern use of hiding a desktop system, though that need seems to be fading away.
So, for years, I have been thinking of cutting up that cherry desk. The plan is to keep the top, maybe the sides, and open up the leg area. But I want to do it in an elegant and attractive way. I’ve held off on the project bcause I just haven’t had the vision for how I want it to look. Particularly the legs, and their transitions.
So for those looking to do a project like this, you might think about re-purposing an old typewriter desk.
I thought of that when I was determining dimensions. This is why I purchased a Steelcase office chair which is rated for 8 to 12 hours of sitting time. With a properly adjusted chair, I find I am not moving around that much while at the desk.
Heh heh. You aren’t 40 yet, are you?
Give it time. You’ll be squriming like a stuck web monkey.
LOL…. Actually I am 48…. I do know what you mean, but I have found that a good office chair, properly adjusted does wonders…. :)
FWIW, when spacing furniture for ADA considerations we’re supposed to leave at least 38″ between furniture. So that might be a good measurement to start with. If it’ll provide room for a wheelchair, odds are it will provide enough room for your legs.
I was thinking what a headache that is. I can see standing up and combining the computer with a lab bench. But as a desk, way too much wrong on the ergonomics side. I guess if you are in teens or twenties it doesn’t matter much; you start appreciating keyboard height, wrist rests and leg sprawl much more when you are older.
I hope I can start soon on my mid-century computer desk that is basically minimal wood and support as possible.
I assume you meant UPS, those UPC stickers are not that big.
lovely made, but wouldn’t you need a bit more leg space?
Agreed, I always hated desks with anything more than legs underneath. I guess I need to turn and move more than some people.
My thought too, but since it’s custom made I guess he doesn’t.
leg space ! leg space ! leg space !
I’d feel really cramped with that little leg space… if you’re going to be that confined, might as well vent the case towards your feet to warm them a bit!
I thought about that, but this is south Texas. It is the middle of December, and we are still in the 80’s during the day around here…. :)
Central Texas, here, and yea, it’s nice now but the insects will be bad in the spring and summer.
I agree with the legroom thing. Not just for comfort(which helps), but to be able to move from one end of the desk to the other, in order to work on multiple sets of documents without having to shuffle them around….
Very nice. I’d say you are 95% of the way there. The one thing that struck me as odd is that you spend so much time on the connection routing, but leave the video card and other expansion cards just dangling there “supported by zip ties”. You should take the time to build a proper bracket to secure those with, especially if you are moving the equipment regularly, like the built-in drawer hardware indicates that you are. You could probably just re-purpose the back panels of those cheap cases you cut up for the 5.25″ drive cages. It would add stability to the build, and make sure that one of those cards doesn’t come lose. The only other thing I’d do is revisit the KVM switches. Look at some more up-scale ones – it sounds like all your experience is with cheap ones. They make ones that support dual monitors, too. Probably won’t give you the flexibility you have now, but worth a look, especially if you have to hook up a 3rd system for whatever reason.
Nice build.
I hadn’t found a good motherboard tray at the time with a proper card support. If I come across one, I will change out the motherboard mounts, since they are simply screwed into the drawer. I felt bad at the time just using zip ties at the time, but it was a quick fix. We have a saying around here, “Temporary becomes permanent real quick, if you are not careful.”
Thank you for your feedback.
Excellent idea, I’m not so sure about the execution though. The dual keyboards seems like a pain to use, a program like Synergy (http://synergy-foss.org/) would deal with that.
I think you could just rotate the motherboard 90 degrees so the cards are vertical instead of horizontal. There would be less stress on the cards and no need for additional supports.
I thought of that, and reviewed that when using Google’s Sketchup to design the drawers. The width of the boards with the cable connections protruding out would have been too tall with some of the larger full atx boards. I wanted to be sure to allow for as many expansion possibilities as possible.
Thank you for your feed back. I welcome any and all constructive criticism and suggestions.
When you cut up a computer case, remember to keep the back panel so it can support the cards and provide a place to install a fan
That is what I originally tried to do, but at the time I hadn’t come across one with a sturdy card support without keeping almost the whole cage of the case. Once I had just the motherboard tray and the card supports by themselves, it wasn’t very sturdy.
I am still looking, and if anyone comes across a good case that will work, please let me know. I am always looking to improve this project.
Thank you for your feedback and suggestion.
I find it amusing how he calls himself a computer tech but doesn’t seem to know anything about airflow at all, maybe he just doesn’t care about his motherboard melting.
I planned for quite a few months before coming up with this design. The air flow intake is actually from the lip of the computer drawer, which does not make an air tight seal against the desk. I also allowed for the contingency of placing filter and fans in/on the acrylic window on each drawer.
Fortunately with my current design, the hottest the computer compartment has been is 80F while playing an old game of Half Life 2. I found this amazing since the ambient room temperature was 72F.
As stated in the blog, the surface of the desk never even gets warm over either of the computer compartments.
Thank you for you comment.
I wonder… has anyone seen the plans for this yet?… Google SketchUp maybe?
I suggest using an air filter on the intake to prevent dust. I used a large furnace filter on one of my computers. The large area allows for fine filtration without constricting airflow.
I can’t help but wonder why you didn’t tuck the UPS and router in one of the drawers. It would eliminate clutter even further.
As the design works now, the lip of the drawers do not seal air tight against the desk. This actually allows for enough air flow through the desk to keep the computer case at a temperature of 80F. I have noticed that about one every two weeks or so, I wipe the lip around the computer drawer to remove mild dust residue.
I had originally thought about putting the UPS into a drawer, but I actually use the two larger drawers for hanging files. I also thought about trying to put smaller UPS’s behind the computer drawers, but didn’t figure there was quite enough room. That is why I settled for the current placement of the UPS.
I did however, originally think about the using an air filter and case fan instead of the acrylic window. The more I thought about it, my inner geek won with a compromise of a window without a lighted fan. I figured the lighted fan and filter would look too gaudy. And any filter/fabric showing would give the desk more of a dated feel and look.
I do appreciate your feedback and suggestions. Thank you :)
I have uploaded the Google Sketchup models to the 3d Warehouse. You can find the models that I used for this desk and a previous project by searching the 3d warehouse for “txbeard”.
Nice, I always liked the wood look for a computer desk over metals. Have been working on designing my own computer desk. Instead of running heat just one way away from the desk, I plan to use a USB controller attached to a thermostat to switch between venting the heat toward me or away from me. May as well recycle all the heat, especially in winter.
Being a reader of SciFi since the mid 1970’s, and having read a lot of it from much farther back, I’ve always been a fan of the desk computer concept.
Desk computer. Not desktop computer or computer desks!
My all time favorite desk computer is Ed Dillinger’s from the original TRON, especially since it’s possible to build one like it with a fully functional touch interface.
Nice desk. I’ve always wondered about shielding when taking a computer out of its case. I figured it was just FCC overkill, but has anyone had any problems with interference either in or out?
I second for the Synergy software. I’ve been using it for years and really love it. I even had it set up on my laptop for a time, so I could drop my laptop next to my monitors and just use one keyboard. The only thing I don’t like is it doesn’t play well with my Wacom tablet.
After two years of use I have not found any issues with shielding. Even with extension cables for the monitors, there are no lines or flicker even at the higher resolutions.